![]()
Key Links

| Description | Link |
|---|---|
| Official Documentation* | http://jgcri.github.io/gcam-doc/index.html |
| FAQs, issues and discussions | https://github.com/JGCRI/gcam-core/discussions |
* Main page is updated with every GCAM public release, with previous
versions archived.
Tutorials
This section lists videos and presentations for selected releases of GCAM. These materials are usually presented at the GCAM annual meeting and curated here as a persistent reference.
GCAM 6.0
| File | Description | Location |
|---|---|---|
| gcam6p0_walkthrough.pdf | GCAM 6.0 walkthrough presentation (how to run GCAM) | Link |
GCAM 5.4
| File | Description | Location |
|---|---|---|
| gcam5p4_overview.pdf | GCAM 5.4 overview presentation | Link |
| gcam5p4_walkthrough.pdf | GCAM 5.4 walkthrough presentation | Link |
gcamdata
| File | Description | Location |
|---|---|---|
| gcamdata.pdf | Introduction to gcamdata (GCAM’s data system), including R package management with renv | Link |
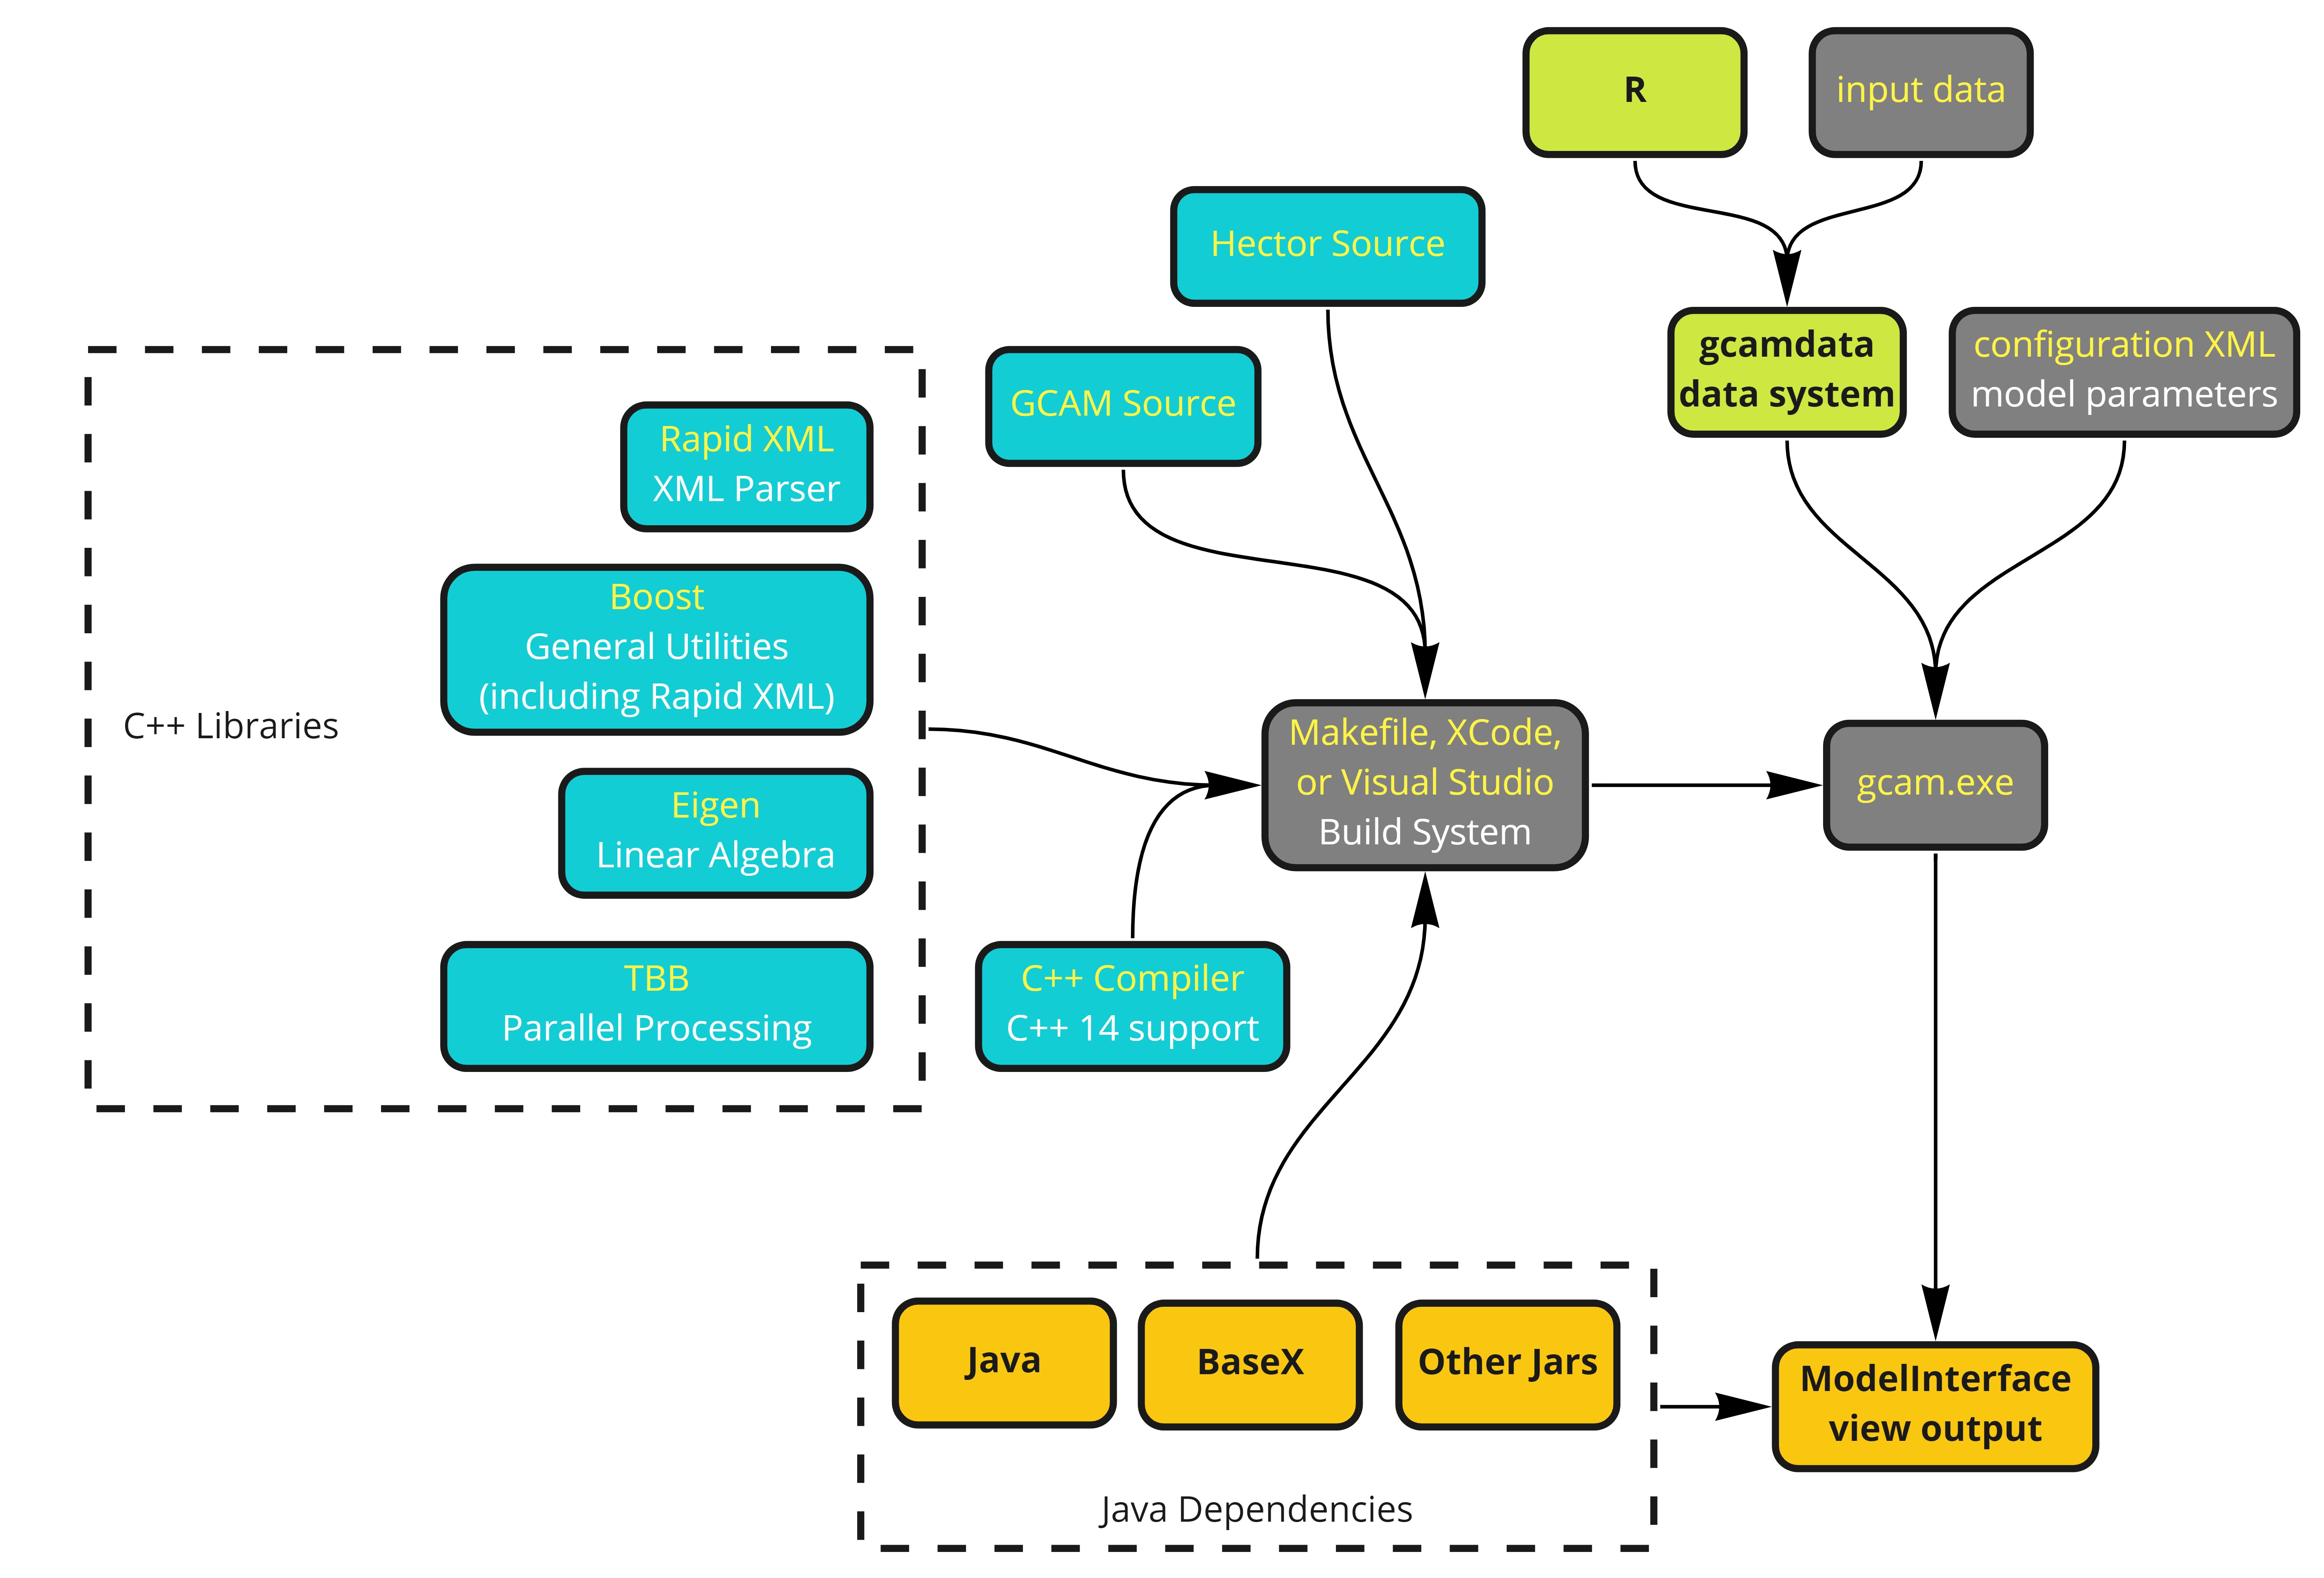
GCAM Software Used
Other resources
| File | Description | Location |
|---|---|---|
| scenario_adjustment.pdf | Guide to designing and implementing scenarios in GCAM | Link |
| create_xmls_user_mod.pdf | Guide to modifying GCAM’s XML inputs, creating new XMLs, and using user modification functions in gcamdata | Link |
| GCAM-USA.pdf | Introduction to GCAM-USA | Link |
| querying_GCAM_outputs.pdf | Guide to querying GCAM outputs using Model Interface and rgcam | Link |
Scenario Adjustments
This section details how to adjust scenarios in GCAM to explore different policy and technology pathways or objectives. The list will continue to be expanded on as we gather relevant examples and use-cases. For each scenario adjustment we provide:
- Relevant example files
- Goal of the adjustment
- General approach
- Relevant background information related to the adjustment
- Step-by-step guide to implementing the adjustment in GCAM
- Example outputs
Electricity Generation Mix
| Files Used | Description | Link |
|---|---|---|
| indonesia_electricity_generation_constraints.xml | Setting constraints: floors for wind and solar; ceiling for coal | Link |
| indonesia_electricity_generation_techs.xml | Applying constraints to electricity generation technologies | Link |
Goal
This example demonstrates how to set floors and ceilings for electricity generation by fuel in GCAM. We will set floors (minimum required generation amounts) for wind and solar and a ceiling (maximum generation amount) for coal from 2025 through 2040.
Approach
We can use a policy-portfolio-standard to set floors and
ceilings for each fuel. This will decrease (increase) the cost of the
electricity generation technologies until the floor (ceiling) is
satisfied.
Background - Policy portfolio standards
A policy-portfolio-standard in GCAM is a policy that can be
used to implement taxes, subsidies, floors, ceilings, and constraints.
Taxes and subsidies can be specified when the exact amount to be added
or subtracted to the price is known. However, a
policy-portfolio-standard can also contain a
constraint, which acts as either a floor or ceiling for the
technology or technologies included. Exact constraints can also be
implemented. See the GCAM
Policy Examples documentation for more information on how to
implement these options.
GCAM Implementation
- Create a folder in the input directory eg.
./gcam-core/input/addons. - Download the example xml files electricity_generation_constraints.xml and electricity_generation_constraint_techs.xml to the folder.
- Within each
policy-portfolio-standardtag in the first XML, adjust the following:
-
constraintfor each year in which a floor is desired -
Set
min-priceto a large negative value for years in which an exact constraint, rather than a floor, is desired
- Within each
supplysectortag in the second XML, make sure that the correspondinginput-subsidyis added within each relevantperiodfor eachstub-technologyyou wish to include in the constraint.
Example XML structures
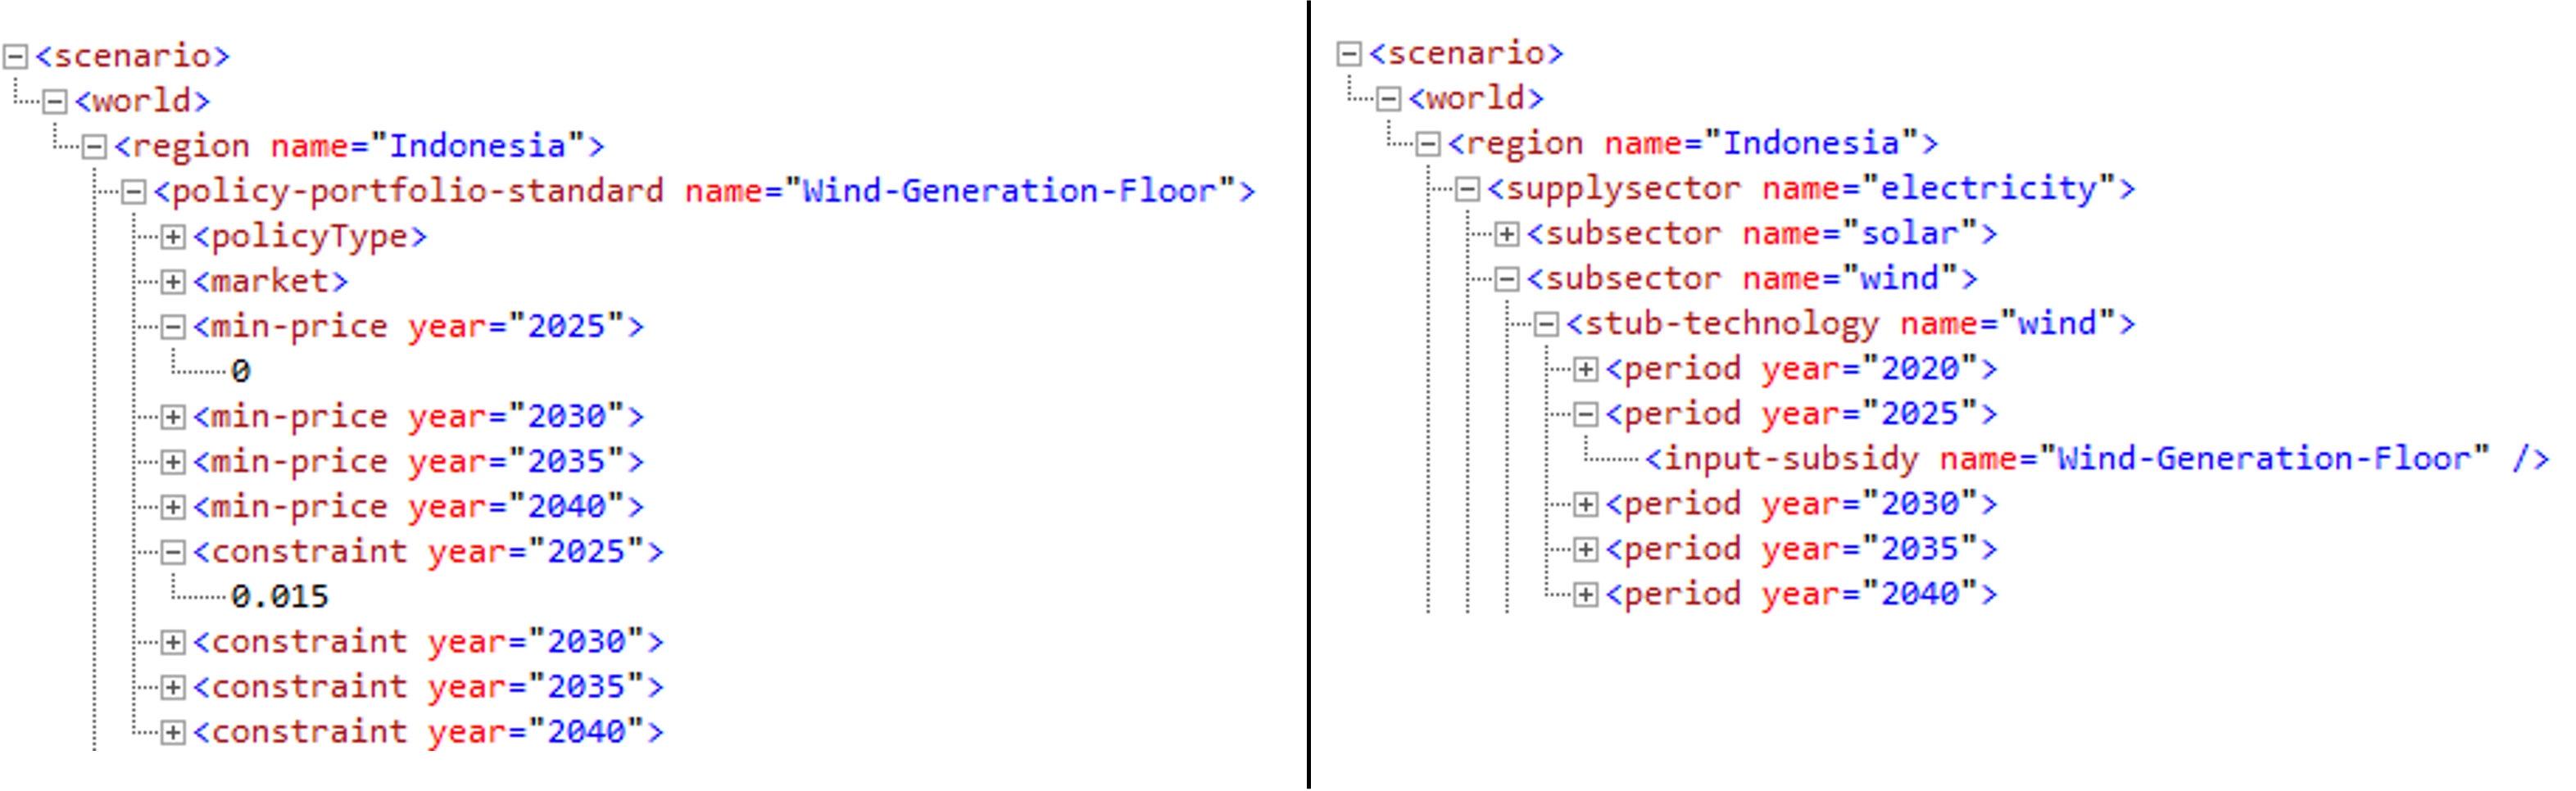 Note:
Note:
min-price should be set to a large negative number (e.g.,
-10000) for years in which an exact constraint is desired rather than a
floor or ceiling. Otherwise, it can remain at the default (0).
- Save the XMLs and then point to them in your configuration file by
adding the lines:
<Value name = "scen">../input/addons//electricity_generation_constraints.xml</Value><Value name = "scen">../input/addons//electricity_generation_constraint_techs.xml</Value>
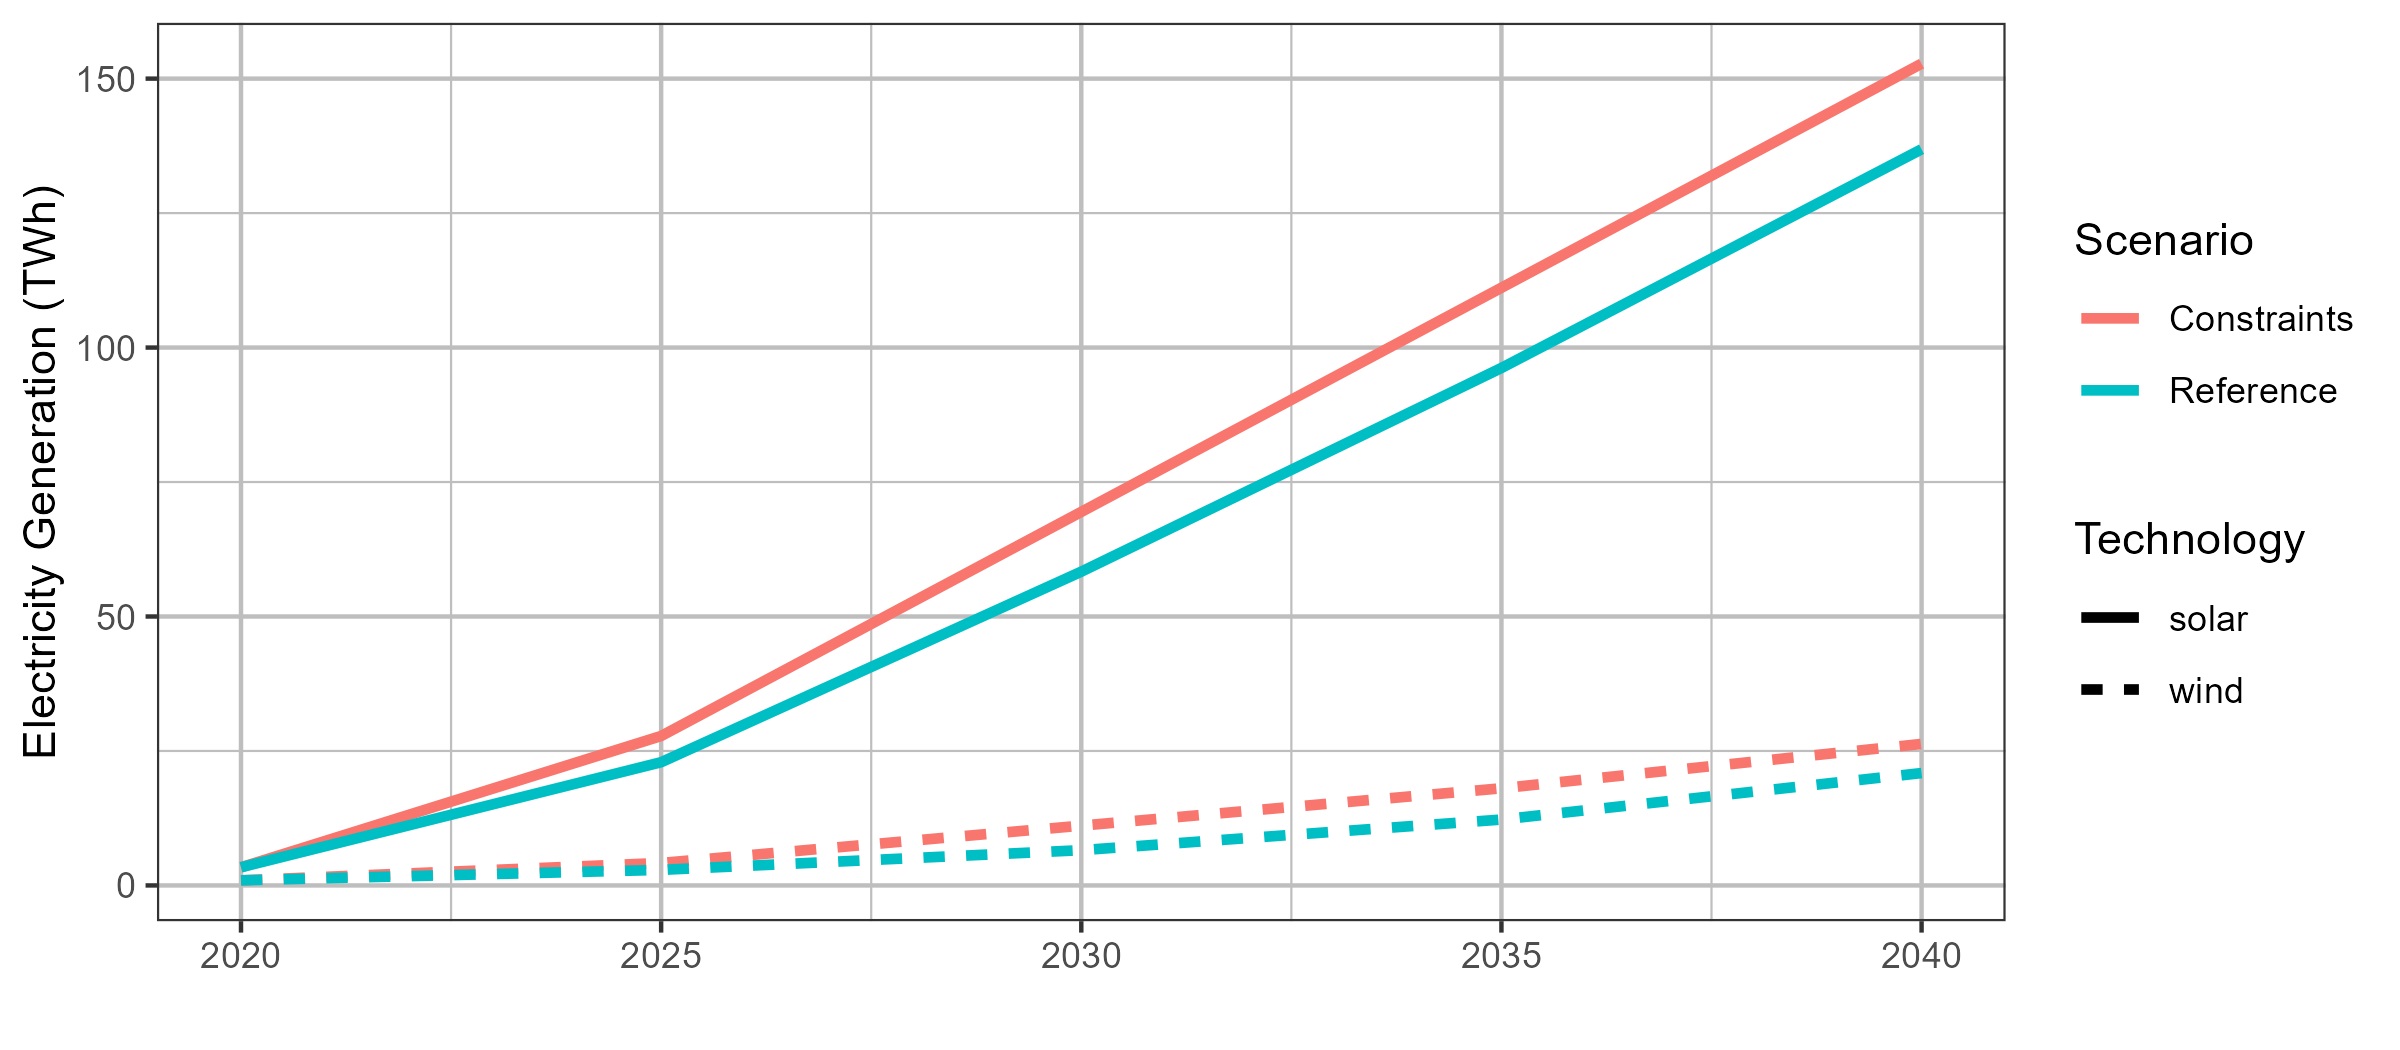
Example Output
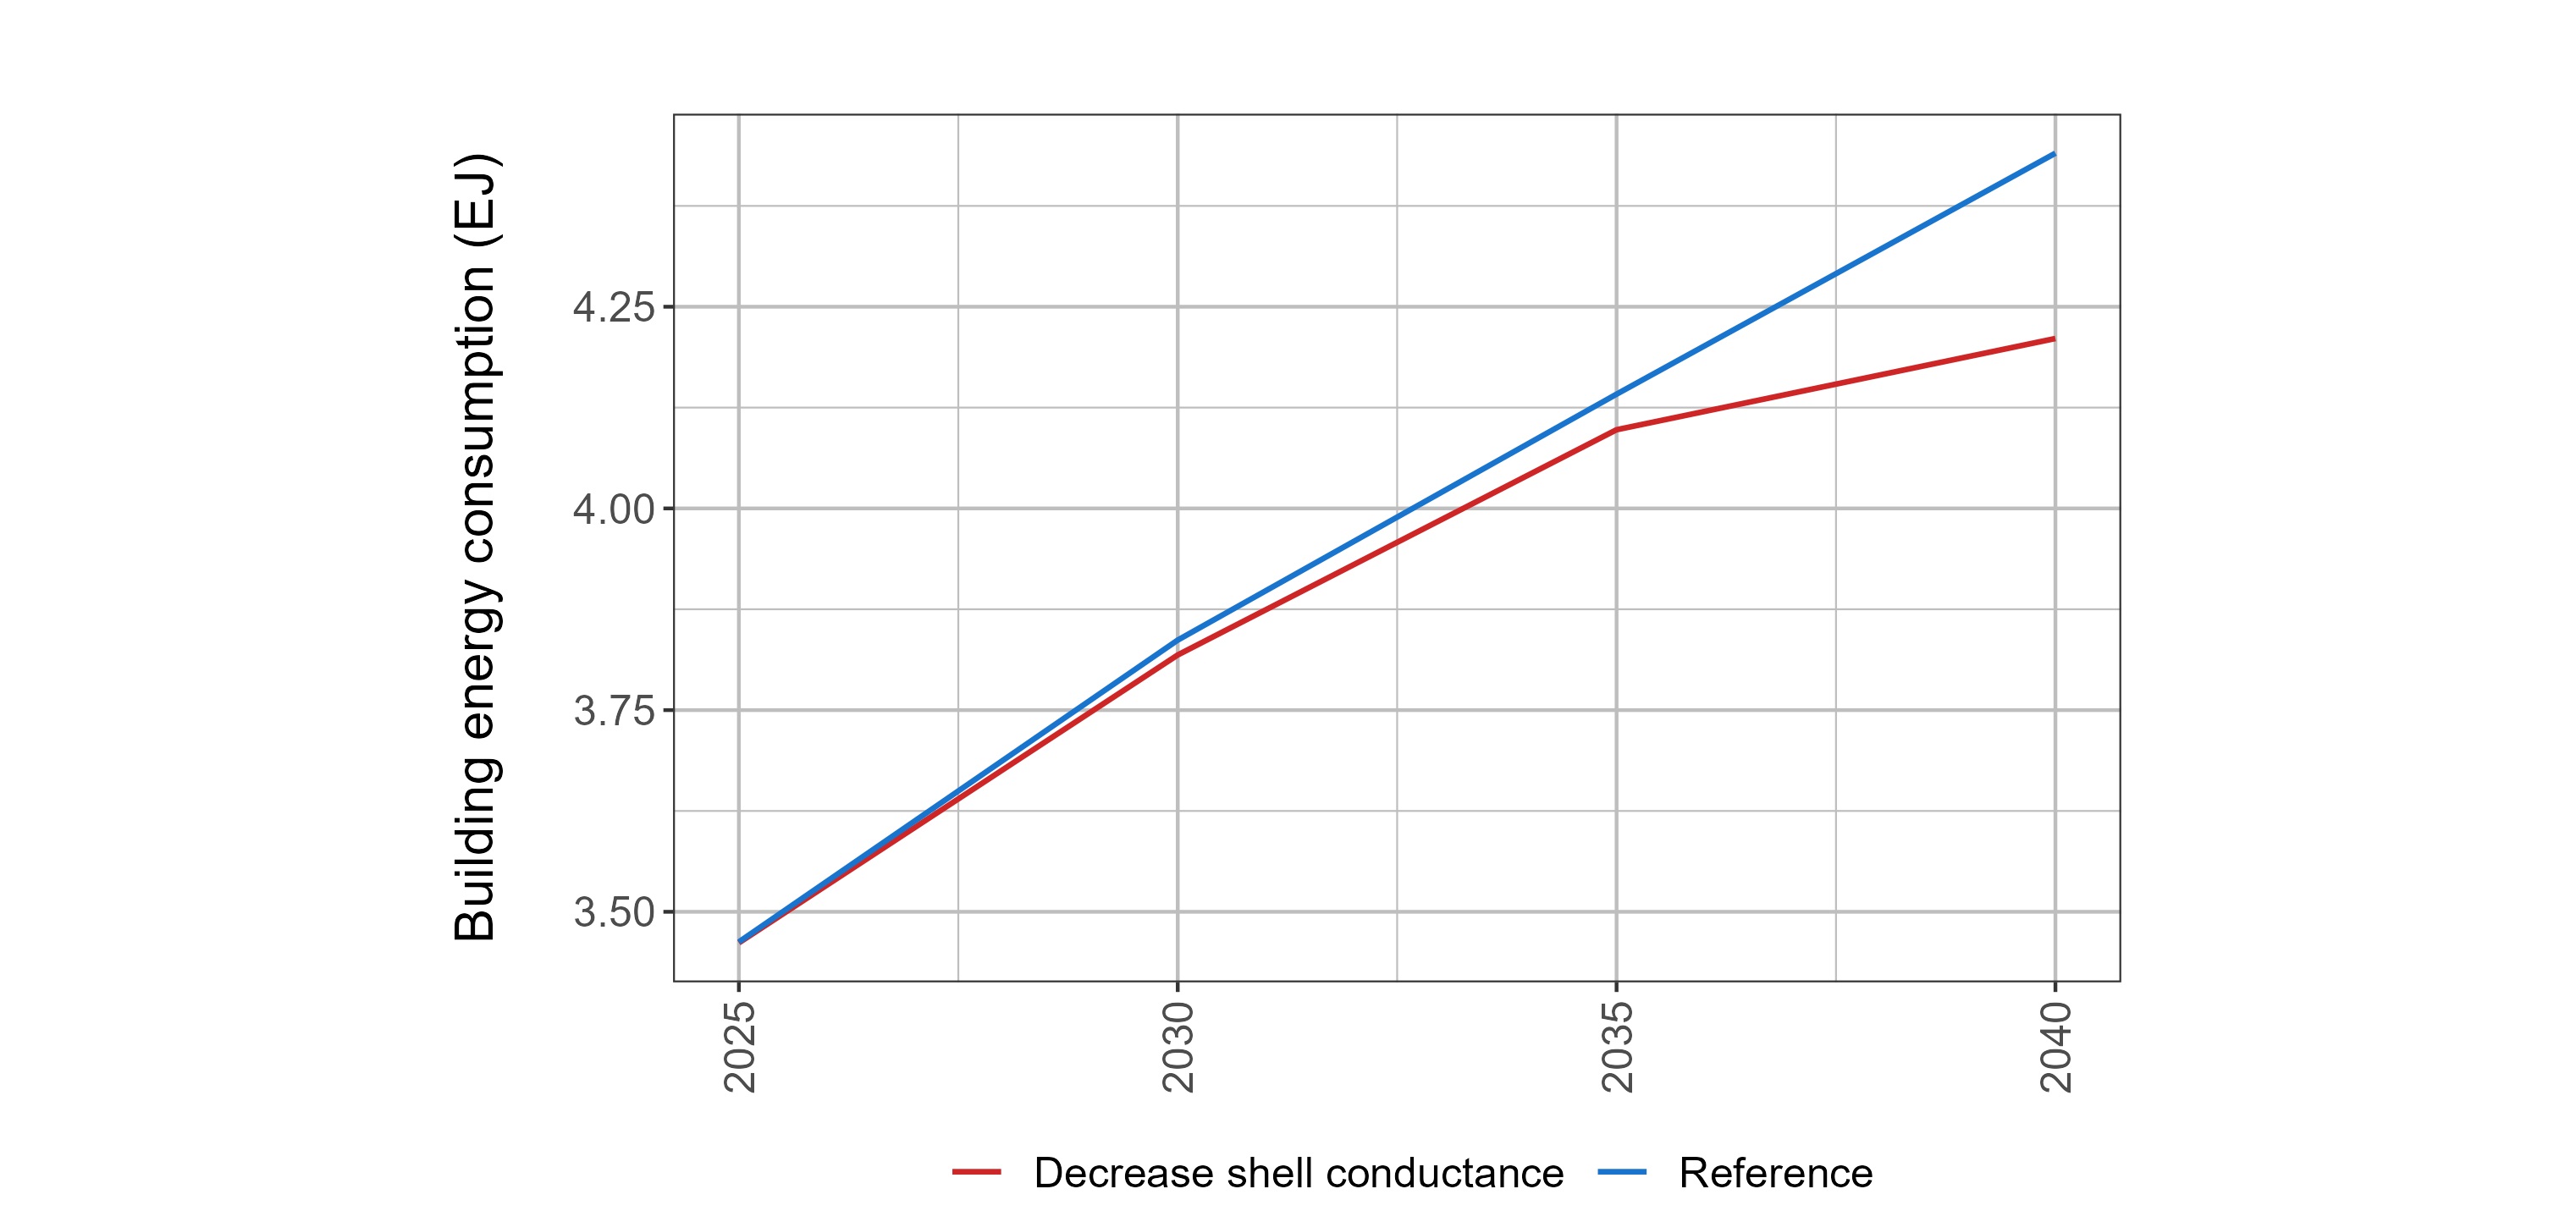
Building Envelope Efficiency
| Files Used | Description | Link |
|---|---|---|
| buildings_shell_efficiency.xml | Modifies shell conductance to represent enhanced building envelope efficiency improvement | Link |
Goal
This example demonstrates how to modify building envelope efficiencies in GCAM. We will increase efficiency over time, which could be used to represent increasing compliance with the envelope efficiency component of building energy codes.
Approach
We can use GCAM’sshell-conductance parameter to represent
an increase in building envelope efficiency.
Background - Cooling Demand
Cooling demand in GCAM depends on the indoor-outdoor temperature
difference (measured using cooling degree days or CDD), the building’s
shell conductance, and the building’s external heat gains along with GDP
and price factors. For more details and to view the equation used to
calculate cooling demand, see the Building service
demand section of the GCAM
energy demand documentation. GCAM’s shell-conductance
parameter is the inverse of building envelope efficiency. Its units are
watts per square meter per degree Kelvin and it represents the amount of
heat transferred through the building’s exterior when there is a
difference between the indoor and outdoor temperature.
GCAM Implementation
- Create a folder in the input directory:
./gcam-core/input/addons. - Download the example xml file buildings_shell_efficiency.xml to the folder.
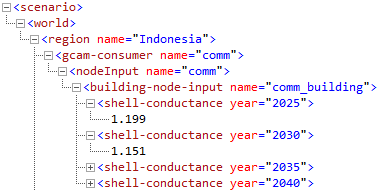
- Within each
gcam-consumertag in the XML, specify the desiredshell-conductancevalues for each year.
Example XML structure
- Save the xml and then point to it in your configuration file by
adding the line:
<Value name = "scen">../input/addons/buildings_shell_efficiency.xml</Value>
Example Output
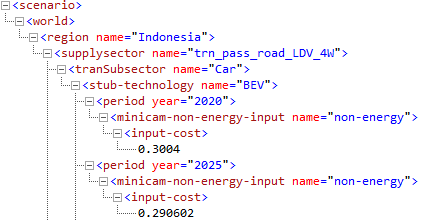
Modifying technology costs - EVs
| Files Used | Description | Link |
|---|---|---|
| transportation_UCD_CORE.csv | XML containing reference transportation technology costs | Link |
| adjust_ev_tech_cost.xml | XML for modifying 4-wheel passenger BEV costs | Link |
Goal
This example demonstrates how to modify non-energy costs of transportation technologies in GCAM. We will decrease these costs for 4-wheel passenger BEVs from 2020 to 2050 to represent policies that lower EV costs.
Approach
We can use GCAM’s input-cost parameter, which represents
the non-energy costs of a given technology.
GCAM Implementation
- Create a folder in the input directory:
./gcam-core/input/addons. - Download the example xml file adjust_ev_cost.xml to the folder.
- In each appropriate
stub-technologytag (within eachtranSubsectortag) in the XML, set the desiredinput-costfor each year. Add othersupplysectortags to include technologies outside of 4-wheel LDVs.
Example XML structure
- Save the xml and then point to it in your configuration file by adding the line:
<Value name = "scen">../input/addons/adjust_ev_tech_cost.xml</Value>
Transport Mode Shift - Share weights
| Files Used | Description | Link |
|---|---|---|
| adjust_shareweight_rail.xml | XML for setting passenger rail share weight dynamics | Link |
Goal
This example demonstrates how to adjust share-weights in GCAM. We will increase the share-weight of passenger rail transport over time to represent policies that increase rail infrastructure.
Approach
Since infrastructure development is a non-cost impact on rail transport,
we can use share weights to represent this impact. Share weights are
calibration parameters and not directly related to any “real-world”
value, so it is usually necessary to test a range of share weight
modifications to obtain the desired effect. The Model Interface query
transport subsector share-weights can be used to check the
reference share weights for transportation modes.
Background - Share weights
Share weights are assigned to different subsectors and technology
choices in GCAM to represent non-cost factors of consumer choice. They
are used primarily to calibrate market shares to historical data but can
also be modified to reflect factors such as infrastructure development
or shifting societal preferences. For more information on share weights
and how they are used in GCAM’s economic choice functions, see the GCAM economic
choice documentation. Share weights should not be used to represent
cost-related policies. Additionally, shareweight interpolation rules
(fixed, linear, or s-curve) can
be used to automatically interpolate shareweights between given years.
GCAM Implementation
- Create a folder in the input directory:
./gcam-core/input/addons. - Download the example xml file adjust_shareweight_rail.xml to the folder.
- Adjust share weights and interpolation rules (
linear,fixed, ors-curve) to the “Passenger Rail”tranSubsectortag in the XML. Add/ remove subsectors as desired.
Example xml structure
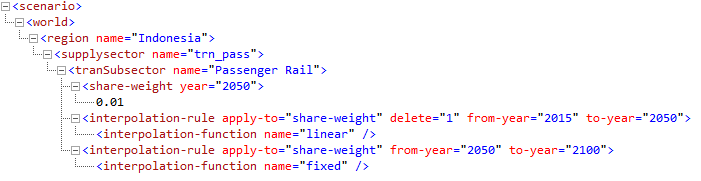
Note: The first
interpolation rule must include delete=“1” in order to override all of
the previous (default) interpolation rules.
- Save the xml and then point to it in your configuration file by
adding the lines:
<Value name = "scen">../input/addons/adjust_shareweight_rail.xml</Value>
Extracting GCAM data
gcamextractor
gcamextractor is an R package which allows users to
extract selected parameters from a GCAM database into standardized
tables with consistent column names for easier downstream plotting and
analysis. gcamextractor also converts the extracted data
into more commonly used units. Detailed documentation for
gcamextractor can be found in the user guide. A simple
example is provided below on how to extract data from GCAM using
gcamextractor in R. Users can select
individual parameters listed here
or simply select summary for a selection of commonly used
diagnostic parameters.
# In R
# devtools::install_github("JGCRI/gcamextractor")
library(gcamextractor)
gcamextractor::params # Check all available params

data <- gcamextractor::readgcam(gcamdatabase = "FULL/PATH/TO/GCAM_DATABASE",
                                paramsSelect = c("pop","elecByTechTWh","watWithdrawBySec"),
                                regionsSelect = c("Argentina","Colombia"))

dataGCAM$data # View all data
dataGCAM$dataAggClass1 # Aggregated to class 1 vars (Example file linked above)
dataGCAM$dataAggClass2 # Aggregated to class 2 vars
dataGCAM$dataAggParam # Aggregated to params| Files Used | Description | Link |
|---|---|---|
| gcamDataTable_aggClass1.csv | One of the outputs from the gcamextractor examples shown here. | Link |
Plotting Data
rchart
rchart is an R package which allows users to plot
gcamextractor outputs into charts with standardized JGCRI
colors. Detailed documentation for rchart can be found in
the user guide. Some
examples are provided below using example data uploaded to the
gcam_training repository. Users can extract the data from
their own databases using the gcamextractor example shown above. Combining gcamextractor
and rchart you can plot very detailed data in just one line
of code.
# devtools::install_github("JGCRI/rchart") # If needed
library(rchart);
url <- "https://raw.githubusercontent.com/JGCRI/gcam_training/main/examples/gcamDataTable_aggClass1.csv"
data <- read.csv(url) # Read Data
charts <- rchart::chart(data, save=F, scenRef = "GCAM_SSP2") # Plot data
names(charts) # See list of charts
Below you can see the outputs for all the different charts produced.
chart_param
charts$chart_param_Argentina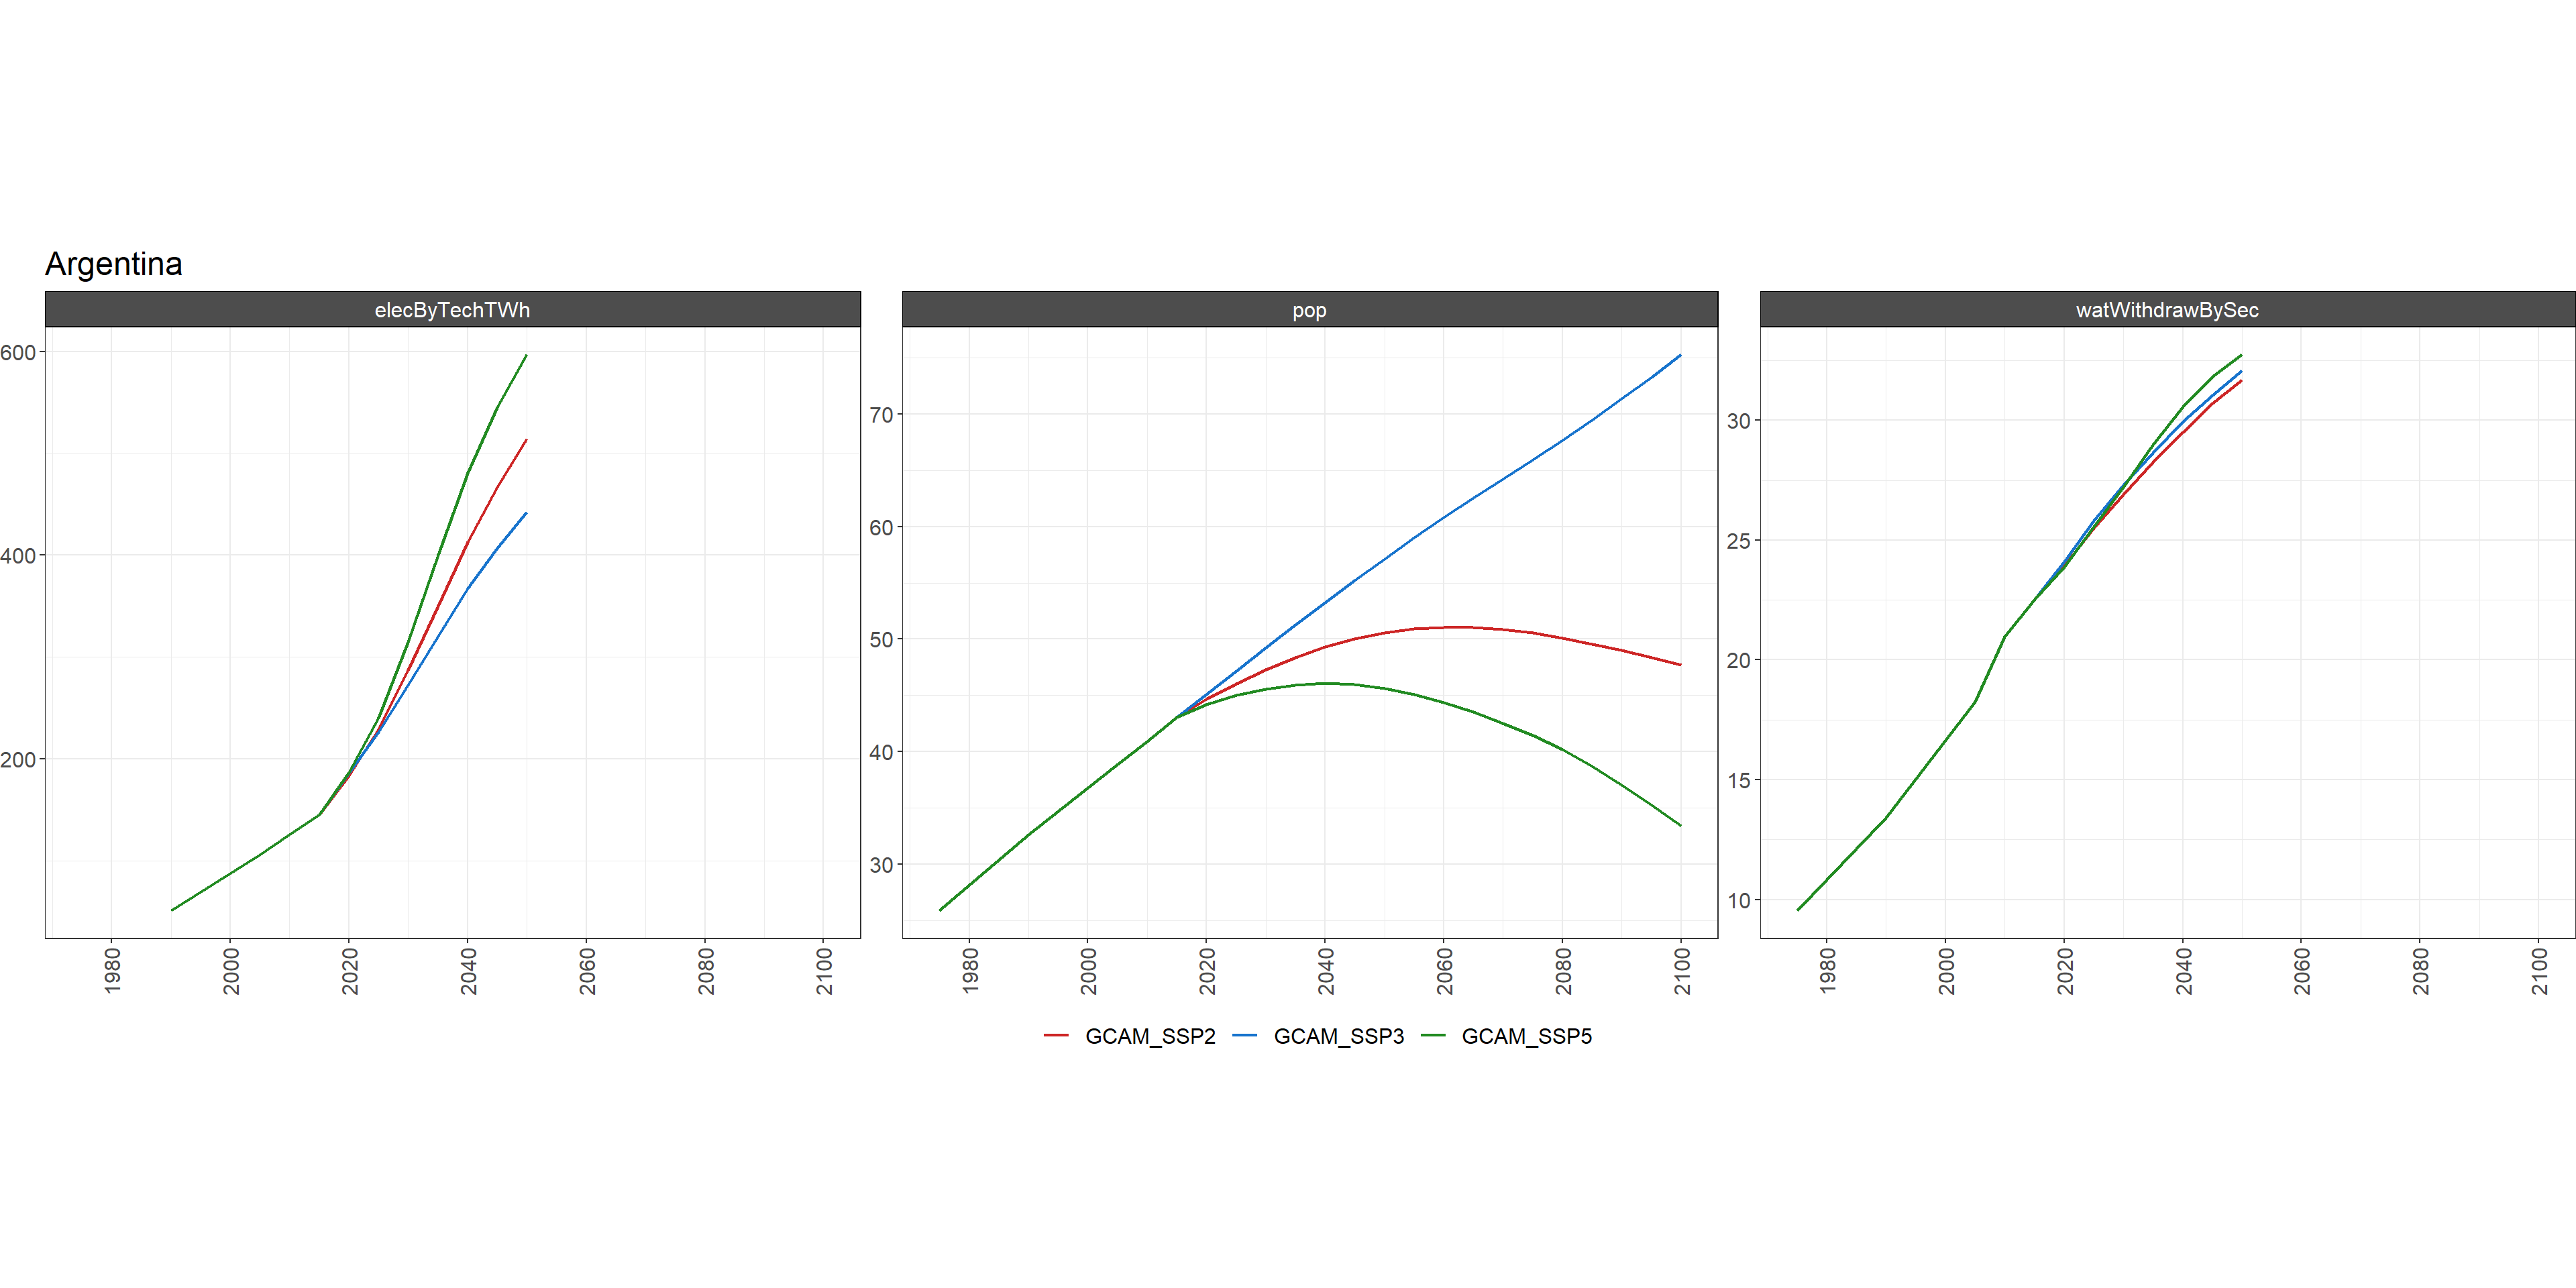
charts$chart_param_Colombia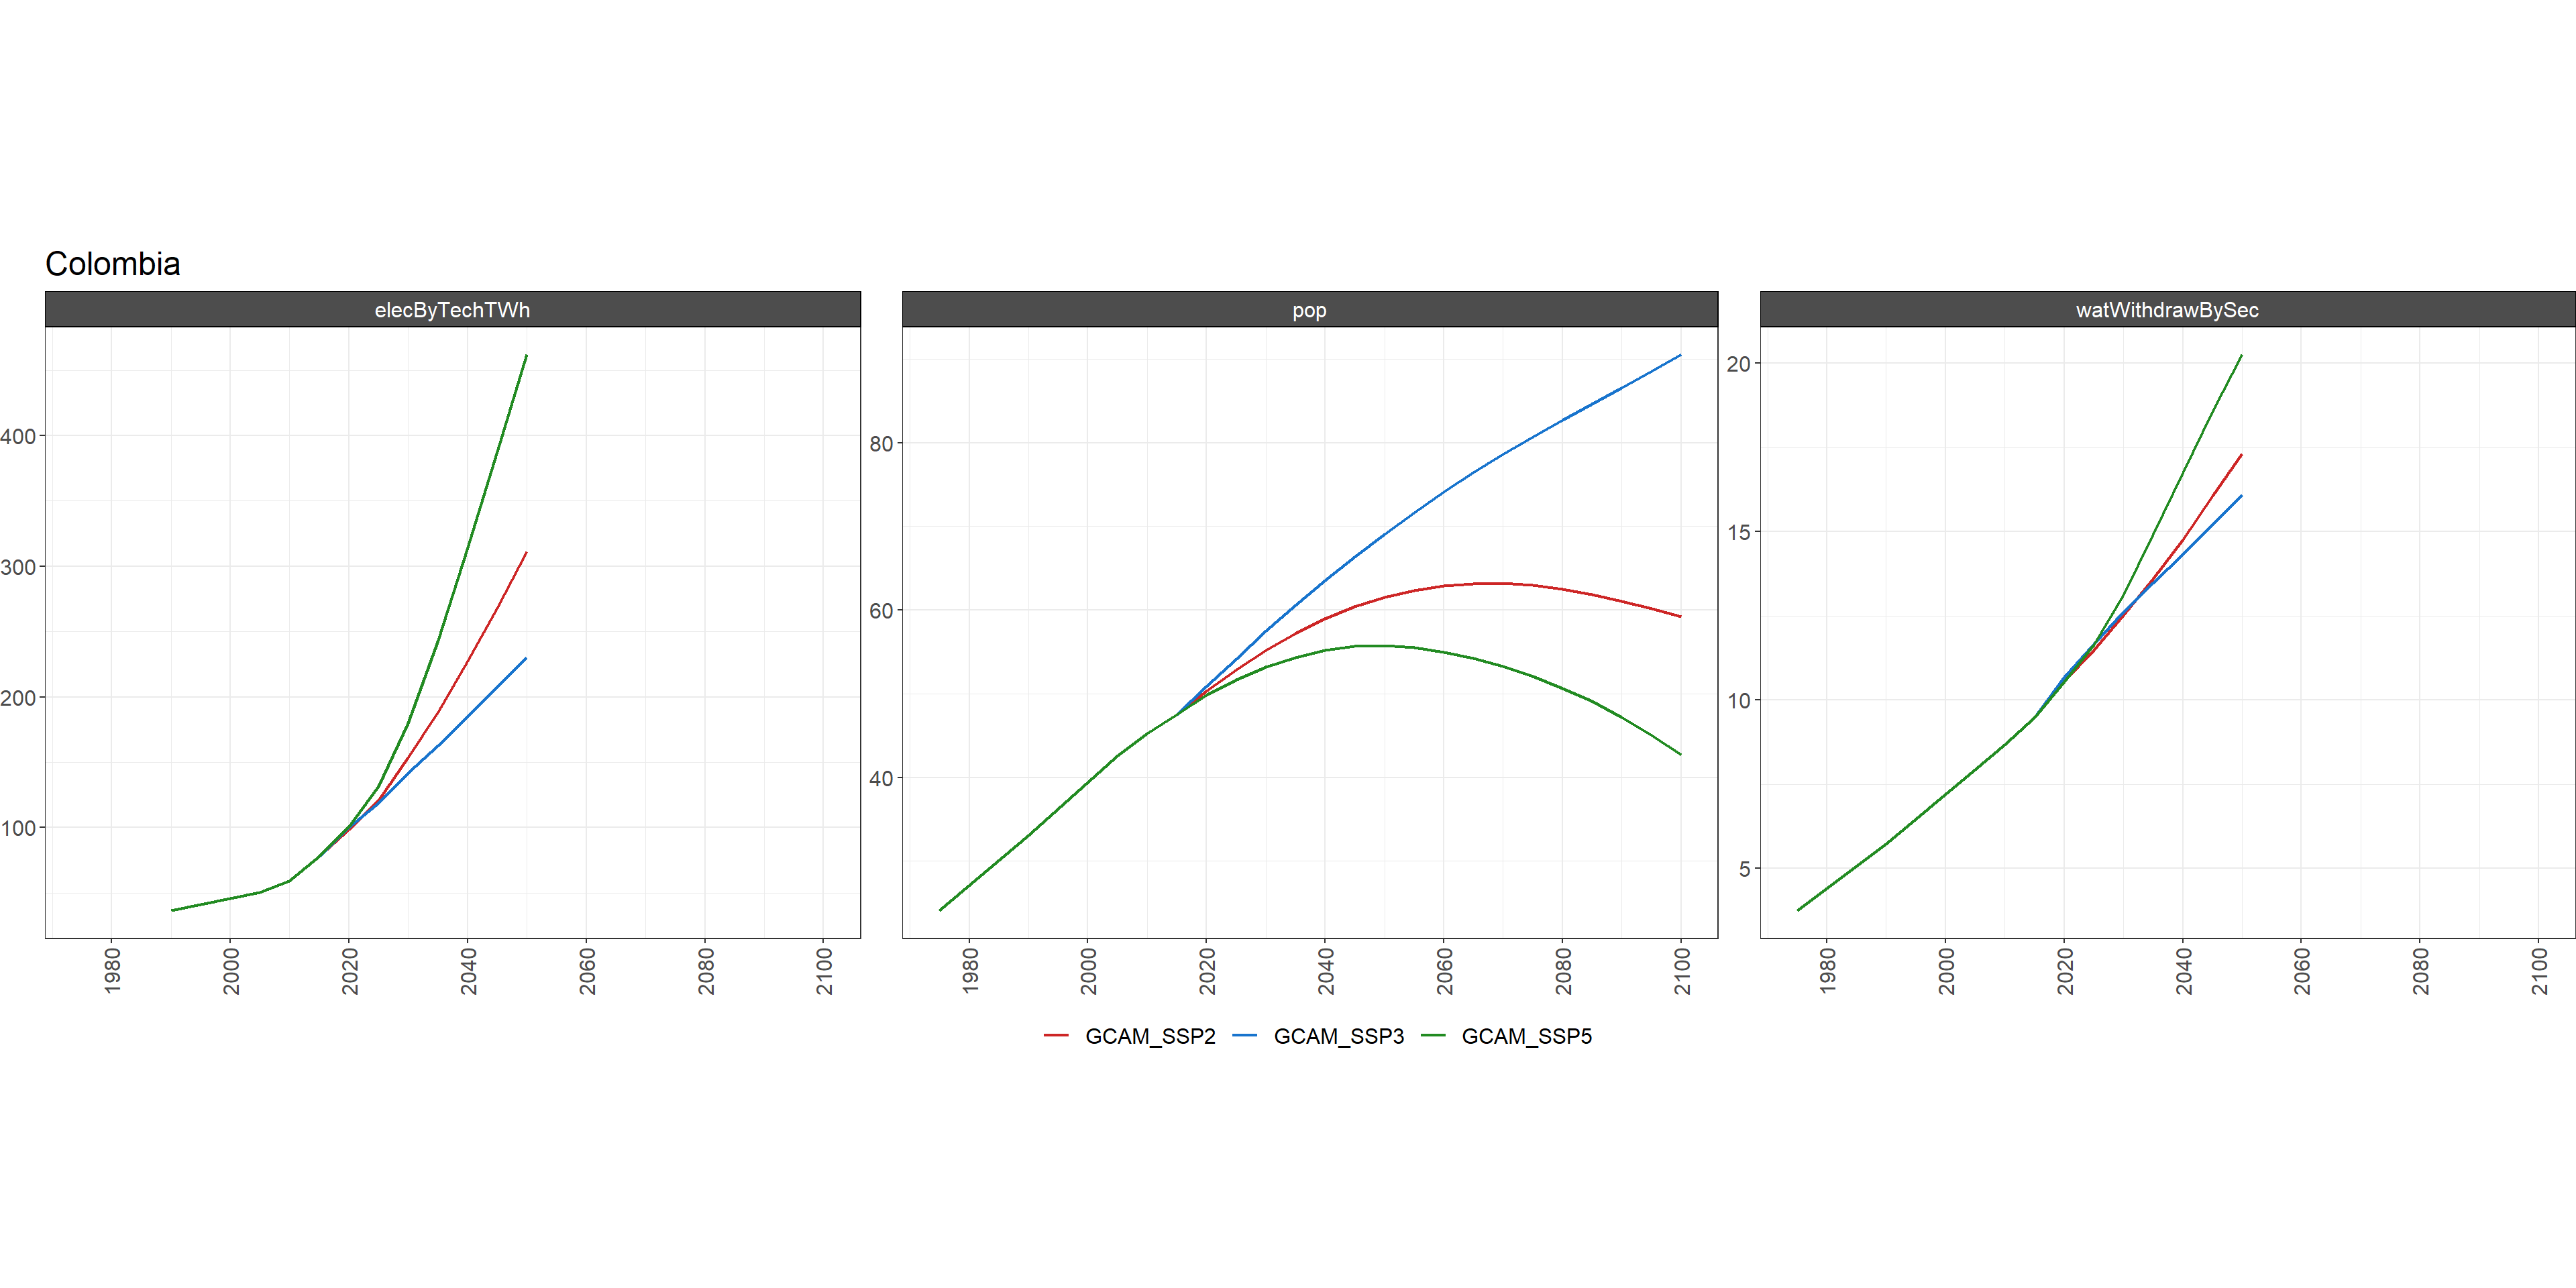
chart_param_diff
charts$chart_param_diff_absolute_Argentina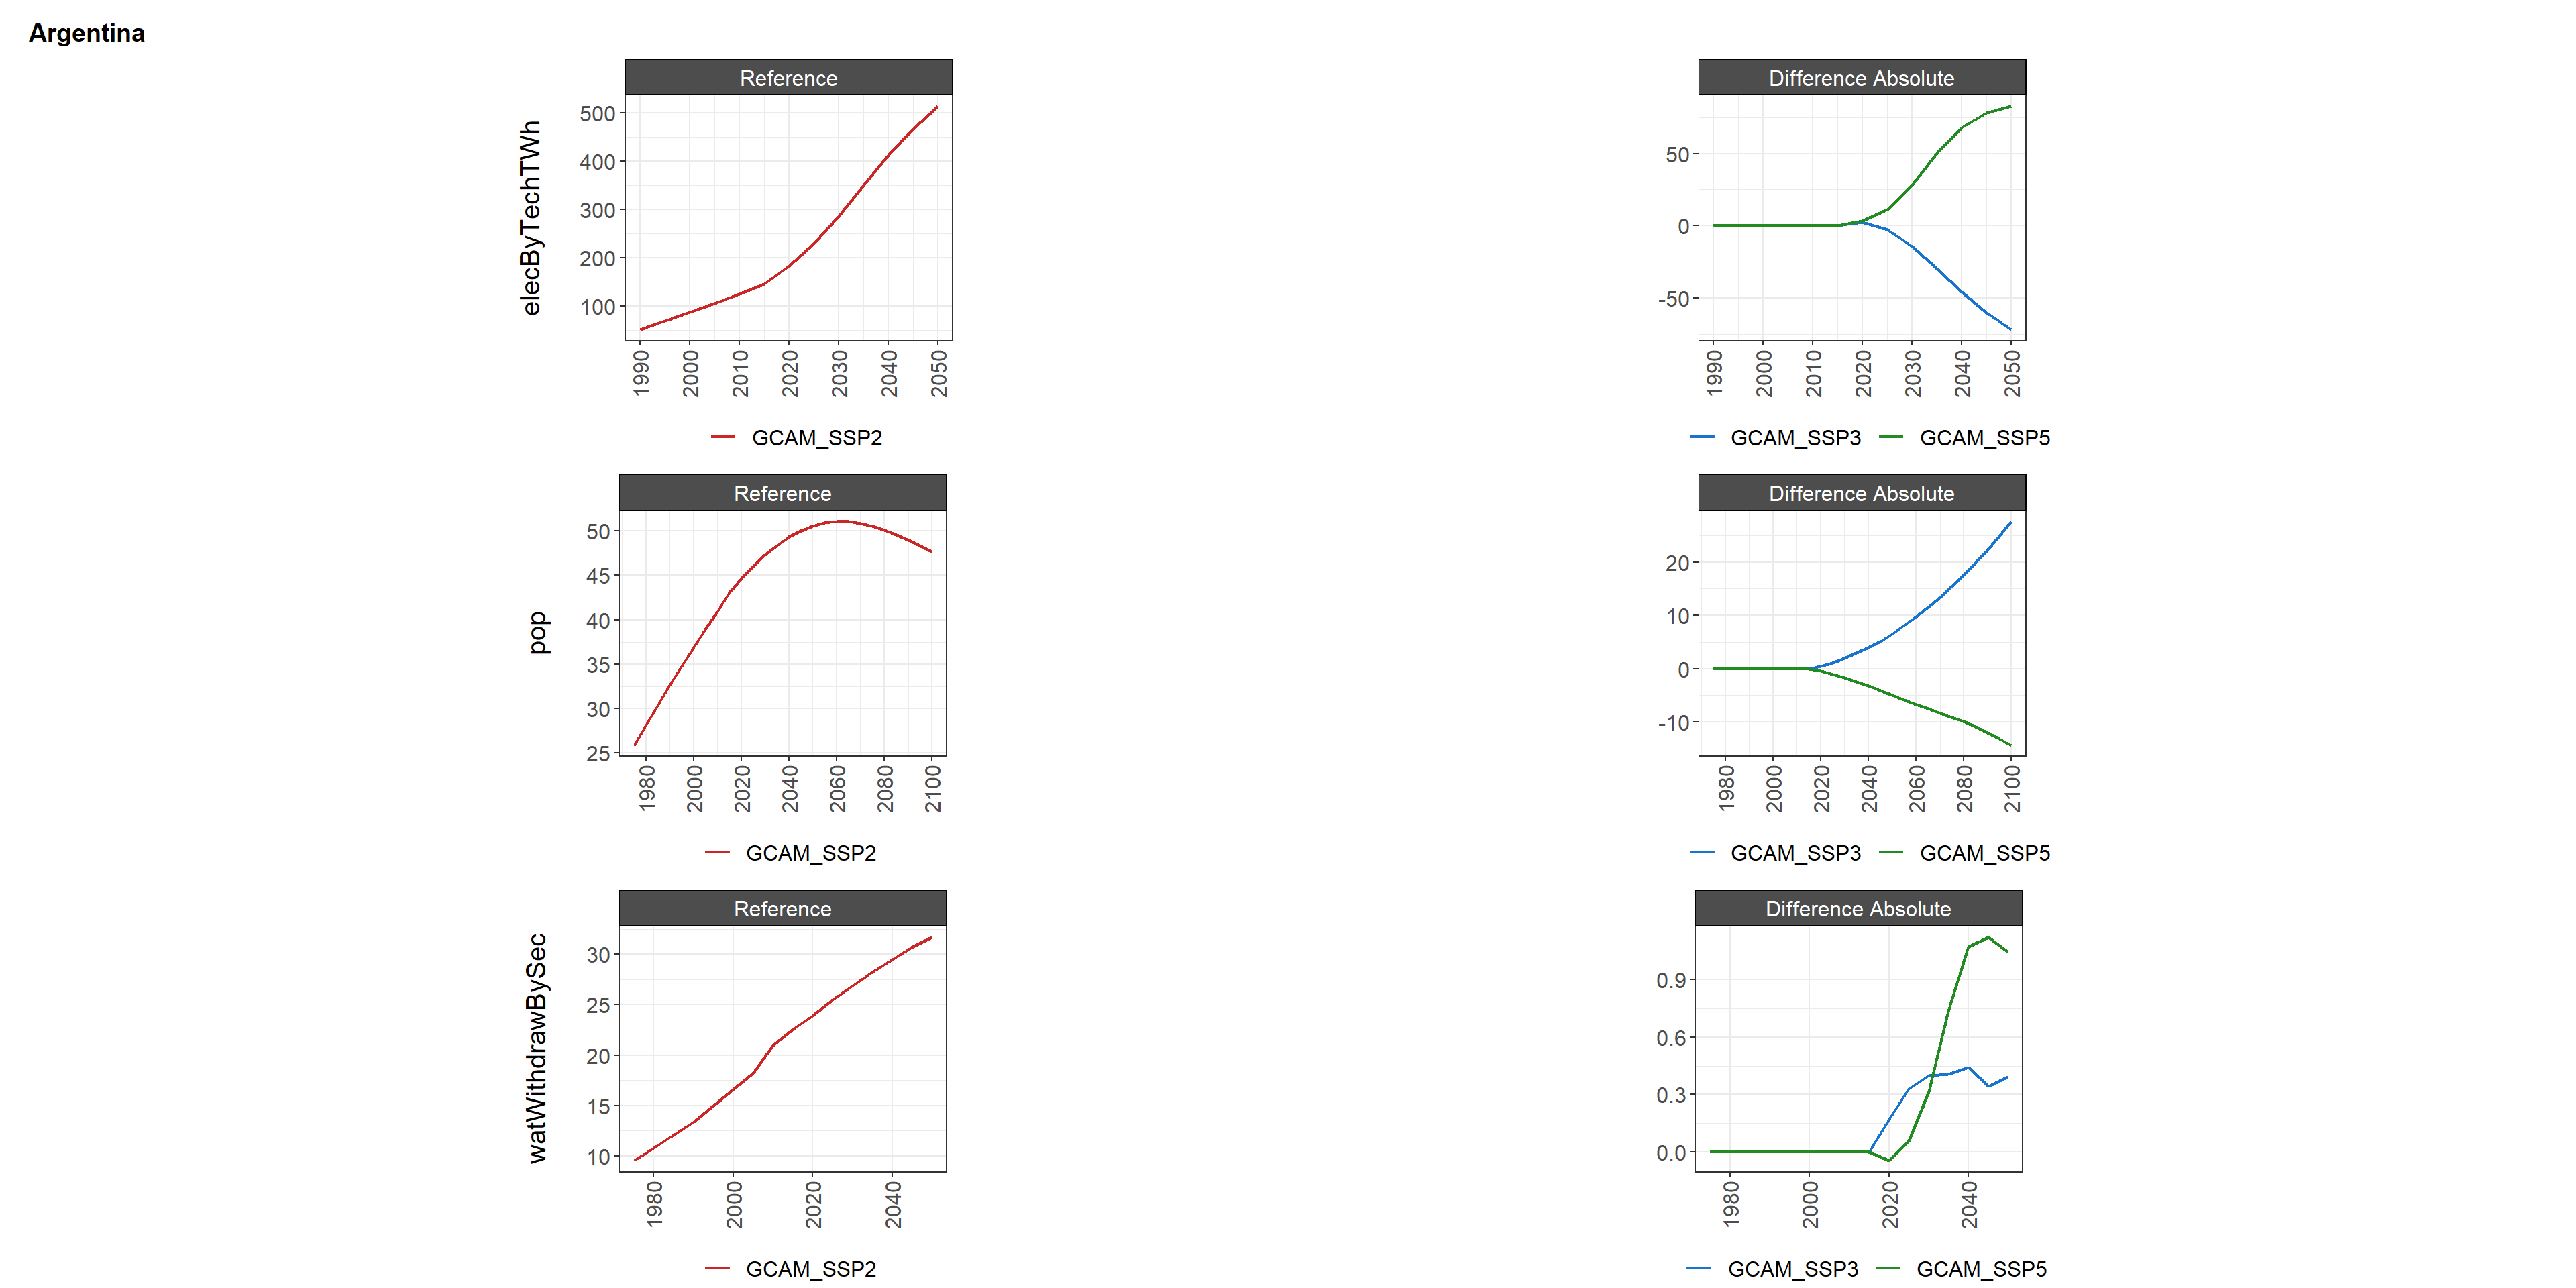
charts$chart_param_diff_percent_Argentina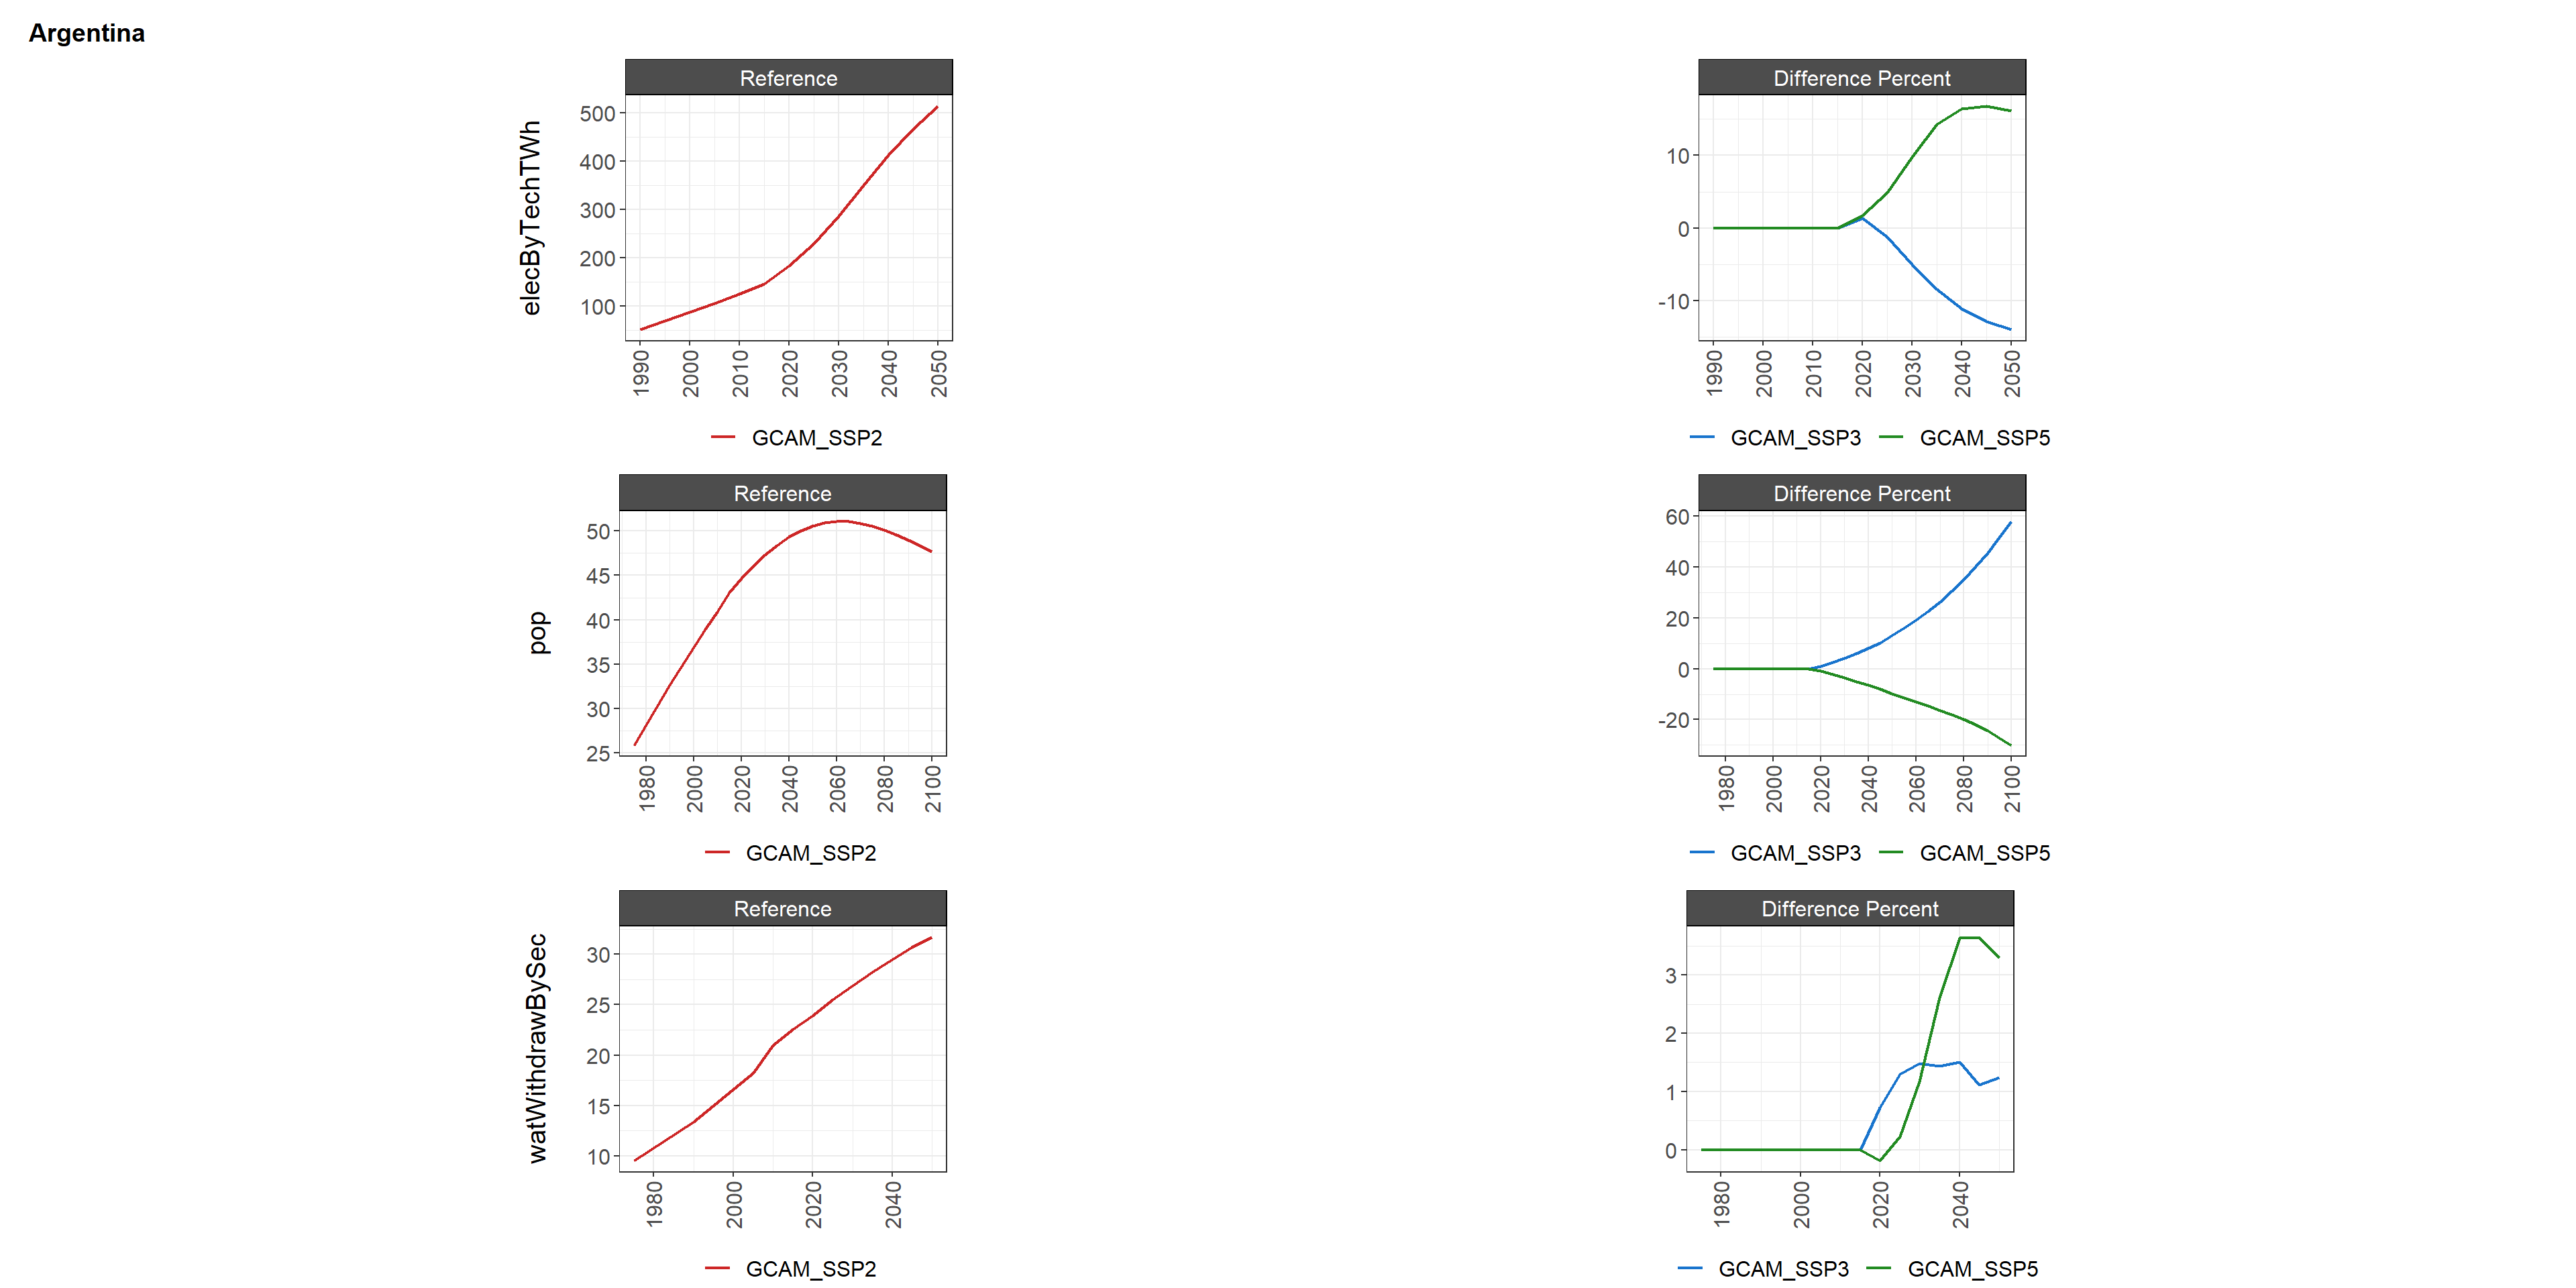
charts$chart_param_diff_absolute_Colombia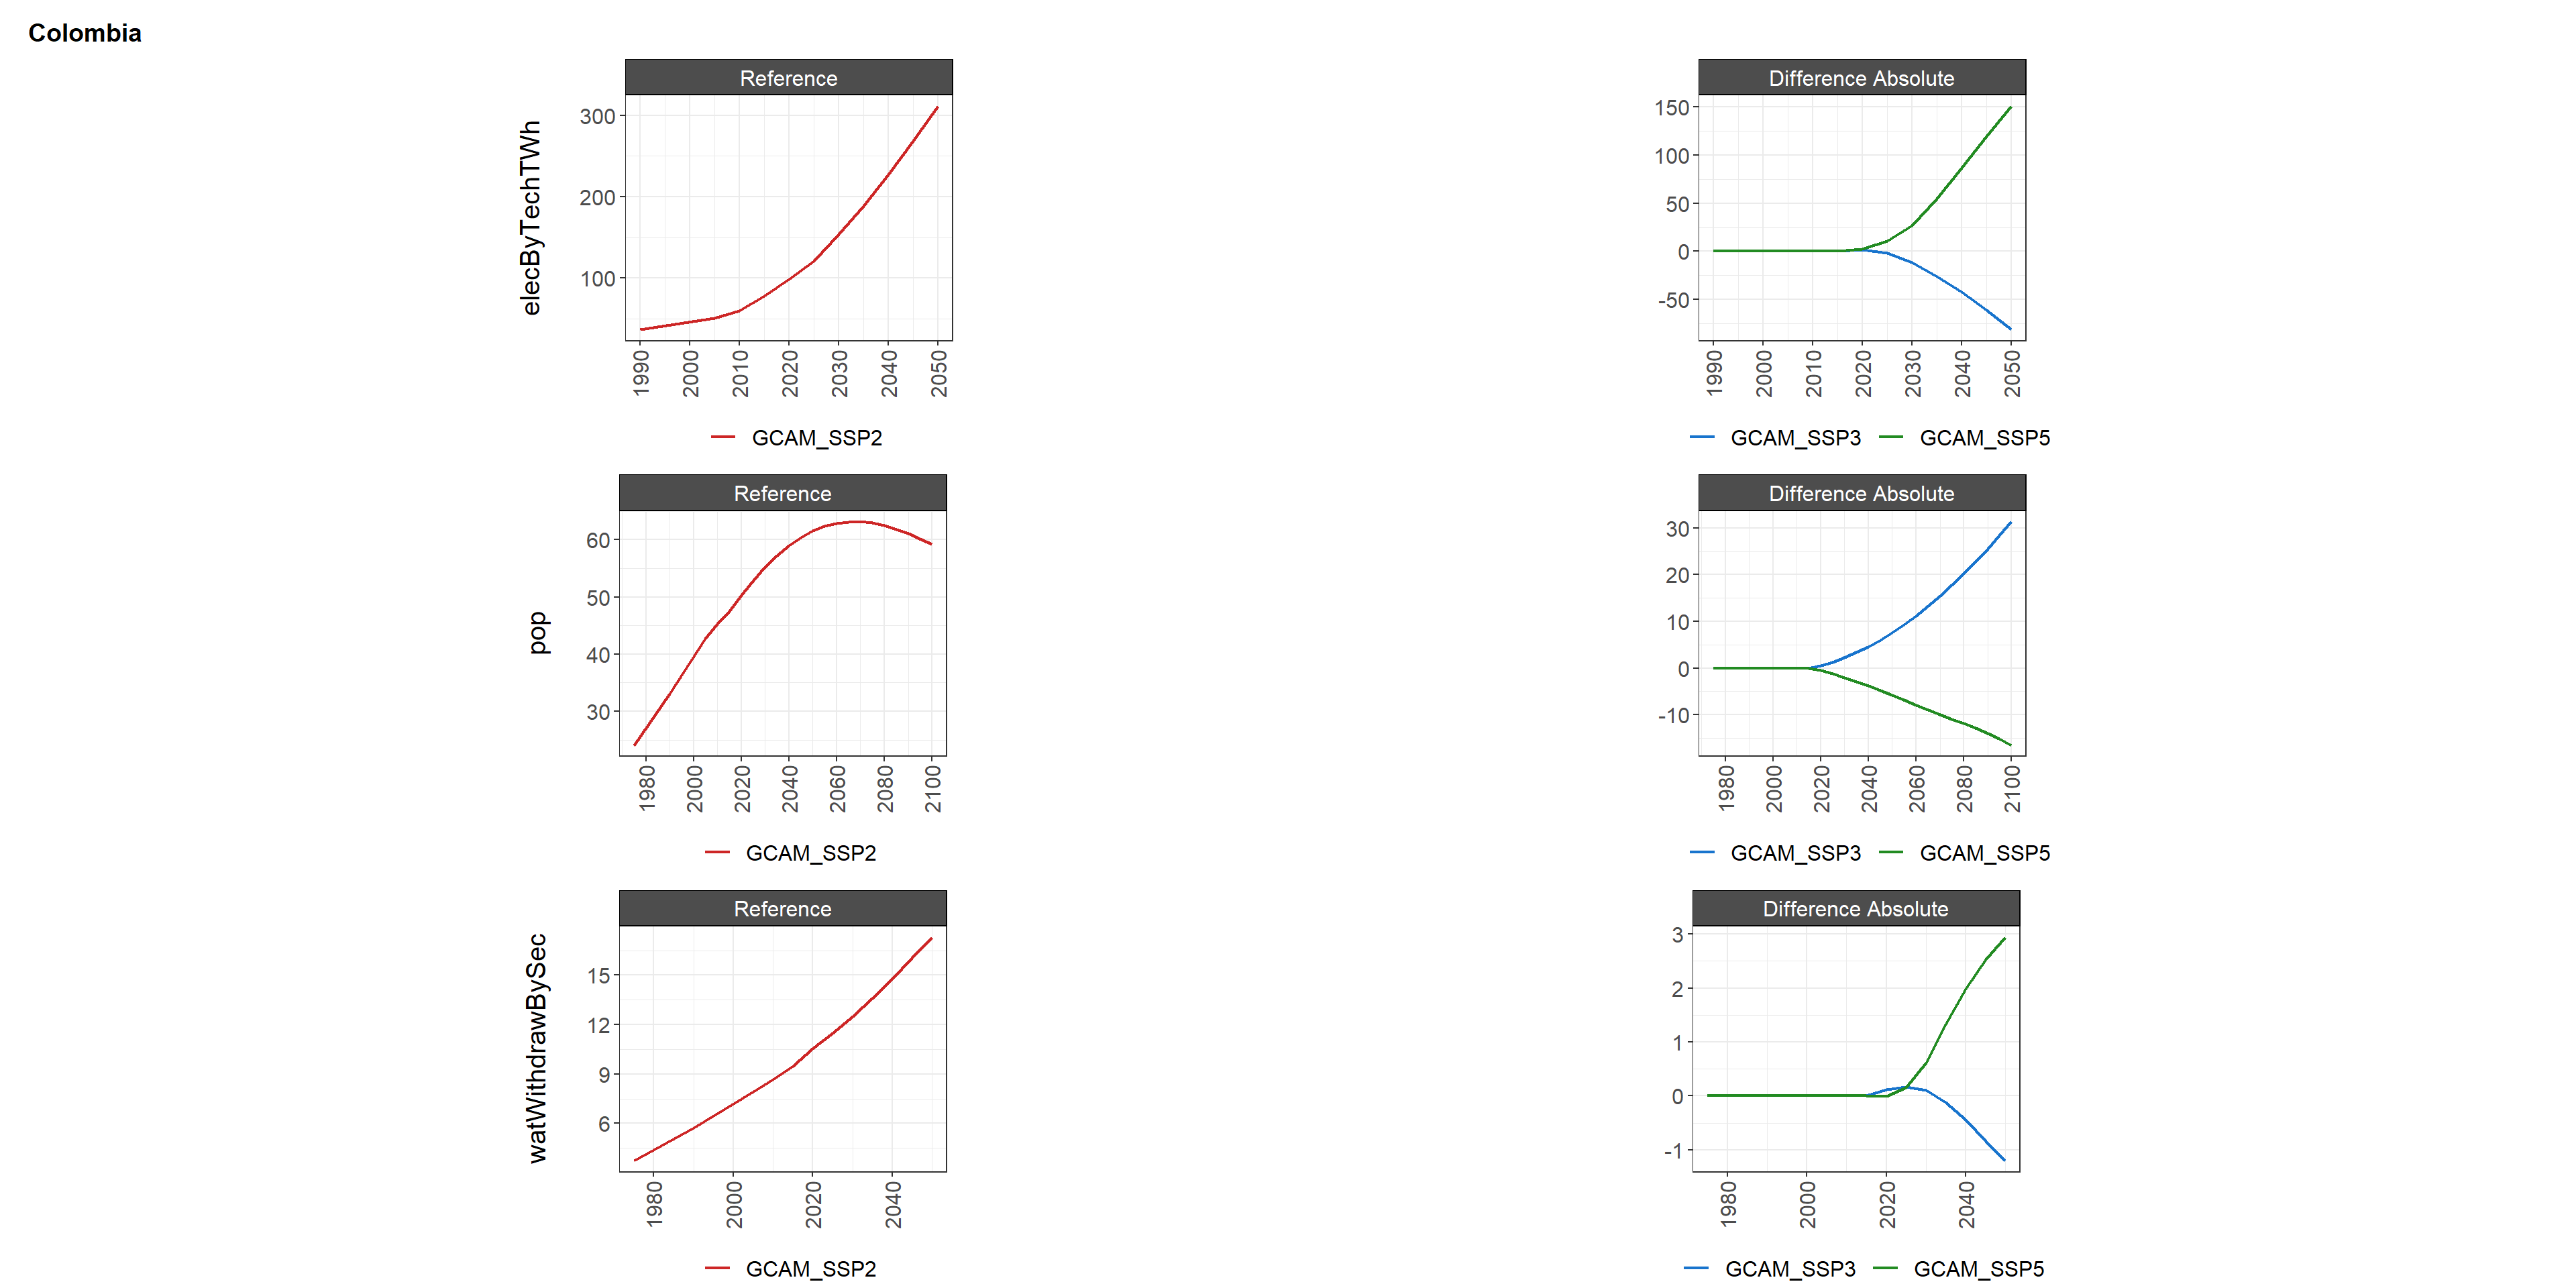
charts$chart_param_diff_percent_Colombia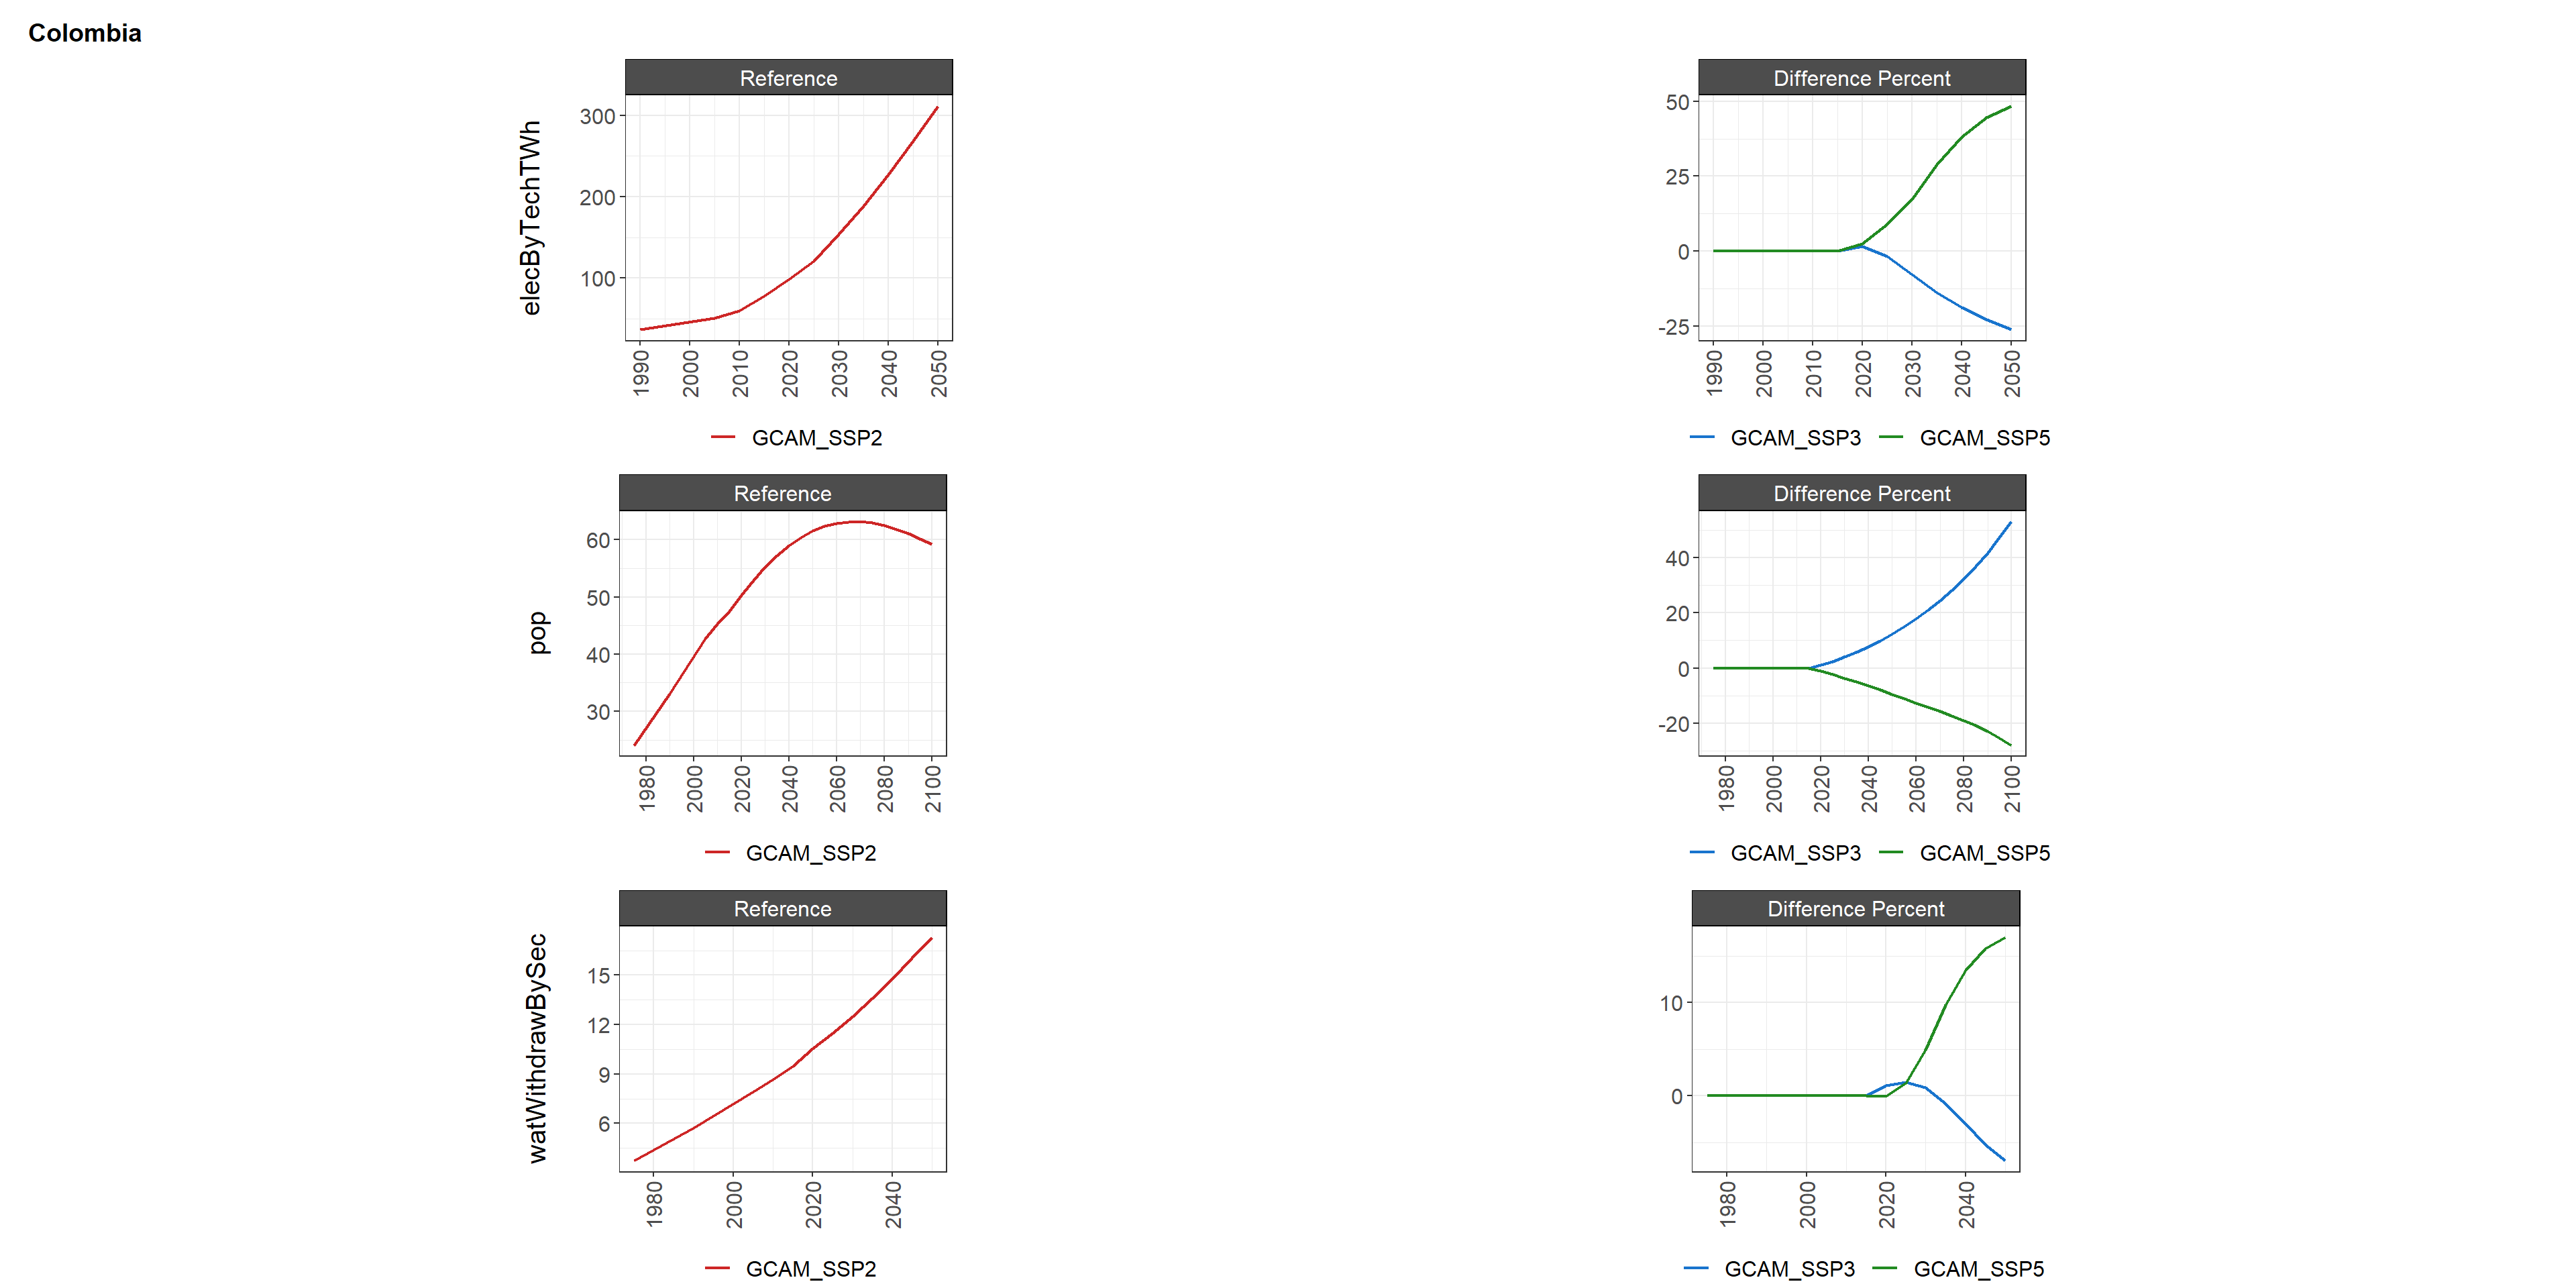
chart_class
charts$chart_class_Argentina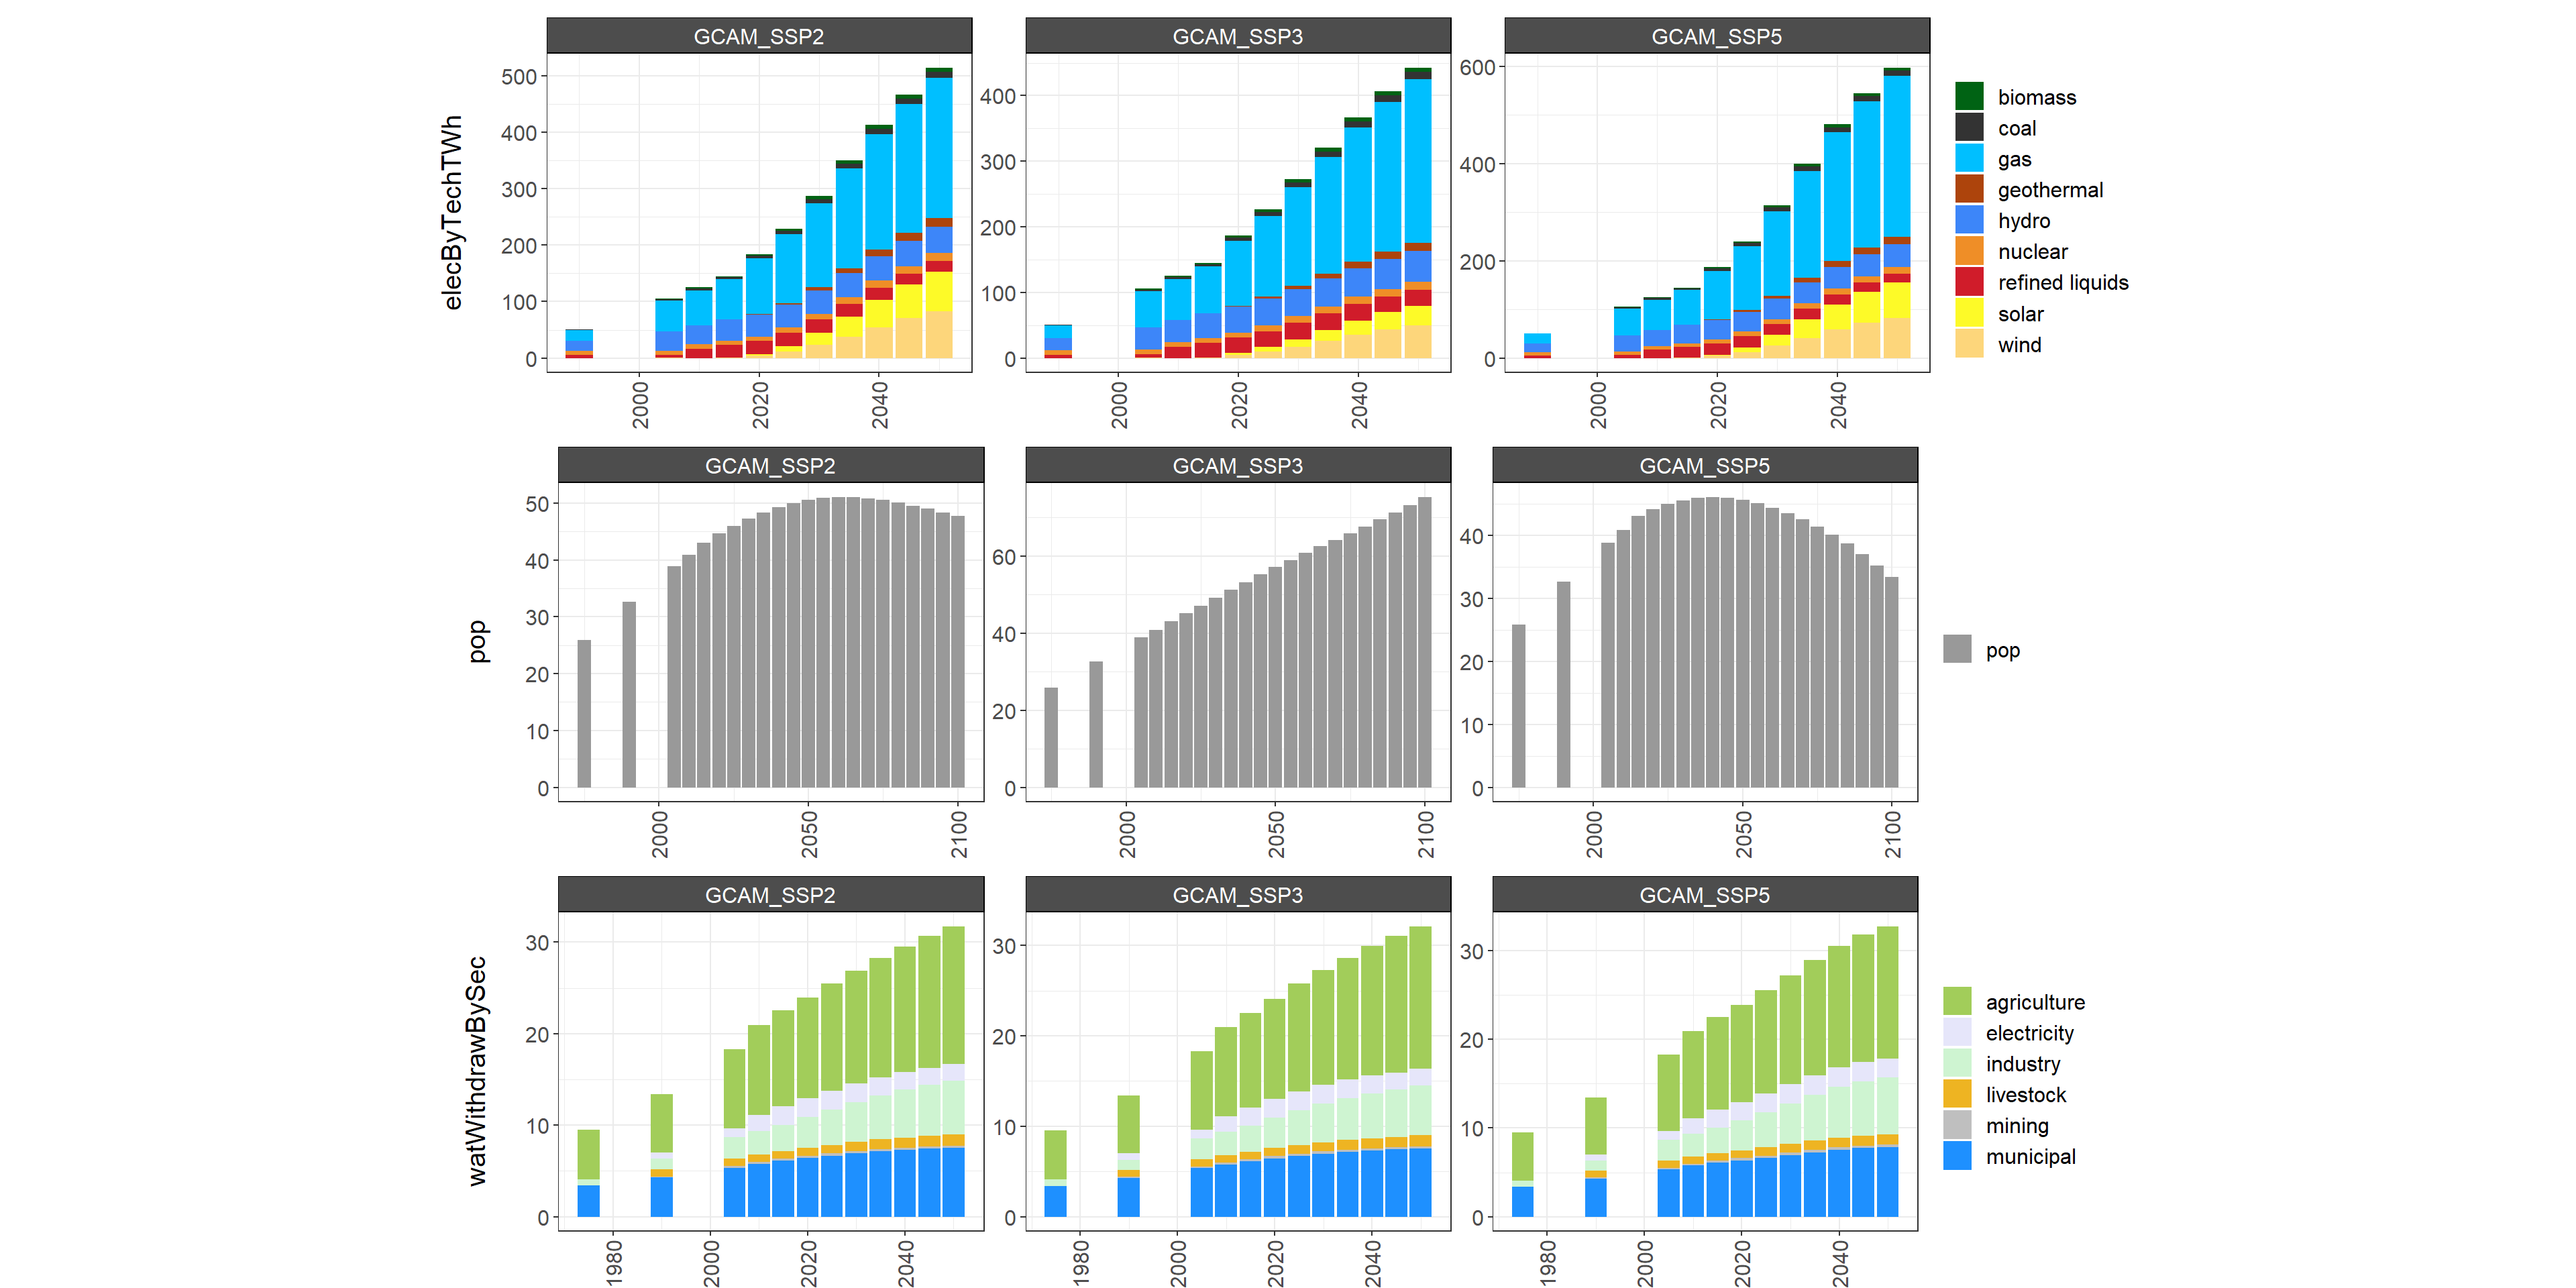
charts$chart_class_Colombia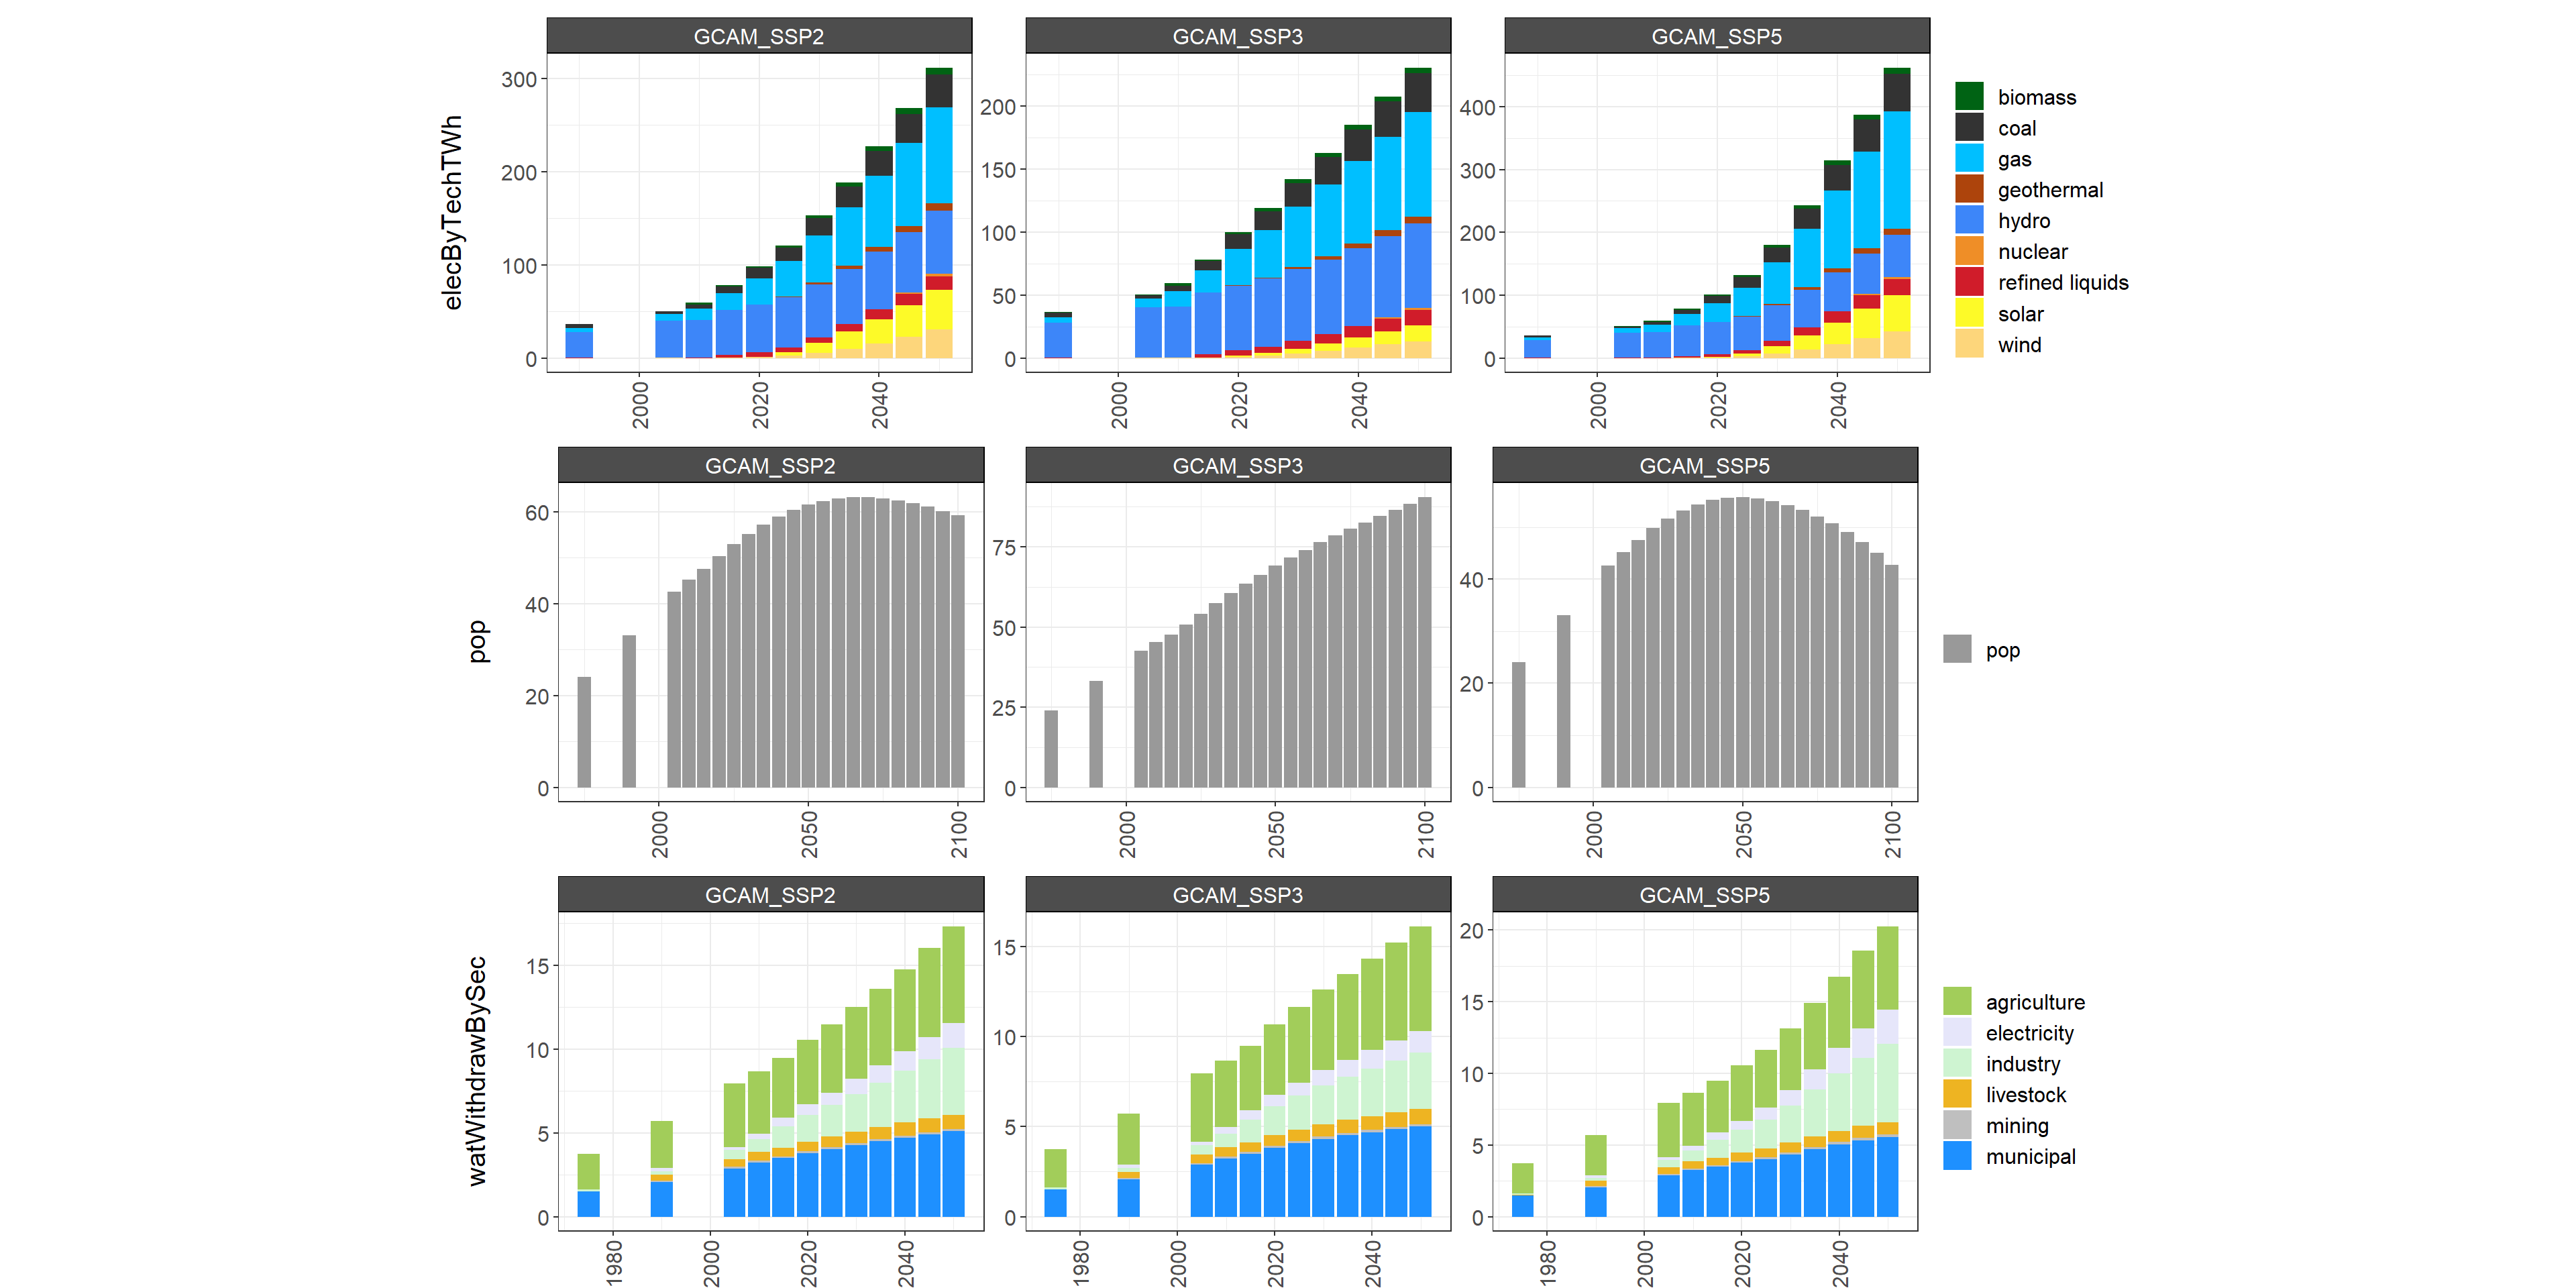
chart_class_diff
charts$chart_class_diff_absolute_Argentina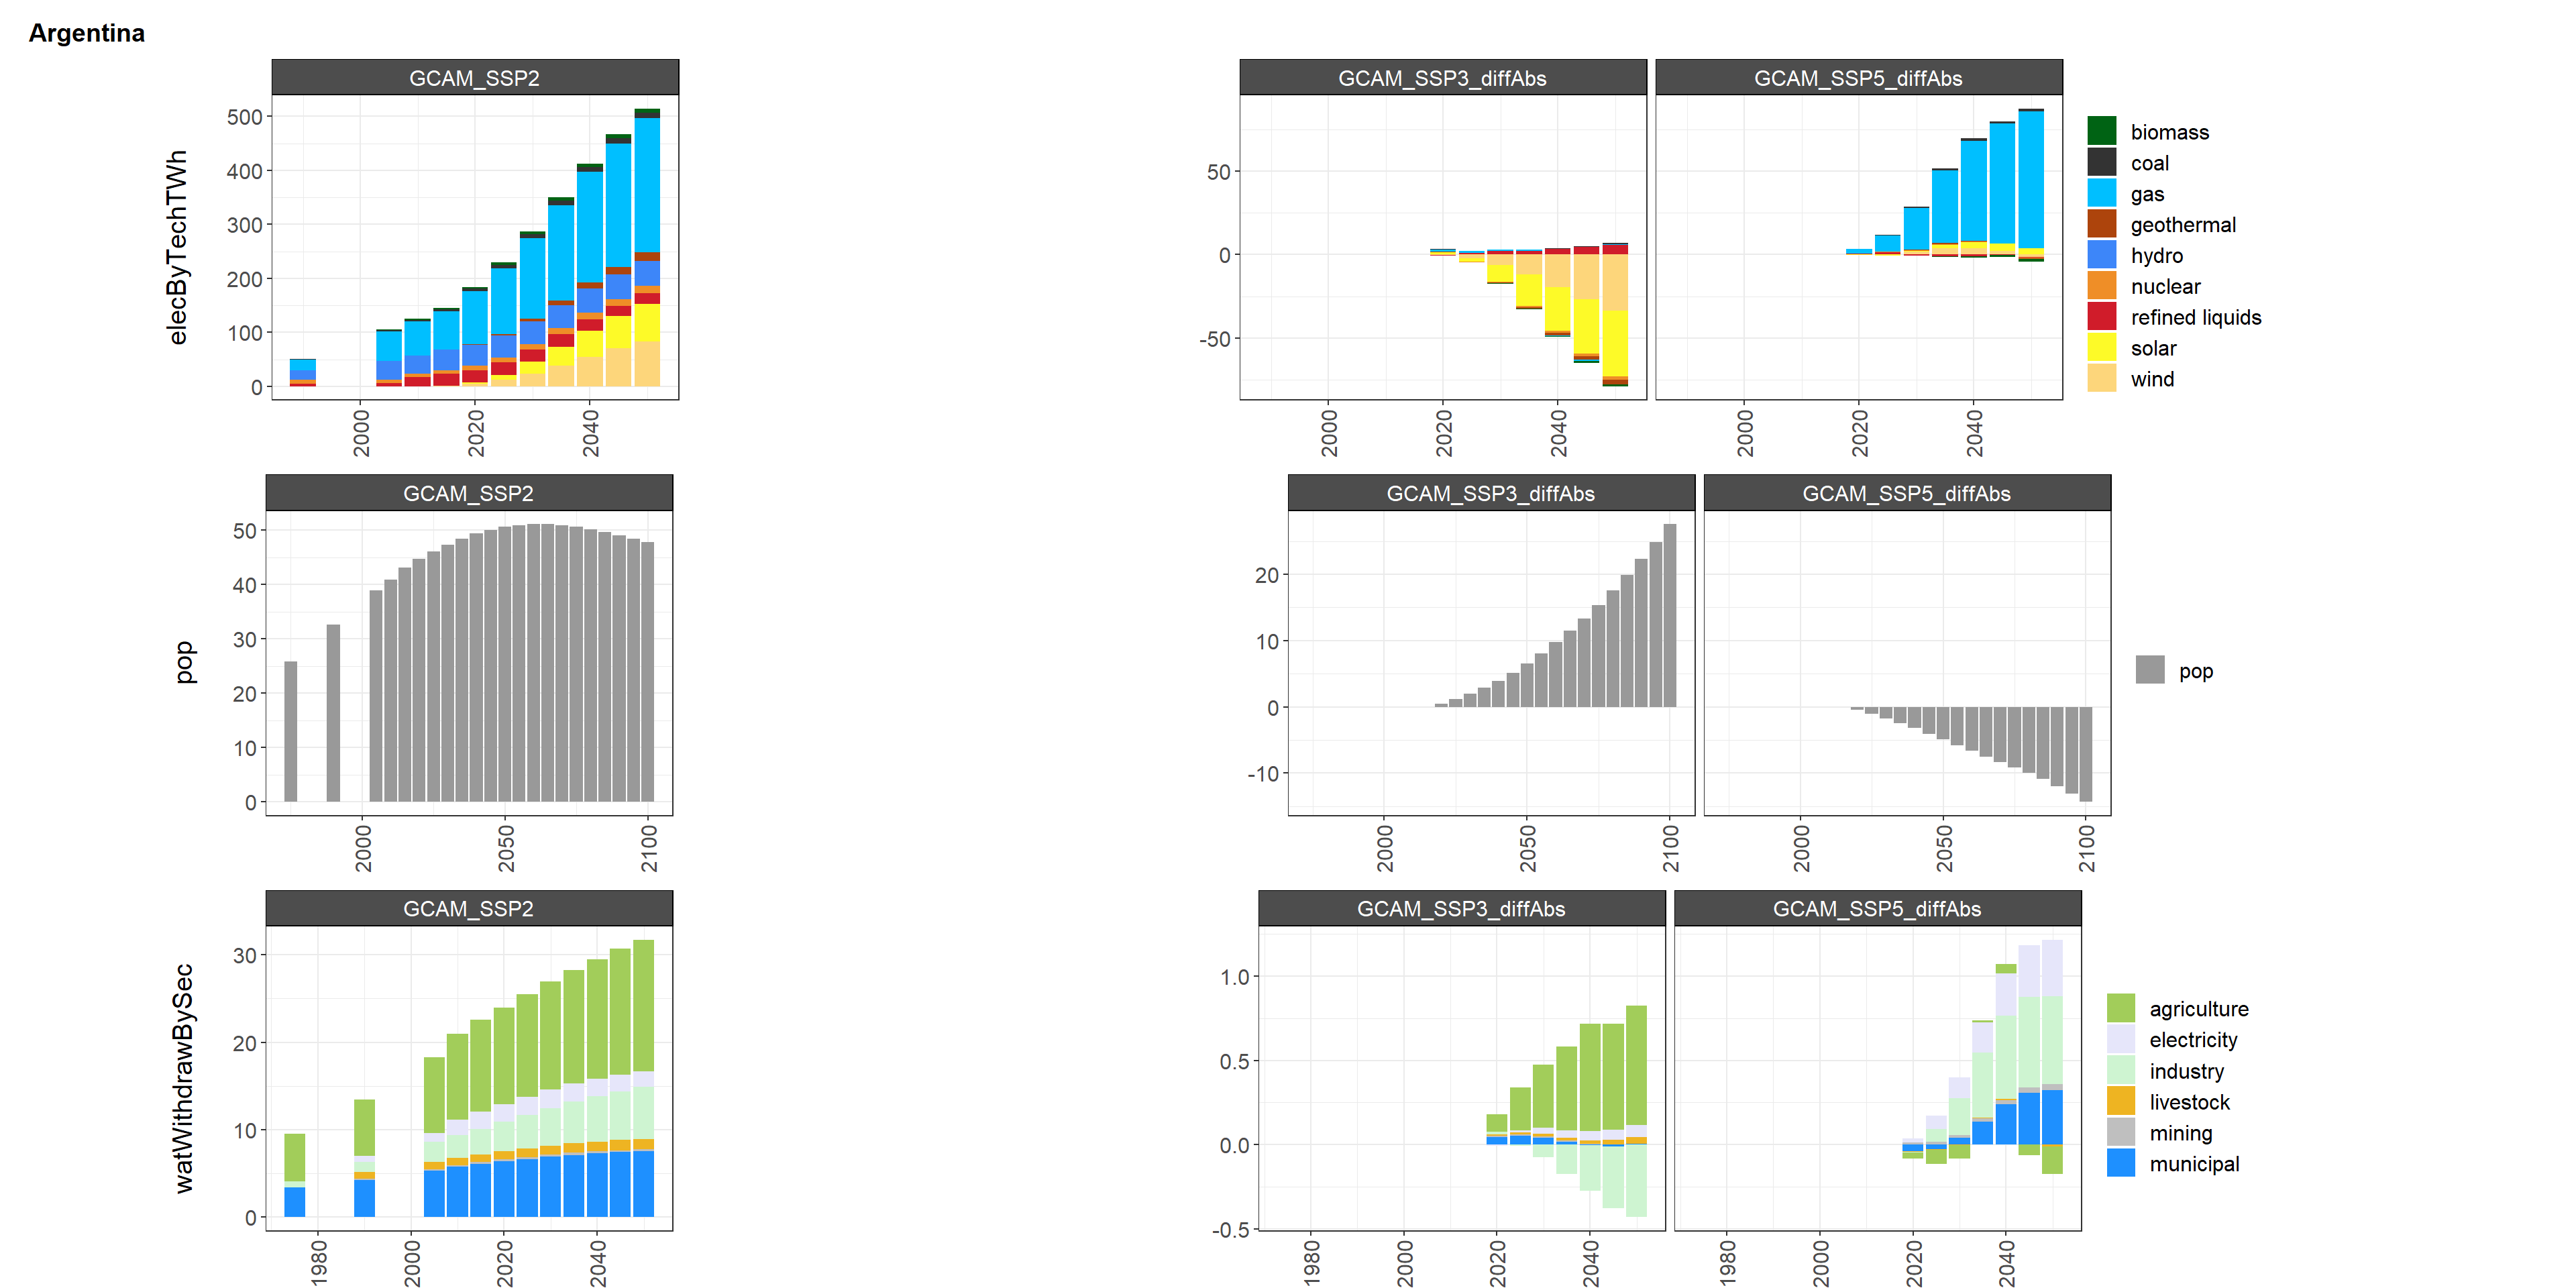
charts$chart_class_diff_percent_Argentina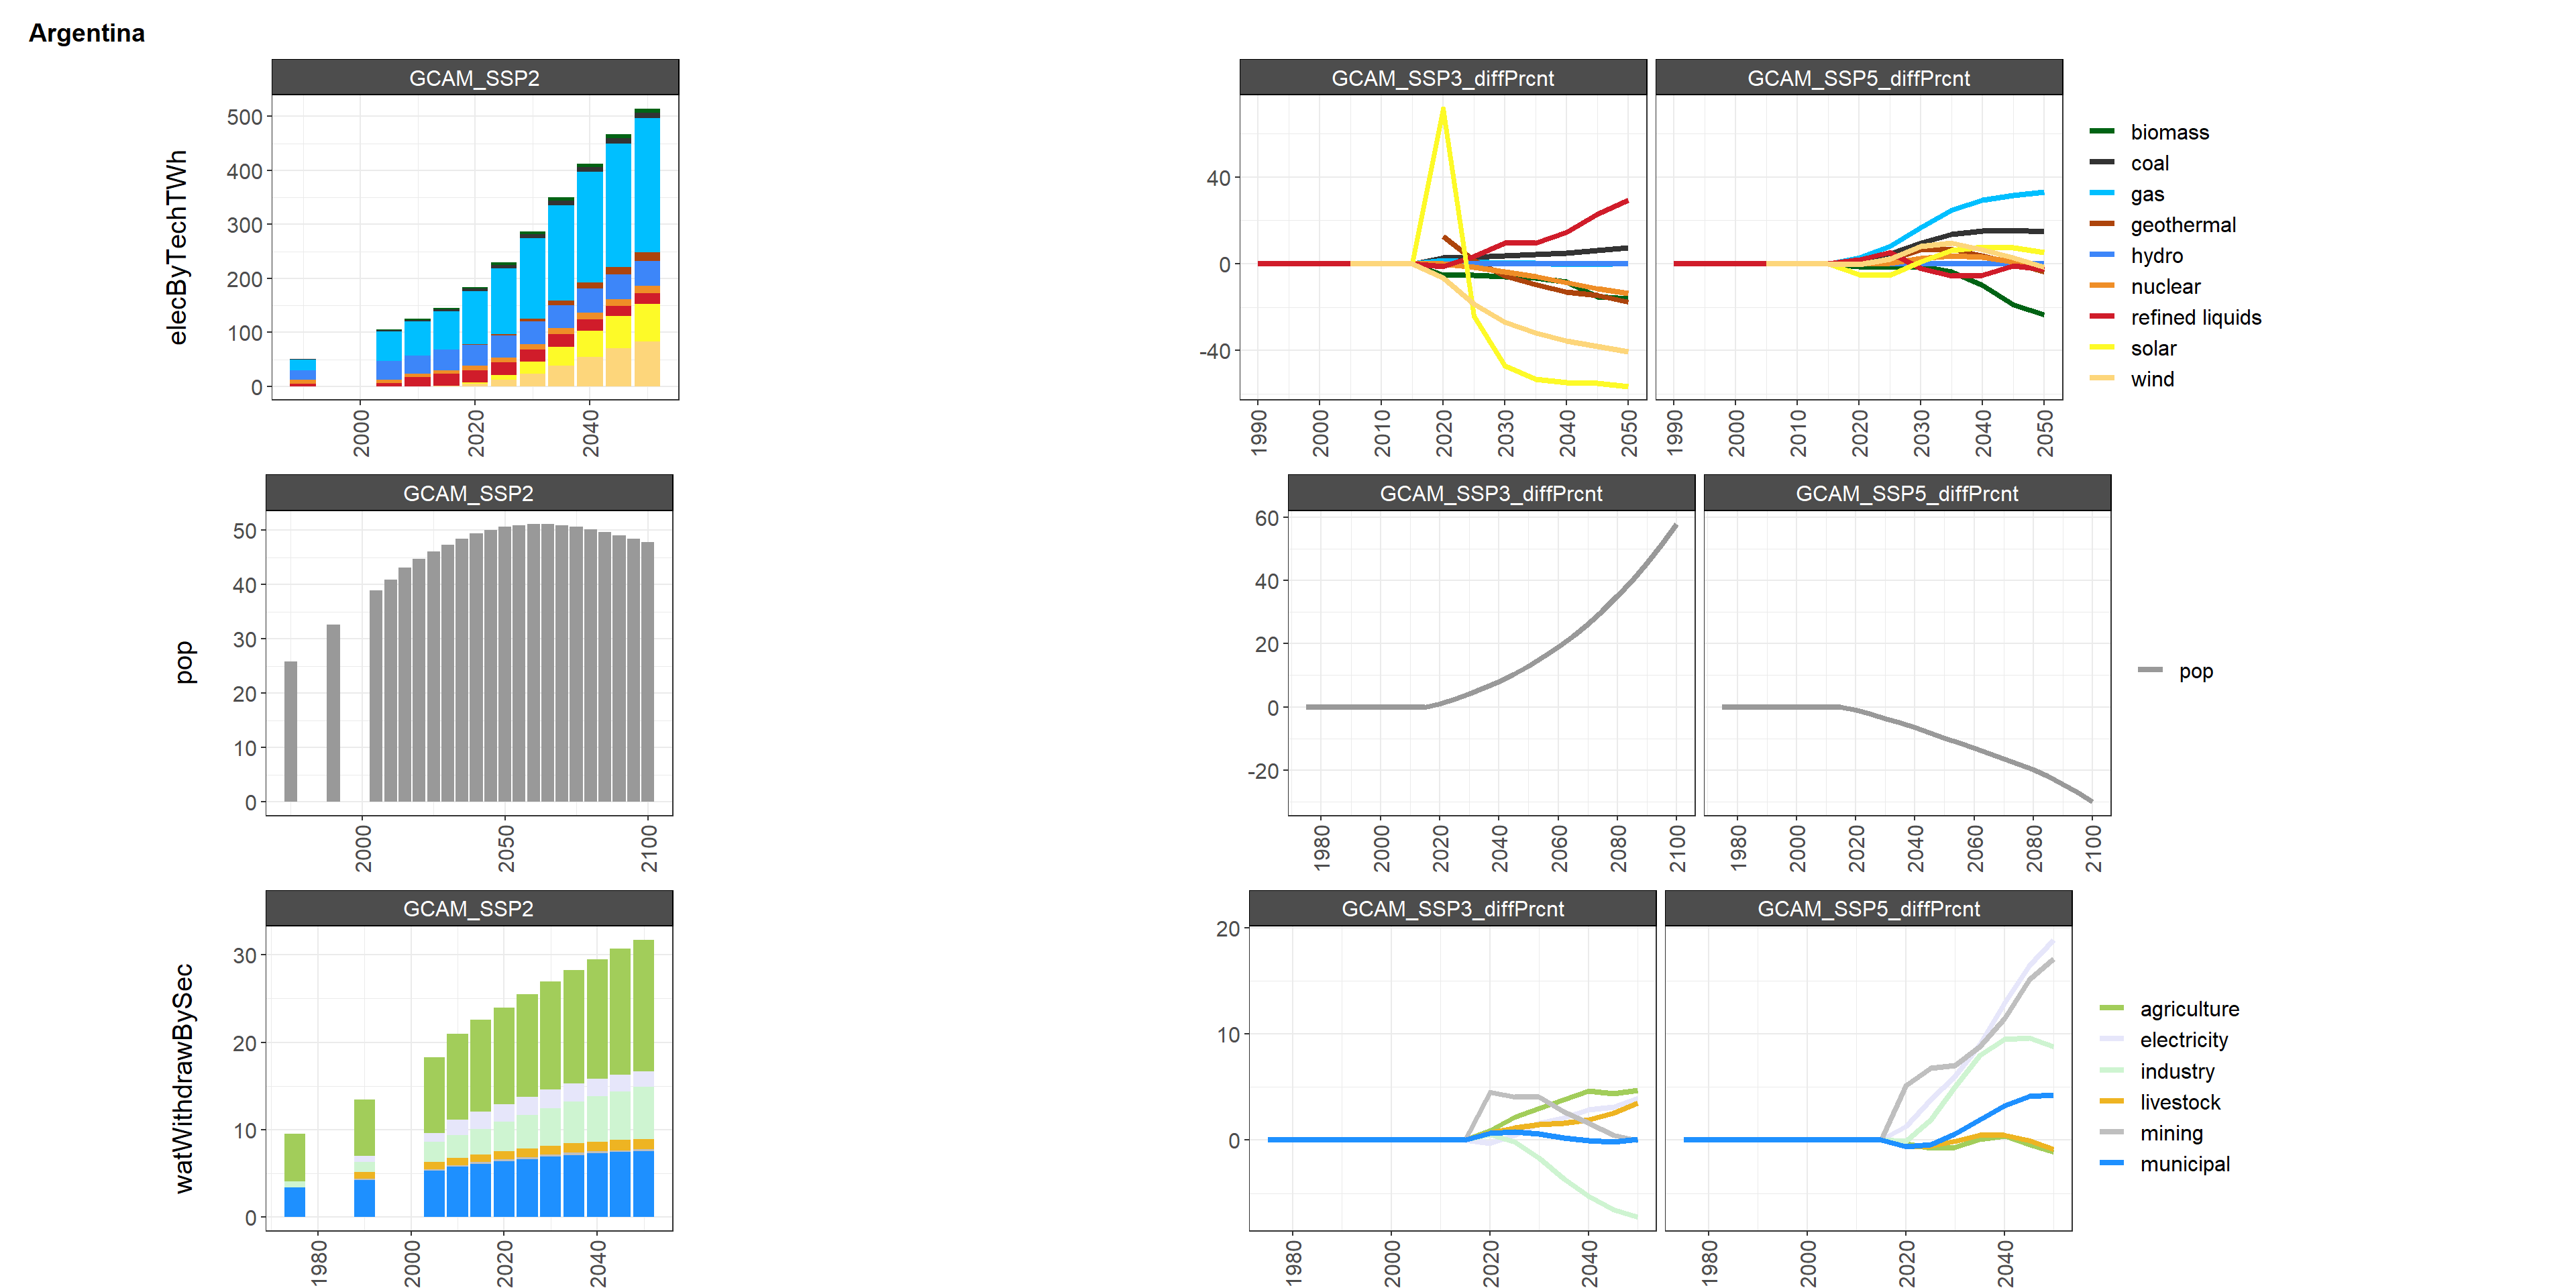
charts$chart_class_diff_absolute_Colombia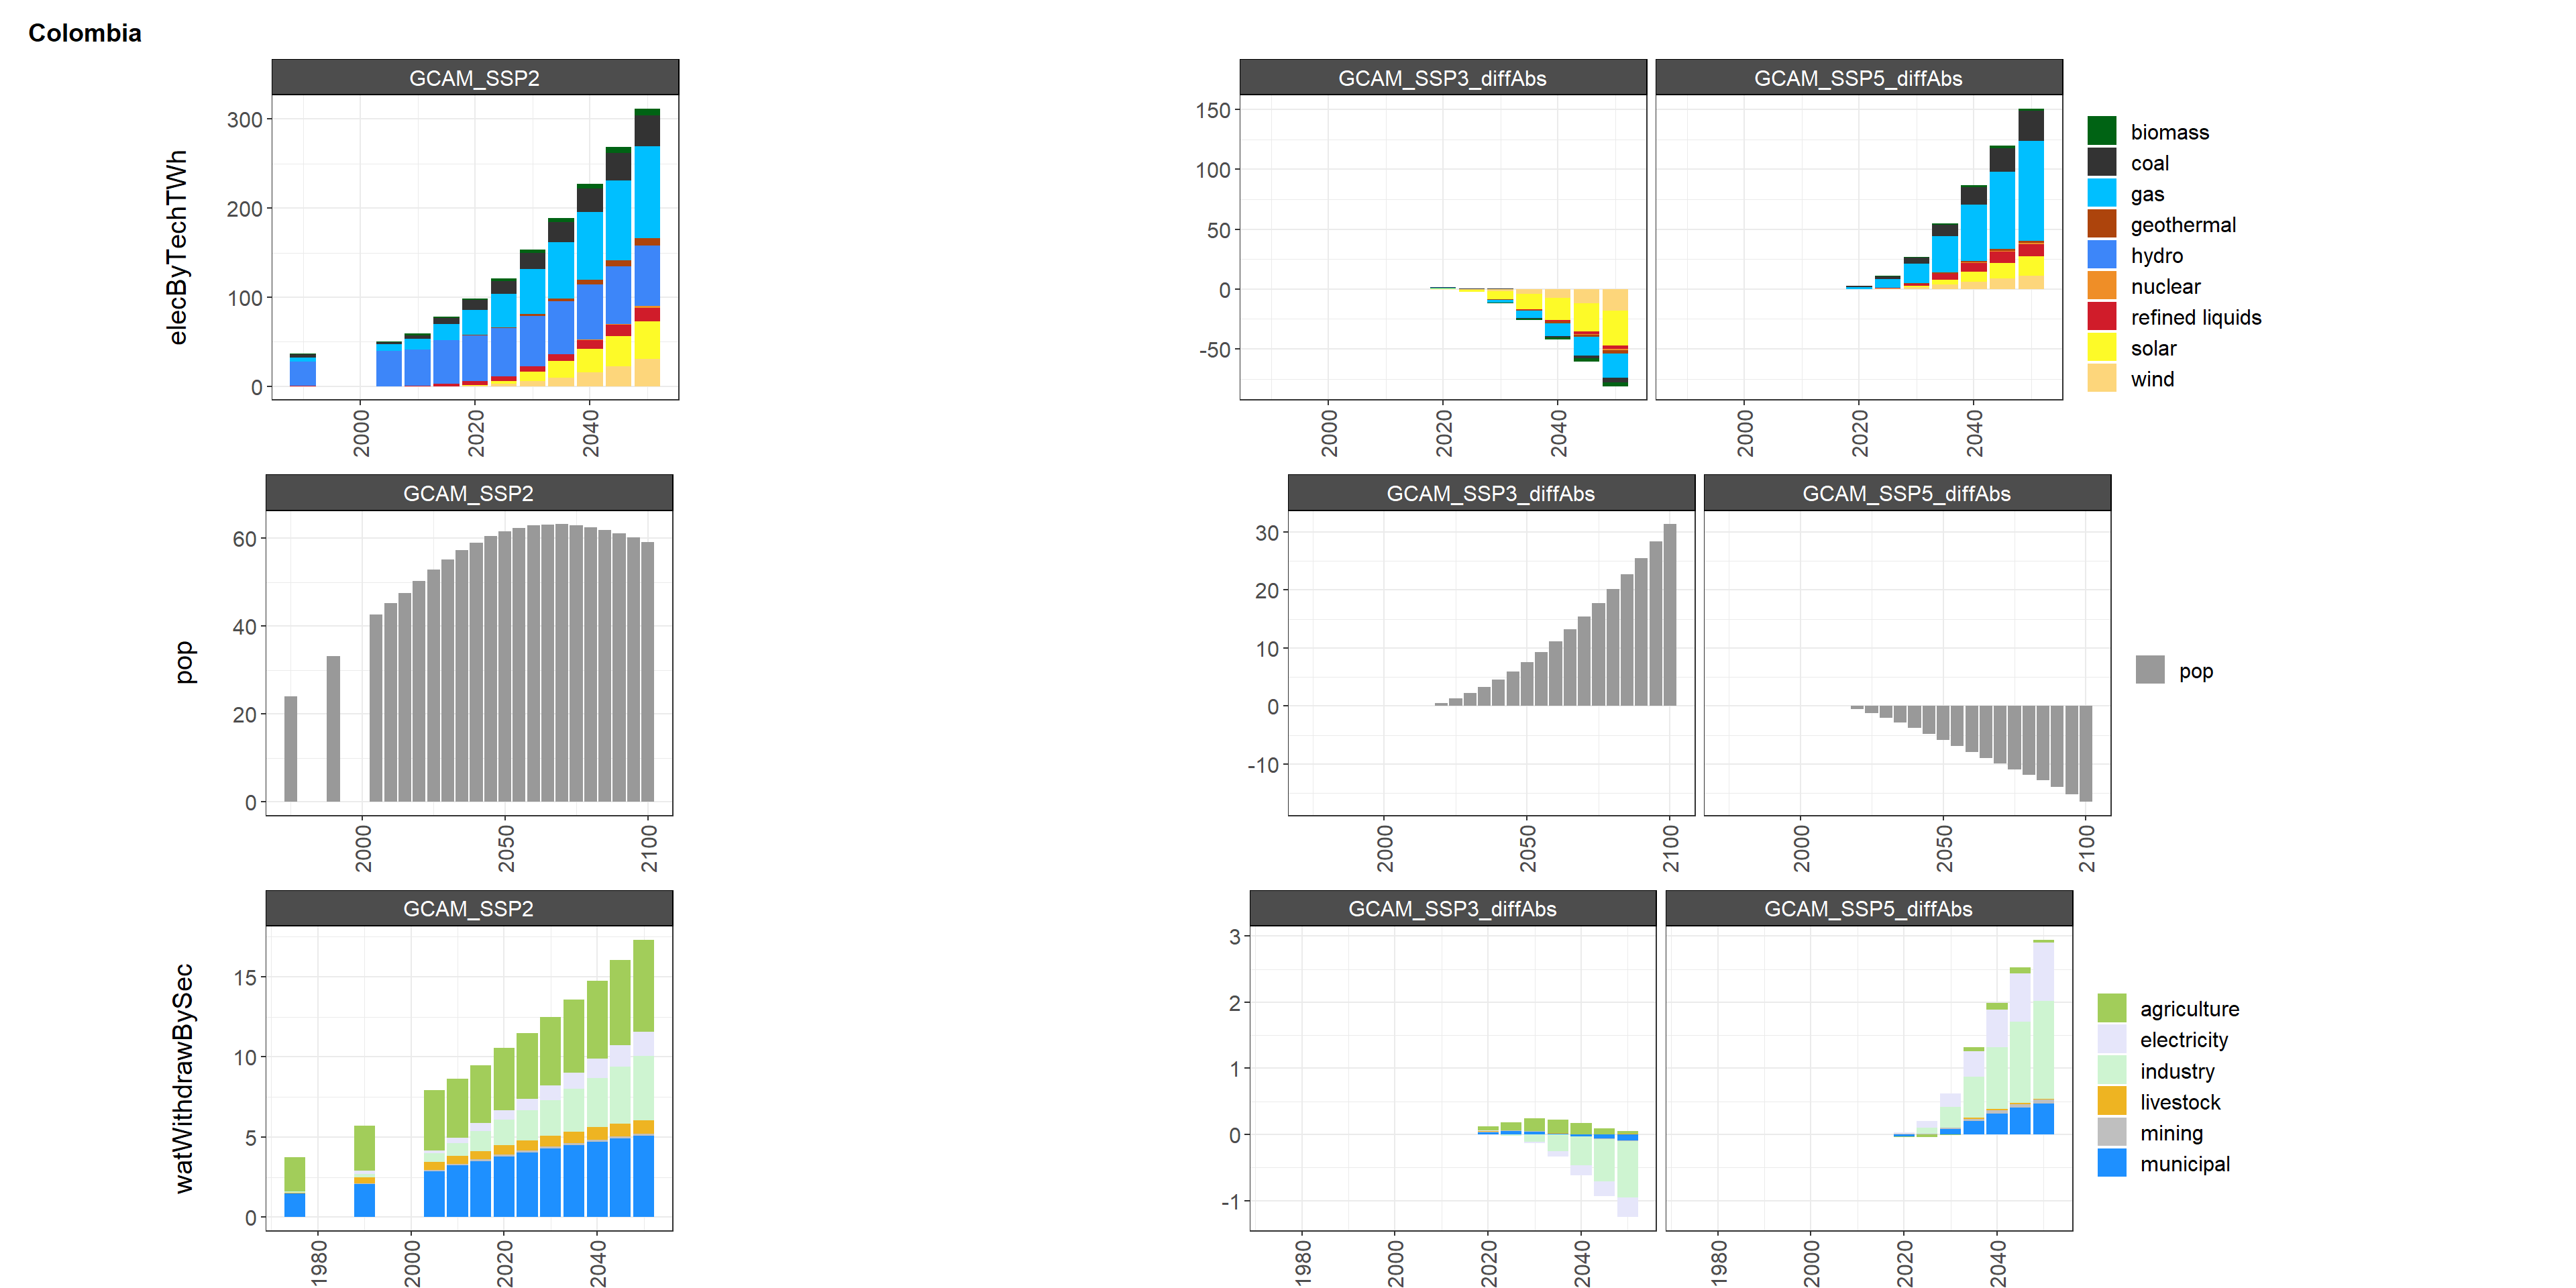
charts$chart_class_diff_percent_Colombia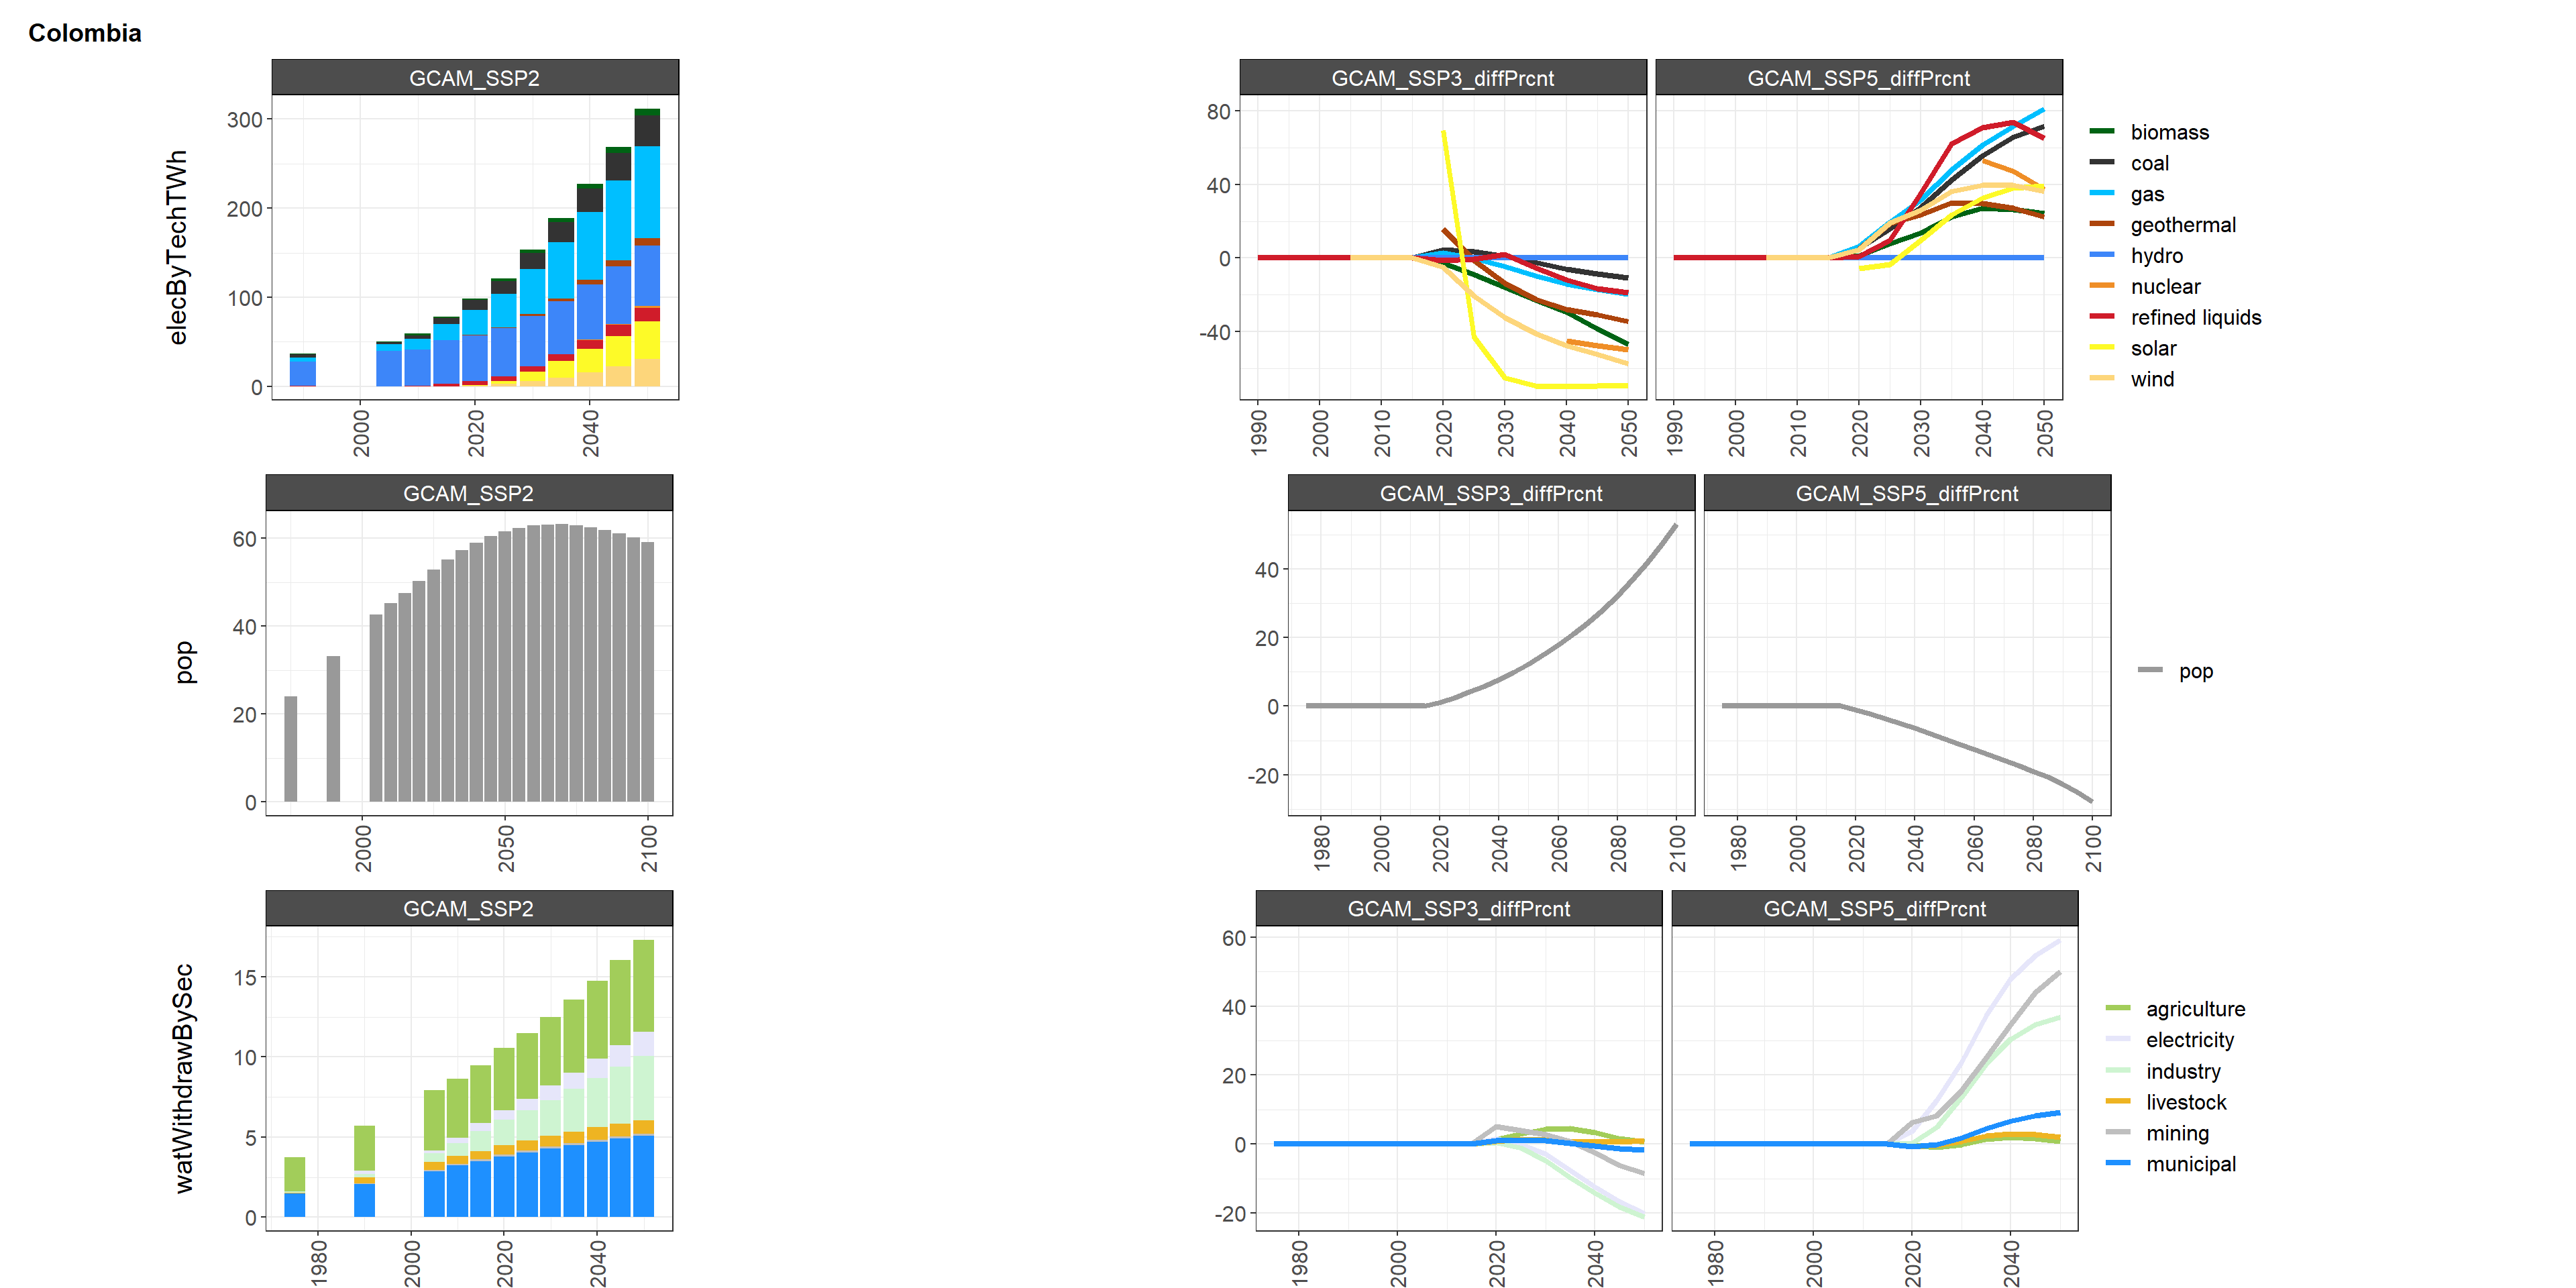
chart_region
charts$chart_region_absolute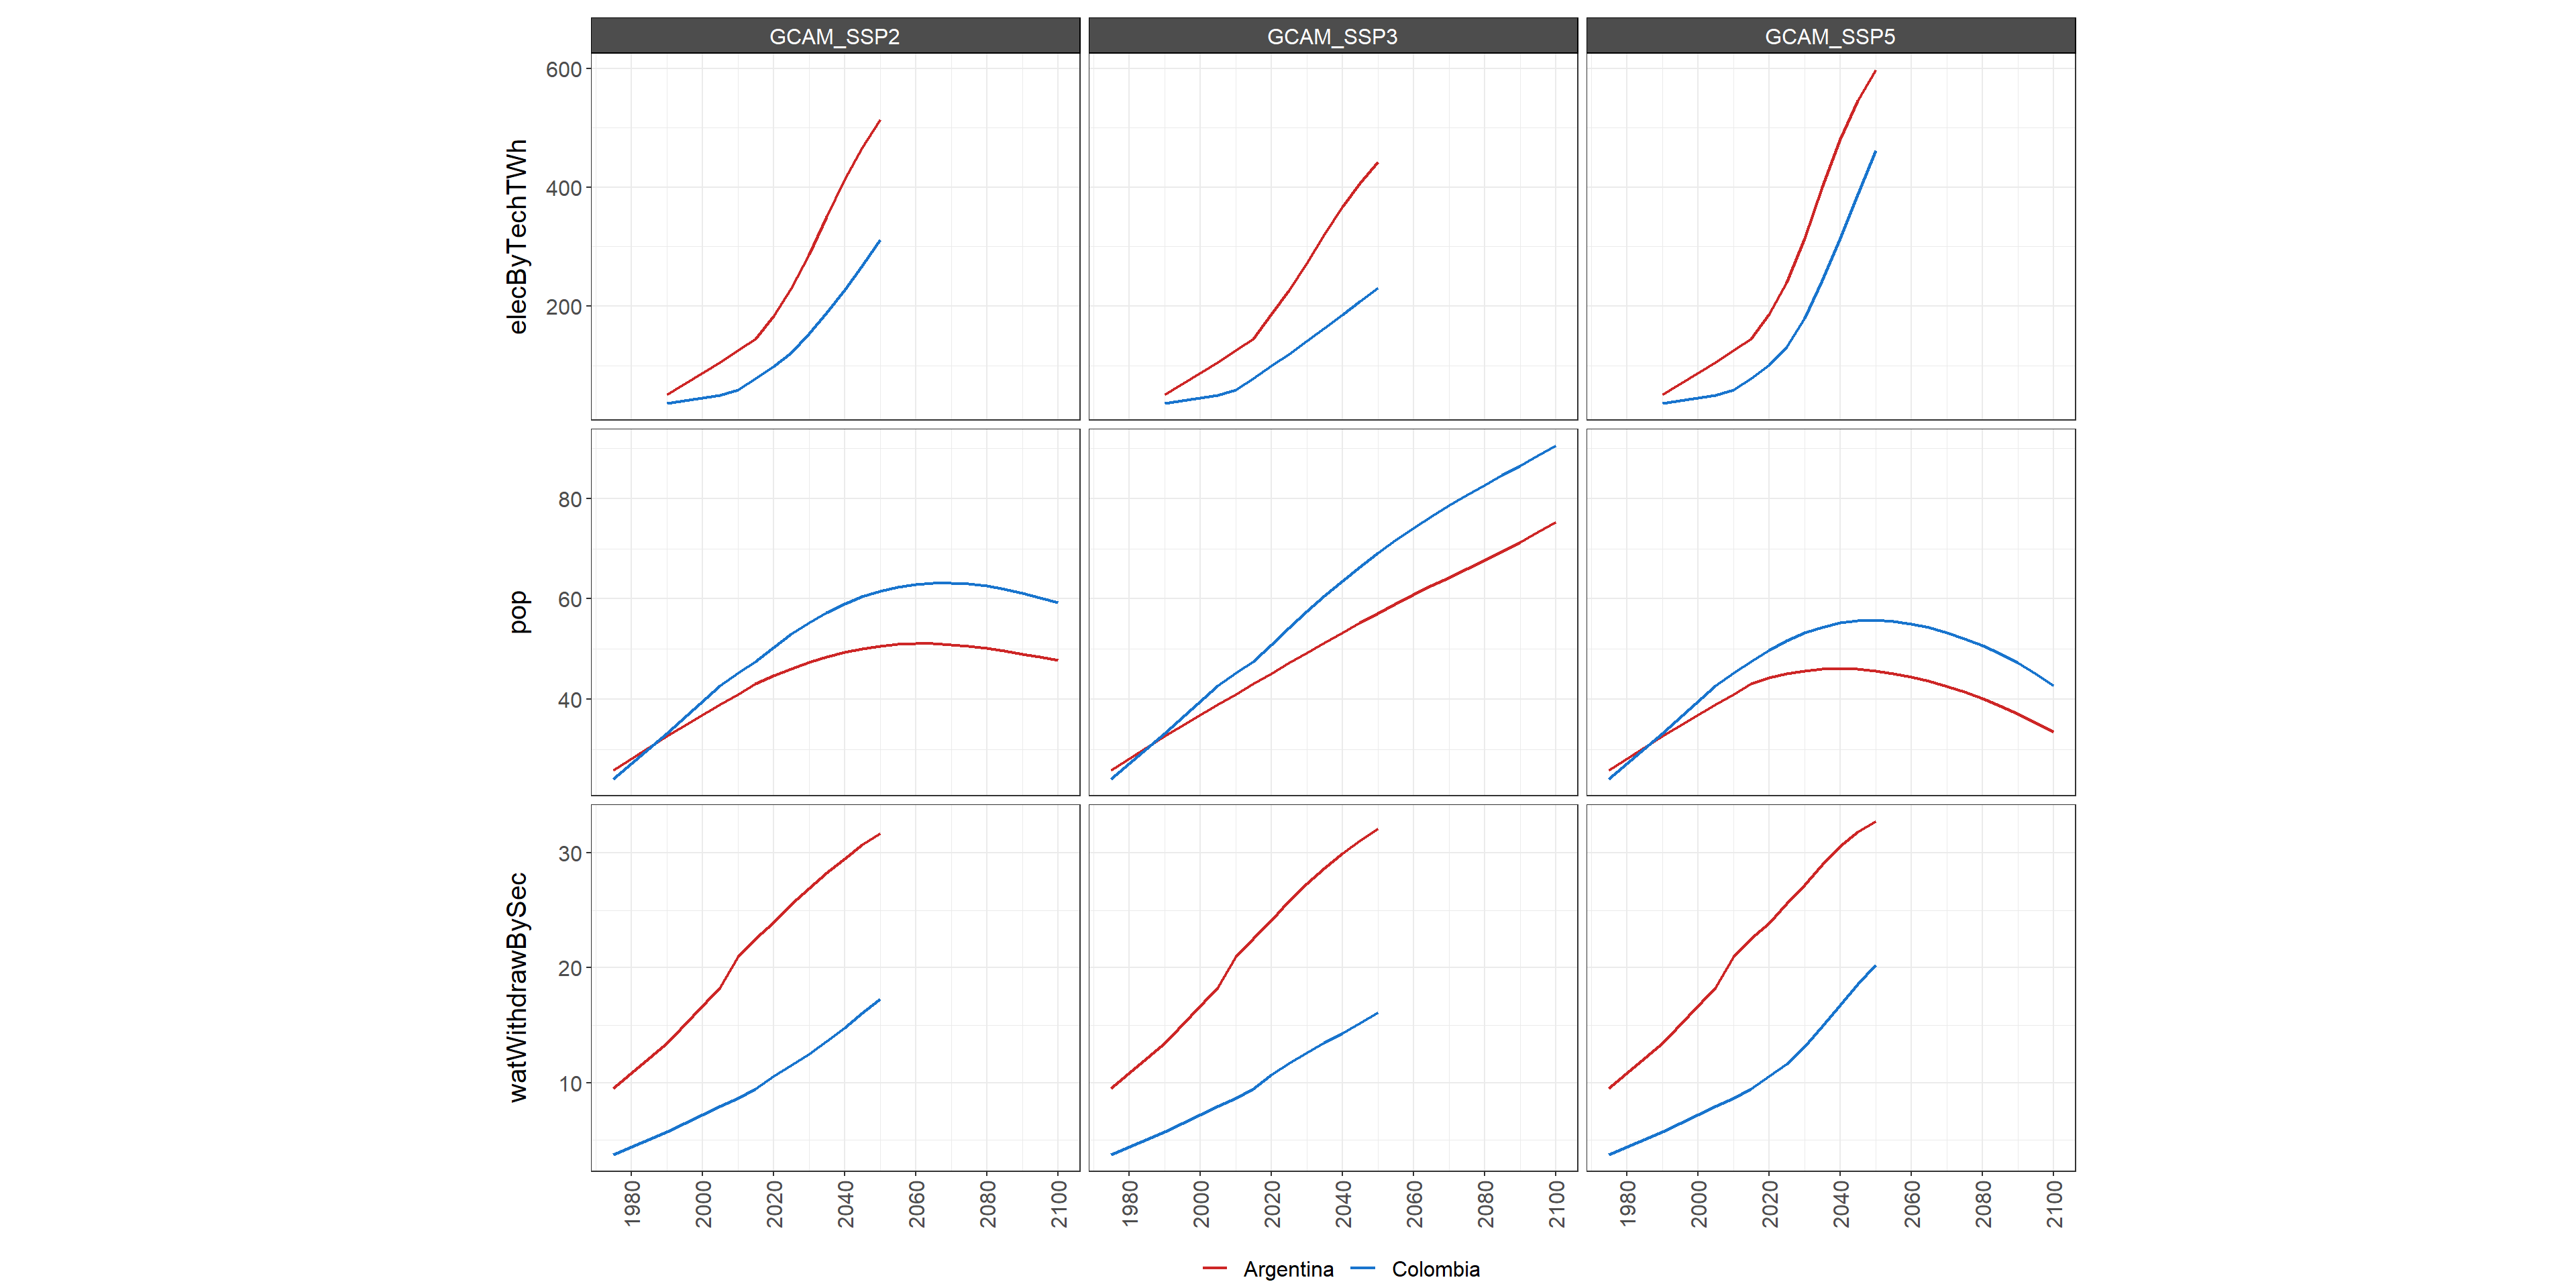
Git
From Stash(Bitbucket) to Github
This section discussed how to push a development branch of GCAM from stash onto github.
From Stash to Github
- Create a new repository in github: https://github.com/new
- Give it a relevant name such as
gcam_v5p4_projectx - Copy the clone address of the new repo e.g. https://github.com/USERNAME/gcam_v5p4_projectx.git
- Push your local stash branch changes up to this branch:
git push https://github.com/USERNAME/gcam_v5p4_projectx.git local_branch_name:new_branch_name- Continue to work stash branch as usual and also push up latest changes to github as above.
git status
git add files_changed
git commit -m "commit message"
git push https://github.com/USERNAME/gcam_v5p4_projectx.git local_branch_name:new_branch_name
Send to Zenodo
Large files from HPC to Zenodo
This section discusses how to send large files (upto 50GB) directly to zenodo from an HPC. For example a compiled zipped version of GCAM. Using a traditional method of uploading directly from the broswer often doesn’t work and keeps crashing during the upload. Using the method below you can submit the upload as a job.
HPC to Zenodo
- Prepare your zipped file and save it on the HPC: <path/to/my_zipped_file.zip>
- Sign-in to your Zenodo account
- DEPOSITION_ID is the first thing you need:
- Create a new upload, ask Zenodo to create a DOI, and save the draft.
- Look at the url in your browser while on your draft deposition
- Save the numeric part of the URL
- For example in https://zenodo.org/uploads/10014561 the deposition_id is 10014561
- PERSONAL_ACCESS_TOKEN is what you need next:
- Click on your name in the top right
- Click on Applications
- Click on new token and give it a name e.g. my_name_zenodo_pat
- Copy and Save the PAT in a safe place. You can only view it once during creation.
- It will be something like: 9cg22jj3nHSzdglTIOat6ABlyeYvnw07g1kv8tgFx7E2nbiTimf8Wur1kfFI
- BUCKET_URL: Next you need to get the bucket ID for
your deposition using the zenodo API
- On your HPC console (PuTTY) Use the following commands:
cd <path/to/my_files curl -H "Accept: application/json" -H "Authorization: Bearer <PERSONAL_ACCESS_TOKEN>" "https://www.zenodo.org/api/deposit/depositions/<DEPOSITION_ID>" > find_bucket.json # Example: curl -H "Accept: application/json" -H "Authorization: Bearer 9cg22jj3nHSzdglTIOat6ABlyeYvnw07g1kv8tgFx7E2nbiTimf8Wur1kfFI" "https://www.zenodo.org/api/deposit/depositions/10014561" > find_bucket.json- This will save the output to find_bucket.json. Open the file with an editor and search for “bucket”.
- Save the BUCKET_URL (e.g. https://zenodo.org/api/files/71e6b638-80a3-4f35-9c54-447490b4cb72)
- SEND TO ZENODO: Now you are ready to send your file
up to Zenodo:
- On your HPC console (PuTTY) Use the following commands:
cd <path/to/my_files> curl -v -# -X PUT -H "Accept: application/json" -H "Content-Type: application/octet-stream" -H "Authorization: Bearer <PERSONAL_ACCESS_TOKEN>" -T <path/to/my_zipped_file.zip> <BUCKET_URL>/<NAME_OF_ZIP_FILE>" # Example: curl -v -# -X PUT -H "Accept: application/json" -H "Content-Type: application/octet-stream" -H "Authorization: Bearer 5cg33jj3nHSadglTIOst7ABlyeYvnw07g1kv8tgFx7E2nbiTimf8Wur1kfFI" -T /rcfs/projects/gcims/projects/seasia/gcamv6p0_seasia.zip "https://zenodo.org/api/files/71e6b638-80a3-4f35-9c54-332490b4cb71/gcamv6p0_seasia.zip" - BASH Script: You can also do this by submitting a
job as follows:
- Create send_to_zenodo.sh script (Replace
PROJECT_ACCOUNT_NAME,
<path/to/my_zipped_file.zip>,<BUCKET_URL>,<NAME_OF_ZIP_FILE>)
#!/bin/sh #SBATCH --partition=slurm,short,shared #SBATCH --nodes=1 #SBATCH --time=300 #SBATCH --job-name=lhs #SBATCH -A <PROJECT_ACCOUNT_NAME> # README ----------------------------------------------------------------------- # # This script will send a zipped file up to Zenodo # sbatch send_to_zenodo.sh # # ------------------------------------------------------------------------------ echo "sending to Zenodo" date cd <PATH/TO/MY_FILES> curl -v -# -X PUT -H "Accept: application/json" -H "Content-Type: application/octet-stream" -H "Authorization: Bearer <PERSONAL_ACCESS_TOKEN>" -T <path/to/my_zipped_file.zip> <BUCKET_URL>/<NAME_OF_ZIP_FILE>" date echo 'completed'- Then submit the job:
sbatch send_to_zenodo.sh - Check your job status:
squeue -u <USERNAME> - Check your SLURM file to see if the file was succesfully submitted.
- Create send_to_zenodo.sh script (Replace
PROJECT_ACCOUNT_NAME,