GCAM v4.2 Documentation: GCAM User Guide
Documentation for GCAM
The Global Change Analysis Model
View the Project on GitHub JGCRI/gcam-doc
GCAM User Guide
1.Introduction
This document provides information on running and using a pre-existing GCAM model set-up including a model executable. For instructions on compiling GCAM see GCAM Compile Instructions.
This user’s guide is divided into two parts. First a GCAM “quickstart” guide with basic instructions on running GCAM and viewing results, followed by a more detailed GCAM User’s Guide.
2. GCAM Quickstart
This section provides a brief introduction on how to use the GCAM Model and view model data using the GCAM model interface. The instructions in this Quickstart guide should work with a GCAM distribution release that has been downloaded and uncompressed to your local machine.
2.1. Running a reference case scenario
GCAM requires a valid configuration.xml file be present in the exe directory of the GCAM workspace. You can run a reference scenario by copying the configuration_ref.xml that is provided in the distribution and renaming it to configuration.xml. Note that a log_conf.xml file is also necessary, but this should already be present in the exe directory. The configuration file is descried in more detail in the User’s Guide section, and should not need to be modified in order to run a reference case scenario. The User’s Guide describes how to create additional scenarios.
In order to run GCAM double click on the executable or run the executable from the command line. You should see log messages scroll up the screen as GCAM reads in xml files and begins solving each model period. Log information for each run can be found in exe/logs/main_log.txt.
After a successful model run the log file will end with the following text (depending on your set-up and platform, you might also see this on your screen):
Starting output to XML Database.
Data Readin, Model Run & Write Time: 1273.42 seconds.
Model run completed.
Model exiting successfully.
2.2 Viewing Model Results
Comprehensive model output from each scenario is stored in an XML database. (Note that the current BaseX database is not comparable with versions of GCAM and the GCAM model interface that use the .dbxml format.)
To view model output open the ModelInterface application. This multi-platform application is written in java and requires that java be installed on your machine.
Select Open from the Model Interface File menu and then select DB Open from the sub-menu. The default setting is that the XML database is located in the Output subdirectory and is called database_basexdb. Select database_basexdb and you should see the following on your screen:
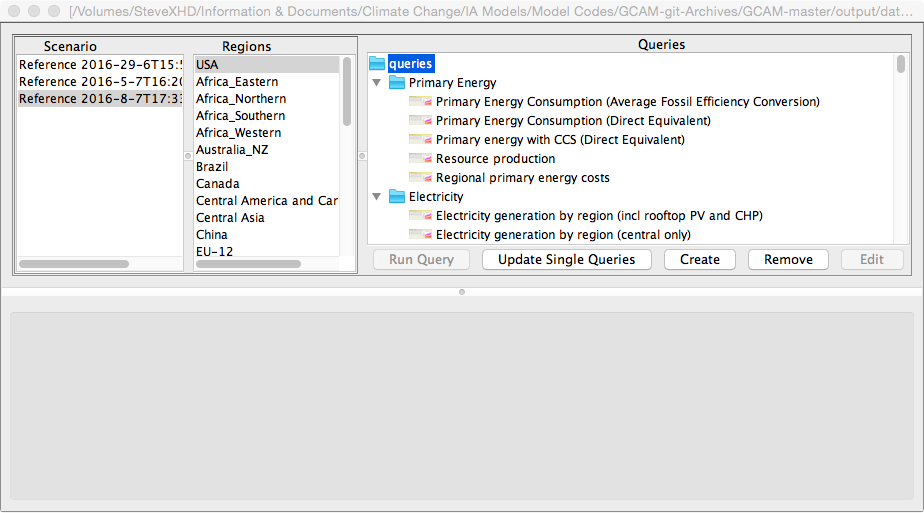
Figure UG-1: Screenshot of GCAM ModelInterface after an XML database has been opened, but before any queries have been run.
To view data select one or more scenarios, one or more regions, and one or more queries. The “Run Query” button will become available once one of each of these elements has been selected. Press this button and model output will appear as shown below:
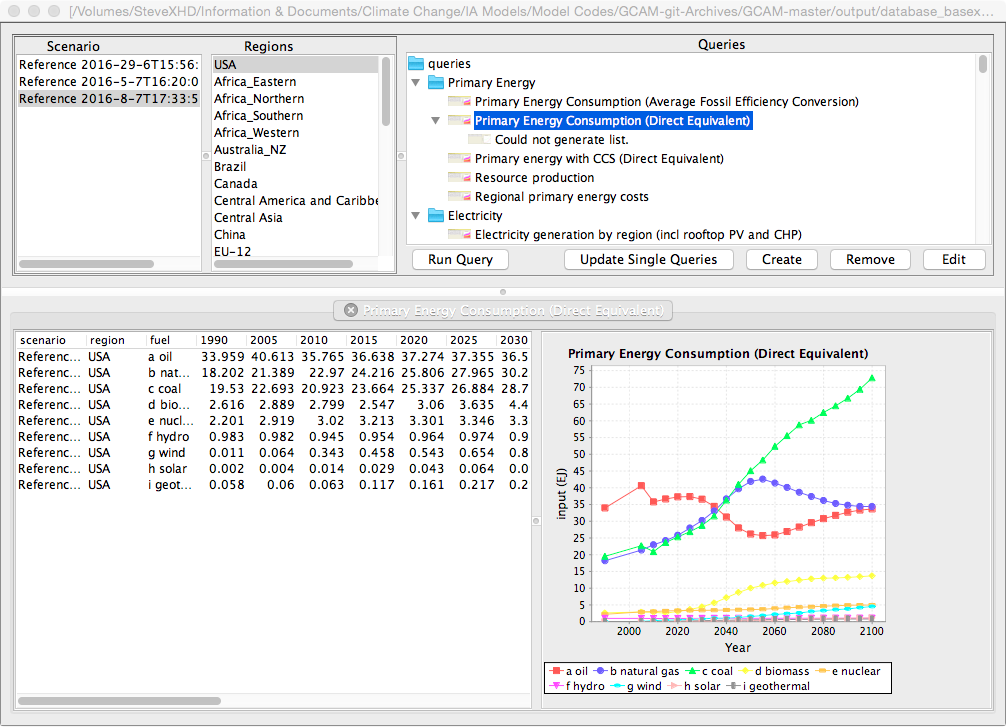
Figure UG-2: Screenshot of GCAM ModelInterface after a query has been run.
A tabular data display will appear on the left and a simple graphical output will appear on the right. If multiple queries were selected, these will open in different tabs.
Sorting: You can sort results in the Model Interface tables by clicking on the table heading. You can add secondary sorting by holding ctrl while click another column heading.
Copying Data: You can copy the table to Excel by selecting copy from the file menu and pasting it to a worksheet. Column labels will not copy. An output table can also be directly dragged to an Excel worksheet by clicking on the output tab and dragging to an open Excel worksheet. Graphs will not be copied, only data.
3. GCAM User’s Guide
This user’s guide contains the following sections:
3.1 Configuration File
The configuration file directs the GCAM executable as to what files to read in and allows the user to set various runtime and output options. A configuration file must always be present for GCAM run. The configuration file is divided into following sections:
| Config Section | Description |
|---|---|
| Files | Points GCAM to various core input and output file locations. The most common item in this block that might need to be changed is the xmldb-location. Changing this item allows the user to change the name and location of the output xml database. |
| ScenarioComponents | This is where GCAM reads in the data that define a scenario. Each entry has a name and a path that must point to a valid GCAM xml input file. Note that the name attribute of each ScenarioComponent is for readability only, these are not used by GCAM. |
| Strings | The primary component in this section that should be modified is the scenarioName, which should be a short descriptive name for the scenario. |
| Bools | These boolean variables alter how GCAM runs and allow some alternative modes for GCAM operation. |
| Ints | These integer variables set various GCAM run and output options. |
3.1.1 Scenario Components
The configuration_ref.xml file distributed with GCAM contains the list of input files that define the reference scenario for that GCAM release. Do not modify any of the original scenario component files. If you wish to make a change, make a copy of the file and modify the copy.
A common method of modifying a scenario is to add on additional components at the end of the list of scenario component files. Scenario components are read in order, and later data supersedes earlier data. A climate policy, for example, can be defined by adding a climate policy component. Examples of climate policy components can be found in the input/policy folder of the GCAM distribution.
For running multiple scenarios, Batch Mode is often more convenient.
3.1.2 <Files> Input Options
The following table summarizes the options available under the <Files> section of the configuration file. Note that for output files the write-output attribute is used to enable/disable output. The append-scenario-name attribute can be used to instruct GCAM to append the scenario name to the specified filename. See configuration_ref.xml for examples.
| File Tag | Description |
|---|---|
| xmlInputFileName | First XML file read in. In recent versions of GCAM this is used to readin the modeltime object, which sets the time intervals for GCAM. The modeltime object can only be read in once. |
| BatchFileName | Name of the batch file input. This will only be used if the BatchMode boolean is set to 1. |
| policy-target-file | Run the model in target finder mode. This will only be used if find-path boolean is set to 1. |
| GHGInputFileName | Default MAGICC input for GHG emissions time series. |
| xmldb-location | Location and name of xml output database |
| xmlOutputFileName | Output xml filename. This xml file contains a complete input dataset that will replicate this scenario. Note that these files can be very large. |
| xmlDebugFileName | Name of debug output file. For the specified debug-region (see below), a set of internal state variables will be output at the end of each model period. |
| climatFileName | Output file that contains the GHG and pollutant emissions that was passed to MAGICC. |
| outFileName | csv formatted GCAM output. Note These results are not maintained, users should prefer xmldb output instead. |
| costCurvesOutputFileName | Output for cost curves if createCostCurve is set to 1. |
| batchCSVOutputFile | csv output of a minimal set of variables. This is useful during large batch runs where creating an xml database would result in excessively large files. |
3.1.3 <Strings> Input Options
The following table summarizes the options available under the <Strings> section of the configuration file. These options should be strings, specified without quotes.
| File Tag | Description |
|---|---|
| scenarioName | Name of the scenario. This name will be embedded in output xml data. For batch file operation this name is the prefix to the final file name. |
| debug-region | String that specifies which region is used for debuging output (see xmlDebugFileName), which provides a dump, by model period, of GCAM internal state variables which can be useful for debugging and understanding results. |
| MAGICC-input-dir | Input directory for necessary MAGICC input files. This normally should not be changed. |
| MAGICC-output-dir | Directory for MAGICC model output files. |
3.1.4 <Bools> Input Options
The following table summarizes the options available under the <Bools> section of the configuration file. These values should be specified as either 1 or 0.
| File Tag | Description |
|---|---|
| CalibrationActive | Activates model calibration. Under normal operation this should be turned on. |
| BatchMode | Activates GCAM batch mode operation. A valid BatchFileName must also be specified. |
| find-path | Turn on path finding capability. A valid policy-target-file must also be specified. |
| createCostCurve | Turns on calculation of a CO2 cost curve. The model will be run multiple times to generate a CO2 cost curve, which will be integrated to estimate total policy costs. |
| debugChecking | Turns on some internal consistency checks. |
3.1.5 <Ints> Input Options
The following table summarizes the options available under the <Ints> section of the configuration file. These values should be specified as integers.
| File Tag | Description |
|---|---|
| numPointsForCO2CostCurve | Number of points to use in CO2 cost curve calcuation (if createCostCurve is turned on). |
| carbon-output-start-year | Starting year for carbon-cycle output in the XML database |
| climateOutputInterval | Output interval for climate data (concentrations, forcing, temperature, etc.) in the XML database |
| parallel-grain-size | A performance tuning option when GCAM is compiled with multi-threaded support. |
| stop-period | Specify an early model exit. Run up to and including the given period, -1 indicates run all periods. |
| restart-period | Instructs GCAM to trust read in market prices up but not including the specified period for the initial solution prices. This can be used in conjunction with stop-period to support checkpoint and restarting of a GCAM simulation. Setting a value beyond the final model period can also speed up target finder scenarios. |
3.2 GCAM Batch Mode
If running multiple scenarios, GCAM can also be run in Batch mode, in which a batch input file contains user-specified sets of add-on components that can be used to define multiple scenarios, which will then will all be run. In order to run in batch mode the BatchMode bool(ean) setting in the configuration file must be set to 1, and a batch input file must be specified as BatchFileName under <Files>.
The Batch file has the following format:
<BatchRunner>
	<ComponentSet name="Policy scenarios">
		<FileSet name="_set1">
		</FileSet>
		<FileSet name="_tax">
			<Value name="ctax">../input/policy/carbon_tax.xml</Value>
		</FileSet>
	</ComponentSet>
</BatchRunner>
The XML files within each FileSet block will be read in after the ScenarioComponents in the configuration file and then run. The scenario name of the run will be the name of each FileSet appended to the scenarioName in the configuration file.
If there are multiple ComponentSet blocks, then all permutations of FileSets within each ComponentSet will be run.
Note that there is also a batch functionality within the ModelInterface, which has a different format.
3.3 Target Finder
Enabling this mode for running GCAM involves specifying a policy target file and enabaling find-path. When run in this mode GCAM will run a scenario several times to find the optimal path to satisfy the configured climate goal. Running GCAM in such a mode can take quite a bit of time, one option to speed this up is to set restart-period to 22 in the configuration file as noted above. Example policy target files are supplied in input/policy and are self documented:
<policy-target-runner name="forcing_4p5">
    <!-- tax-name | default: CO2 | The market name to change the price on -->
	<tax-name>CO2</tax-name>

    <!-- target-value | no default | The target value such as concentration
         or forcing.
     -->
    <target-value>4.5</target-value>

    <!-- target-tolerance | default: 0.01 | The solution tolerance -->
    <target-tolerance>0.005</target-tolerance>

    <!-- path-discount-rate | default: 0.05 | The hotelling rate -->
    <path-discount-rate>0.05</path-discount-rate>

    <!-- max-iterations | default: 100 | The maximum  number of attempts to
         solve any given period.
     -->
     <max-iterations>100</max-iterations>

    <!-- target-type | default: concentration | The climate parameter which
         we are targeting.  The available ones are:
            concentration | CO2 (or possibly other gasses via the configuration
                            string: concentration-target-gas)
            forcing | Total radiative forcing
            stabilization | Stabilize CO2 (or possibly other gasses via the
                           configuration string: concentration-target-gas)
                           with disregards to what that concentration might be
            kyoto-forcing | Radiative forcing from Kyoto GHGs only
            rcp-forcing | Radiative forcing using the RCP definition
            temperature | Global mean temperature
            cumulative-emissions | Reach a cumulative emission goal for CO2
                                   emissions (or possibly other gasses via the
                                   configuration string: cumulative-target-gas)
     -->
    <target-type>rcp-forcing</target-type>

    <!-- first-tax-year | default: 2020 | The first year to start a tax in -->
    <first-tax-year>2020</first-tax-year>

    <!-- forward-look | default: 0 | Allow forward looking behavior by skipping
         this many periods.
     -->
    <forward-look>1</forward-look>

    <!-- stabilization | This is the default behavior is to stabilize the target
         overshoot year="2100" | Allow for an overshoot to hit in the target in
                                 given year.  If the year is not provided the
                                 last model year will be assumed.  If it is
                                 provided and before the last model year then
                                 it will have to stay on target after that year.
     -->
     <stabilization />

    <!-- max-tax | default: 4999 | Set a maximum tax to try in any given period
                                   to avoid extremely large taxes for which GCAM
                                   may have trouble solving.  Note that it may
                                   be possible the algorithm finds a solution
                                   with tax values capped at max-target for some
                                   years in which case the user should increase
                                   the max-tax.  If the actual solution price
                                   lies above max-tax the algorithm will fail.
     -->
    <max-tax>4999</max-tax>
</policy-target-runner>
Note that target finder runs can also be configured in Batch mode. In this case you should leave the find-path bool to 0. Note the policy-target-file are specified in their own section, and <single-scenario-runner /> indicates to run a permutation with no target finding, e.g. the reference scenario:
<BatchRunner>
    <ComponentSet name="Policy scenarios">
        <FileSet name="FFICT_">
            <Value name="land-policy">../input/policy/global_ffict.xml</Value>
        </FileSet>
        <FileSet name="UCT_">
            <Value name="land-policy">../input/policy/global_uct.xml</Value>
        </FileSet>
    </ComponentSet>
    <runner-set name="policy-target-runner">
        <Value name="6p0target">../input/policy/forcing_target_3p7.xml</Value>
        <Value name="4p5target">../input/policy/forcing_target_4p5.xml</Value>
        <Value name="2p6target">../input/policy/forcing_target_2p6_overshoot.xml</Value>
        <single-scenario-runner />
    </runner-set>
</BatchRunner>
3.4 ModelInterface
The model interface is a GCAM tool to view GCAM results from the BaseX XML database or convert CSV files to XML. You may find a copy at the top level of your release package and can be run by double clicking the ModelInterface.jar (on Mac this will be ModelInterface.app). This section will focus mainly on viewing results. It can be used in an interactive mode or users can set up batch query files to automate dumping results to CSV or XLS.
3.4.1 Interactive Mode
Please see the Quick Start section for the basics on how to open an database and run queries. The Scenarios and Regions sections get populated automatically from the GCAM results that are stored in the database. The Queries are loaded from a query file. You can check the model_interface.properties file which is located in the folder as the ModelInterface.jar:
<entry key="queryFile">../Main_User_Workspace/output/queries/Main_queries.xml</entry>
Each query is represented in it’s own XML syntax such as:
<emissionsQueryBuilder title="GHG emissions by region">
    <axis1 name="GHG">GHG</axis1>
    <axis2 name="Year">emissions</axis2>
    <xPath buildList="true" dataName="emissions" group="false" sumAll="false">*[@type = 'sector' (:collapse:) or @type = 'resource' (: collapse :)]//*[@type = 'GHG']/emissions/node()</xPath>
    <comments/>
</emissionsQueryBuilder>
This XML can be copied directly out of the ModelInterface by using Ctrl-C (or CMD-C on Mac) and pasted back into the Model Interface or as text elsewhere such as email. Similarly the XML text can be copied out of an email and pasted back into the Model Interface using Ctrl-V (or CMD-V on Mac). This is a handy short cut for sharing or editing queries. You will notice when queries are modified a * appears at the root of the qeries. You can choose to File -> Save to update the underlying query file or use File -> Save As to save and switch to a new query file.
3.4.2 ModelInterface Batch Modes
When doing scenario analysis on GCAM results it is often very useful to predefine the set of queries you would like to look at and automatically save the results to CSV or XLS format for plotting or making tables, etc. Setting up the Model Interface to do this is done in one or two steps depending on the level of automation you would like.
First you must set up a “batch query” file. An example of such a file can be found in output/gcam_diagnostics/batch_queries/Model_verification_queries.xml. The idea of such a file is you list the quries you would like to run one after the other and for each query you include the regions (which can be any of the ones listed in the Regions section of the GUI) you would like to query.
<queries>
    <aQuery>
        <region name="USA" />
        <region name="Canada" />
        <gdpQueryBuilder title="GDP by region">
            <axis1 name="region">region</axis1>
            <axis2 name="Year">gdp-mer</axis2>
            <xPath buildList="true" dataName="gdp-mer" group="false" sumAll="false">GDP/gdp-mer/text()</xPath>
            <comments/>
        </gdpQueryBuilder>
    </aQuery>
The actual queries are of the same format as described above and can be copied out of a query file or pasted from the Model Interface.
Users can run this “batch query” file from an interactive Model Interface session by selecting File -> Batch File and selecting the “batch query” file they wish to run. Users are then asked where to save the results (.csv saves as CSV and .xls saves to excel) and which scenarios to run.
Alternatively if users prefer to set up a workflow that does not require any manual user interaction they may prefer to set up a “batch command” file as well. An example of such a file can be found at output/gcam_diagnostics/batch_queries/xmldb_batch.xml:
<ModelInterfaceBatch>
    <!-- Note multiple sets of the following are allowed to run several
         batch queries sequentially.
      -->
    <class name="ModelInterface.ModelGUI2.DbViewer">
        <command name="XMLDB Batch File">
            <!-- List all the scenarios to query, if no scenario are given then
                 the last scenario in the database will be queries. Note that if
                 multiple scenarios have the same name the latest one will be used,
                 to differentiate explicitly define the date with date="..." in the
                 scenario tag.
              -->
            <scenario name="Core_Ref"/>

            <!-- The Batch queries to run -->
            <queryFile>batch_queries/Model_verification_queries.xml</queryFile>
            <!-- Where to write results -->
            <outFile>gcam_data/Core/reference.csv</outFile>
            <!-- Which database to query -->
            <xmldbLocation>../database_basexdb</xmldbLocation>
            <!-- Additinoal query options which will be ignored when saving to CSV -->
            <batchQueryResultsInDifferentSheets>false</batchQueryResultsInDifferentSheets>
            <batchQueryIncludeCharts>false</batchQueryIncludeCharts>
            <batchQuerySplitRunsInDifferentSheets>false</batchQuerySplitRunsInDifferentSheets>
            <batchQueryReplaceResults>true</batchQueryReplaceResults>
        </command>
    </class>
</ModelInterfaceBatch>
Users can the invoke the Model Interface from the command line to call their batch file and no user interface will be presented:
java -jar ../../ModelInterface/ModelInterface.jar -b batch_queries/xmldb_batch.xml