GCAM v4.3 Documentation: GCAM Build Instructions
Documentation for GCAM
The Global Change Analysis Model
View the Project on GitHub JGCRI/gcam-doc
GCAM Build Instructions
1.Introduction
This section is for users that wish to compile GCAM C++ source code into an executable. Note most users can just use the Mac or Windows binaries provided in the GCAM release as most scenario modifications are done by changing XML input files. Users may need to re-compile the C++ source code for reasons such as:
- For use on general POSIX systems or a version of Mac or Windows for which the released binary was not compatible.
- To add new features or otherwise customize the model.
GCAM provides a generic Makefile as well as Xcode and Visual Studio project files. It relies on the following third party libraries. Mac and Windows users should be able to use the libraries provided, otherwise see the section on building third party libraries.
- Boost C++ Libraries, details here
- Xerces C++ XML Parser, details here
- Java, required to write XML DB results. See below for more details.
In addition users will have to download the Hector submodule.
Note that, in a departure from past releases, in addition to compiling the C++ GCAM code, creating a GCAM executable now also requires compiling hector and (if not using the release version of the libraries) compiling boost libraries.
2. Building Third Party Libraries
This section details where to get and how to build the additional software required to re-compile and run GCAM. In addition some notes beyond those provided by the source as it pertains to GCAM. All of these required software are open source and/or available free of charge. Note: Mac and Windows binary packages (with the exception of Boost due to its large size) will already include these libraries and users only need to follow these instructions if they have a specific need to rebuild them.
2.1 Boost
Boost includes many general purpose utilities for the C++ language and helps GCAM compile correctly across most platforms. The library can be downloaded from Boost. The version released with GCAM was 1.62 however any recent version should work. GCAM now requires the header files and to build the system and filesystem libraries. The Xcode and Visual Studio project files will expect boost to be located in <GCAM Workspace>/libs and where the folder unziped after downloading boost_1_62_0 is either renamed or symlinked to boost-lib. When building using the Makefile they can be located anywhere and are referenced by setting an environment variable.
2.1.1 Building Boost Windows Notes
Users can look at Boost documentation for building the needed libraries. On Windows boost users will need to use the Developer Command Prompt for VS20NN (and they may need to run as Administrator) to ensure the C++ compiler can be found to build boost. In addition they will need to ensure the libraries are built as 64-bit:
cd <GCAM Workspace>/libs/boost-lib
./bootstrap.sh --with-libraries=system,filesystem
./b2 address-model=64 stage
2.1.2 Building Boost Mac Notes
Users can look at Boost documentation for building the needed libraries. Note for users who want to use Xcode to build, the default project file setting is to use libc++ instead of libstdc++ so you should build boost accordingly.
It is generally simplest to build using the command line by using the following commands:
cd <GCAM Workspace>/libs/boost-lib
./bootstrap.sh --with-libraries=system,filesystem
./b2 cxxflags="-stdlib=libc++" linkflags="-stdlib=libc++" stage
Note on the Mac the prefix seems to get ignored. So users will want to change to relative path install names instead by using the following commands:
cd <GCAM Workspace>/libs/boost-lib/stage/lib
install_name_tool -id @rpath/libboost_system.dylib libboost_system.dylib
install_name_tool -id @rpath/libboost_filesystem.dylib libboost_filesystem.dylib
install_name_tool -change libboost_system.dylib @rpath/libboost_system.dylib libboost_filesystem.dylib
2.1.3 Building Boost POSIX Notes
Users can look at Boost documentation for building the needed libraries. Generally it will be something like:
cd <GCAM Workspace>/libs/boost-lib
./bootstrap.sh --with-libraries=system,filesystem --prefix=<GCAM Workspace>/libs/boost-lib/stage/lib
./b2 stage
2.2 Xerces XML Parser
We use the Xerces C++ XML parser for reading in XML, the format in which all GCAM inputs and configurations are specified in. The library can be downloaded from Apache, the C++ version is the one to get. The version released with GCAM was 3.1.1 but any recent version should work.
Once you expand the xerces zip or tar file, you can find detailed installation instructions for building and installing the library in doc/html/index.html. You can follow the instructions there appropriate for your platform.
2.2.1 Xerces Windows Notes
GCAM requires the 64-bit version of the library to be built. This means you should change the build configuration to Release and the Solution Platform to x64 when building the library. Only the core library is needed, the command line tools and tests are not necessary. Once built you can copy (or symlink using mklink /D, note administrative privileges may be required to run this command) the build artifacts to where the Visual Studio project file is expecting them:
<GCAM Workspace>/libs/xercesc/include
<GCAM Workspace>/libs/xercesc/lib
In addtion you should copy xerces-c_3_1.dll into <GCAM Workspace>/exe.
2.2.2 Xerces Mac or POSIX
GCAM requires the 64-bit version of the library to be built. In addition users have had trouble linking with the cURL library which isn’t necessary for running GCAM so you could disable that. The follow could be used as a template for building the library:
Set the following environment variables:
XERCES_SRC: Set to the top-level directory created when you unpacked the xerces zip or tar file.XERCES_INSTALL: Set to the directory in which you want to install xerces.
Example:
export XERCES_SRC=$HOME/GCAM/build/xerces-c-3.1.1
export XERCES_INSTALL=<GCAM Workspace>/libs/xercesc
With these variables set, you can configure and build xerces as follows:
cd $XERCES_SRC
./configure CFLAGS="-arch x86_64" CXXFLAGS="-arch x86_64" --prefix=$XERCES_INSTALL --disable-netaccessor-curl
make install
After installing xerces, you can optionally delete all the intermediate files that were generated during the xerces build by running:
make clean
2.3 Java
Java is required by GCAM in order to store results in a BaseX XML database, which itself is written in Java. GCAM will use the Java Native Interface to interact with the database. Since BaseX is written in Java it is inherently cross platform thus building it is not discussed here. GCAM uses version 7.9 of the BaseX library, which is the last version which still supports Java 1.6. GCAM, therefore requires Java version 1.6 or newer. The official Oracle version or the open source version should work (both are free to install). Some additional notes:
2.3.1 Disable Java
GCAM can be configured to compile without Java support, doing so implies GCAM results are not written to the BaseX database. To disable Java edit <GCAM Workspace>/cvs/objects/util/base/include/definitions.h and set __HAVE_JAVA__ to 0:
//! A flag which turns on or off the compilation of the XML database code.
#ifndef __HAVE_JAVA__
#define __HAVE_JAVA__ 0
#endif
Note that even if you turn off Java support you can still have GCAM generate the XML document that would have been inserted into the database by editing <GCAM Workspace>/cvs/objects/reporting/source/xml_db_outputter.cpp and set DEBUG_XML_DB to 1:
// Whether to write a text file with the contents that are to be inserted
// into the XML database.
#define DEBUG_XML_DB 1
Which can subsequently be loaded into an XML database by using the Model Interface by opening a database, choosing File -> Manage DB, then Click Add, finally select the debug_db.xml document to add to the database. Note a new database can be created by simply selecting an empty folder to open as a database (you will see a warning message about potentially deleting files and you should pay attention to it).
2.3.2 Java On Windows
On Windows users can get by with just installing the Standard Runtime Environment (JRE) for running GCAM however when building the Java Development Kit (JDK) is recommended. GCAM will expect the following header and lib files within <GCAM Workspace>/libs:
libs/java/include/jni.h
libs/java/include/jni_md.h
libs/java/lib/jvm.lib
Which can be placed there by copying or symlinking:
C:\Program Files\Java\jdk1.8.0_102\include
C:\Program Files\Java\jdk1.8.0_102\lib
In addtion the PATH variable may need to be updated so that GCAM can find the jvm.dll. Note that this is the purpose of the <GCAM Workspace>/exe/run-gcam.bat wrapper. Users can take a look at this file to understand how GCAM detects the JAVA_HOME and updates the PATH accordingly.
2.3.3 Java on Mac
Java on the Mac is complicated by Apple’s custom Java installation and subsequent removal of said Java since OSX 10.10+. The Apple version is only up to the now ancient Java version 1.6. It can still be installed on newer version of OS X with an explicit download. All versions of OS X can still use a more recent version of Java from Oracle/openJDK instead (note users must install the JDK, not the JRE). Even if users on OS X 10.10+ install the Oracle/openJDK version of Java they may still be prompted to install the old Apple JDK when running GCAM or the Model Interface. Note the purpose of the <GCAM Workspace>/exe/run-gcam.command wrapper is partially to detect and work around some of these issues. For users that are being asked to install the old Apple JDK even if the newer version is installed they can try the following edit to the Java JDK Info.plist file in Terminal to resolve the issue:
JAVA_HOME=$(/usr/libexec/java_home)
open $JAVA_HOME/../Info.plist
And add the following JVMCapabilities:
<dict>
    <key>JVMCapabilities</key>
    <array>
        <string>CommandLine</string>
        <string>JNI</string>
        <string>BundledApp</string>
    </array>
Users who want to use the Xcode build environment will need to set up in the <GCAM Workspace>/libs the include and lib directories. For users using the old Apple JDK the run-gcam.command will copy into place a stub library to appropriately call the Apple JavaVM.framework (TODO: where to find the include). For users using the Oracle/openJDK Java they will need to create the following symlinks:
cd <GCAM Workspace>/libs/java
JAVA_HOME=$(/usr/libexec/java_home)
ln -s ${JAVA_HOME}/include include
ln -s ${JAVA_HOME}/jre/lib/server lib
2.3.4 Java On POSIX
Please use the appropriate methods on your platform for installing Java. Please see the Compiling with Makefile for how to set environment variables so that your Java installation is found by GCAM.
3 Compiling Hector
Hector is the simple climate developed at JGCRI. It is available from the hector project’s Github repository.
The GCAM Make / project files are expecting the hector source to be in <GCAM Workspace>/cvs/objects/climate/source/hector. If you cloned the GCAM Git repository onto your local system, you can place hector into the appropriate location within the GCAM workspace by initializing it’s submodule:
cd <GCAM Workspace>
git submodule init cvs/objects/climate/source/hector
git submodule update cvs/objects/climate/source/hector
We have also added a Make target to do that for you:
cd <GCAM Workspace>
make install_hector
If you have simply downloaded the standalone GCAM release Source code then you will have to go to Hector page on Git hub and download the branch gcam-integration. You can then unpack and move into place hector:
cd <GCAM Workspace>/cvs/objects/climate/source
unzip gcam-integration.zip
mv hector-gcam-integration hector
4 Compiling GCAM Source Code
Once users have gotten the additional third party libraries and hector installed they can proceed to compile the GCAM source code. GCAM strives to use standard C++ capabilities where possible and use Boost to work around deficiencies otherwise. GCAM has been successfully compiled with GCC, Visual Studio, Clang, Intel, and Portland. That being said we only actively test GCC, Visual Studio, and Clang. In addition we provide a Unix Makefile, Xcode project file, and a Visual Studo project file for compiling.
4.1 Building with Makefile
Users on POSIX systems can use the generic Makefiles to build GCAM on their system. In addition Mac users who do not wish to install/use Xcode can also use these (they will still have to install the Apple Command line tools at a minimum). Windows users have also had success using the Makefiles under cygwin however some modification was necessary and is beyond the scope of this document.
The core of the Makefile configuration is located under <GCAM Workspace>/cvs/objects/build/linux/configure.gcam however typically users simply set the following environment variables (with values set appropriately for their system):
export CXX=g++
export BOOST_INCLUDE=${HOME}/libs/boost-lib
export BOOST_LIB=${HOME}/libs/boost-lib/stage/lib
export XERCES_INCLUDE=${HOME}/libs/xercesc/include
export XERCES_LIB=${HOME}/libs/xercesc/lib
export JARS_LIB=${HOME}/libs/jars/*
export JAVA_INCLUDE=${JAVA_HOME}/include
export JAVA_LIB=${JAVA_HOME}/jre/lib/server
With these environment variables set a user can simple run:
cd <GCAM Workspace>/cvs/objects/build/linux
make gcam -j 8
Note the -j 8 is simply to compile multiple sources files at a time (set as appropriate for your system configuration) and is only necessary to speed up the processes. Once complete an executable will be copied to <GCAM Workspace>/exe and can be run from that directory with gcam.exe -Ccofig_file.xml.
4.2 Building with Xcode
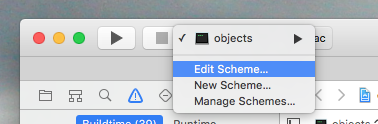
Mac users who would like to use the Xcode integrated development environment must have it installed (available from the Apple App Store), any version 3.2+ will work. Users can find the project file under <GCAM Workspace>/cvs/objects/build/xcode3/objects.xcodeproj. Once open you should change the Scheme to build the Release target. You can find the scheme settings here:
Then under the Info tab change the build configuration to Release:
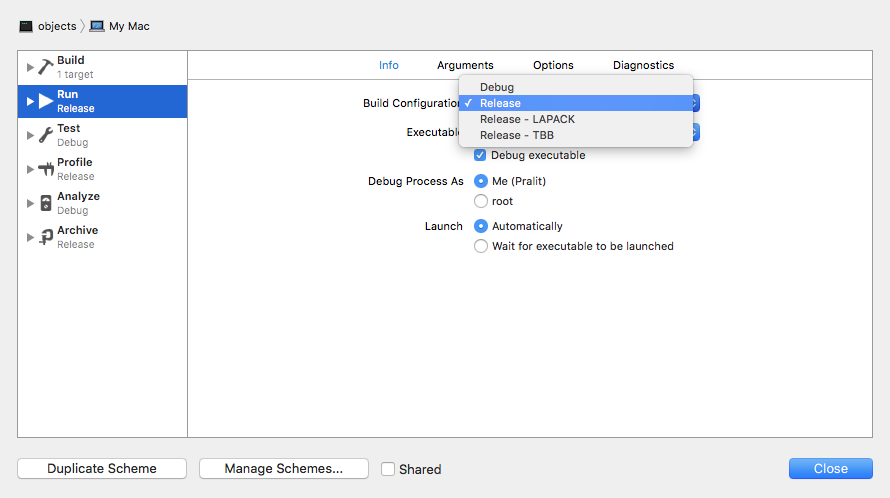
Finally select menu option Product -> Build to build GCAM. Once complete an executable will be copied to <GCAM Workspace>/exe and you can still use run-gcam.command to run it. Note that to run GCAM from within Xcode, you must set the working directory to the exe directory within your workspace. This is done within the Options section of the current scheme.
4.3 Building with Visual Studio
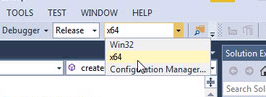
Users will need to have Microsoft Visual Studio C++ compiler installed (usually called for Windows Desktop). Any version 2010+ will work as the 64-bit C++ compiler is required. Note Microsoft does provide a free option called “Express”. Users can find the project file under <GCAM Workspace>/cvs/objects/build/vc10/objects.vcxproj. Once open you should change the Solution Configurations and Solution Platform to Release and x64:
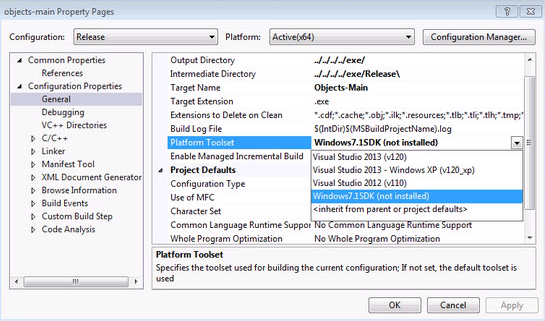
Also you will likely have to change the Platform Toolset under menu Project -> objects-main Properties.. to the latest toolset installed with your Visual Studio. Note that to run GCAM from within Visual Studio, you must also set the working directory to the exe directory within your workspace and update the PATH environment variable to find jvm.dll. This is done within the same project properties dialog under the Debugging section and properties Working Directory and Environment.
Finally select menu option Build -> Build Solution to build GCAM. Once complete an executable will be copied to <GCAM Workspace>/exe and you can still use run-gcam.bat to run it.
5 Recompiling Java Components
The Java components of GCAM XMLDBDriver.jar and ModelInterface.jar are included with the GCAM source code (in the Git repository or release package) and are inherently cross platform. Users will not typically need to recompile these unless they need to apply bug fixes or feature updates. In such a case simple Makefiles have been provided. Note the Java compiler is required. In both cases users will need the <GCAM Workspace>/libs/jars which are included in both the Mac and Windows binary release add-ons.
5.1 Recompiling ModelInterface.jar
Users will need to set up the classpath and run the following.
export CLASSPATH=<GCAM Workspace>/libs/jars/\*
cd <GCAM Workspace>/input/gcam-data-system/_common/ModelInterface/src
make ModelInterface.jar
5.2 Recompiling XMLDBDriver.jar
Users will need to set up the classpath and run the following which will also copy it into the exe directory where GCAM will be expecting it.
export CLASSPATH=<GCAM Workspace>/libs/jars/*:<GCAM Workspace>/input/gcam-data-system/_common/ModelInterface/src/ModelInterface.jar
cd <GCAM Workspace>/cvs/objects/java/source
make clean
make install
6 Troubleshooting
Below we list some issues that you may encounter along with potential solutions.
-
Build fails on a unix/MacOS system with an error:
ld: library not found for -lboost_systemYou may have not complied the necessary boost libraries. See section above on compiling boost.